Are you looking to buy a new pair of binoculars? I’ll walk you through why I bought these and what you may want to consider when making your own purchase!
Recommended Binoculars for You: Please consider buying through these links to support this channel. If you do, I may earn a small commission.
Are you looking to buy a new telescope to view the Moon, planets, nebulas and galaxies? I’ll walk you through everything you need to know when looking to make your next big purchase in amateur astronomy.
Recommended Telescopes for You: Please consider buying through these links to support this channel. If you do, I may earn a small commission.
From China to Virginia
After a worldwide journey from the mass production factories of China, to Orion’s Headquarters in California, the Orion XT8i ended its journey at my house. Shipped in two packages, one containing the base with the other containing the optical tube, finder scope, two eye pieces and Computerized Object Locator, this new telescope arrived in pristine condition with no dings in the optical tube or base and a beautifully clean primary mirror. Pictures on the internet of this telescope do not do it justice. Even when reading other reviews and viewing pictures posted by those who owned it, I thought to myself “well that must just be a very short man standing next to the telescope.” Taking out the well packaged optical tube for the first time proved my “short man theory” to be incorrect. Do not be intimidated by its size, but do be aware of it. While the telescope tube is bulky in its shape, it weighs only 20 lbs and is easy to carry. The base, with its weight of 21 lbs was packed with the same degree of care as the optical tube and is equally easy to lift once assembled.
Some Assembly Required
Rarely have I ever read directions. This is not a problem when building 10 dollars models, but when putting together a dobsonian telescope, it is probably a good idea. Thankfully, Orion provided a clear and concise manual with step by step instructions alongside pictures and graphics ensuring that astronomers of various levels of experience will have no trouble figuring out what goes where. With virtually all of the assembly involving the base, it was no surprise that this was the most difficult part of the process. Figuring out the correct order of the washers and how tight the two base plates needed to be proved to be a headache but overall assembly went smoothly, with it taking a couple hours for my brother Alston (the real brains behind the operation) and I to complete.
Our First Night Together As many telescope owners will tell you, with a new scope comes the curse of cloudy skies, my experience was no exception. About a week after receiving the scope, the skies opened up and I decided to take it out, even though there was still two week old snow on the ground that over time had turned into a solid sheet of ice. With setup complete it was time to uncover the 8 in mirror and test her out. My first target was Saturn. After taking some time figuring out how to use the right angle finder scope, I placed in the provided 25mm eyepiece found Saturn and was blown away by its brightness. With several of its moons visible the brightness and sharpness exceeded my expectations. Up next was the Orion nebula which showed off hues of green and blue that I had never seen before and Andromeda which was a slight disappointment because of my unrealistic expectations of being able to view the spiral arms in great detail. Overall a tremendous introduction to my new telescope, but as this blog has shown, this first night was just the tip of the ice berg in terms of its power and optical quality.
Intelliscope Computer Object Locator One of the main reasons for buying the XT8i and not the Zhumell Z8 or other less expensive 8 in dobsonian telescopes came from its inclusion of the Computer Object Locator. The marketing claimed that with the easy alignment of two bright stars the intelliscope would display through a numbering system how far right/left and up/down to move the scope. When all numbers reached 0, the telescope would reveal the object in the field of view of a low powered eye piece. Even though this was a main feature that led me to this scope, I definitely had my doubts. As a teenager, going out many times with the Meade DS114, I was never once able to figure out how to use the Object Locator and tracker. Now this could partially have been because of my age and not fully understanding the directions, but I believe it was also from the product not working well. Because of this, testing the object locator on the XT8i for the first time was a bit nerve racking. Aligning the scope and typing in Saturn, the handheld device told me where to move the telescope. Once it was complete, I realized by looking up that it was in the right ball park and was amazed when I looked through the eye piece to see Saturn positioned to the farthest edge of the field of view. This has been my experience with the Object Locator ever since. While it is not always directly in the field of view through my 25mm eyepiece, it is always in the finder scope and can be easily found by searching the small area of the sky that it takes me to. Over the past year, this feature has helped me learn the sky to the point where I find myself needing it less the more I use it.
Optics and Performance While having a telescope that can help you locate objects is impressive, providing unforgettable views of those objects once discovered is the most important aspect regardless of any extra bells and whistles. While I am not an expert on the optical quality of telescopes and try not to get bogged down in debates over what wavelength a mirror is and the differences between mass produced mirrors from China compared to Taiwan, I can say this. The high magnification views of planets and the lunar surface at magnifications up to 240X have been incredible in this telescope. As has been noted several times in articles throughout this blog, detailed views of the Martian surface, cloud formations on Jupiter and the majestic rings of Saturn have all been viewed with sharp detail at magnifications of 120X and 240X. The 8 inch dobsonian telescope has been described as the best entry level scope for starting to observing deep sky objects. My experience with the XT8i has proven this to be the case. With limited light pollution from my observing sight I have been able to view the brightness of the Orion Nebula and the dim yet exemplary Veil Nebula. The 5.9 focal ratio of this scope has provided me with the high magnification needed to observe crisp views of the planets and low magnification needed to enjoy nebula, galaxies and star clusters.
Overall Summary
Posted on telescope.com: 1/22/10 This telescope balances the three needs of any amateur astronomer: aperture, portability and affordability. I have seen everything from low power viewings of Orion’s Nebula and Andromeda to sharp high power observations of Mars, Saturn and Jupiter that revealed detailed land features, rings and cloud belts. Clear directions walked me through every step of assembly with my only difficulty dealing with connecting the two base plates of the Dobsonian mount. The Computerized Object Locator (COL) included in this package is a deal that cannot be beat. Powering up the COL, I set the telescope to vertical, do a two star alignment and view more objects in an hour than I would have in most entire nights. On top of all of these features, the 25mm and 10mm eyepieces included provide a great starting point for viewing nebulae and galaxies as well as planets and lunar observations. While I am sure many people will be able to carry this scope out in one piece, I carry it in two, because of its weight and how long it is. After a year of use, I have barely scratched the surface of all the objects the XT8i can locate and observe. High quality optics, affordable aperture and the Computerized Object Locator make this the perfect telescope for beginners and experienced astronomers alike. I know it will provide a lifetime of use and enjoyment.
Surprisingly, I was never into LEGO growing up. My interest peaked however, when I came across an article describing a fan designed Apollo Saturn V Rocket. The website LEGO Ideas allows fans to design and submit their own builds. Valérie Roche and Felix Stiessen submitted a proposal for the Saturn V Rocket back in August of 2014. After nearly three years and a process which included 10,000 people voting for the project and LEGO officially reviewing it, their work is now an official LEGO product.
Upon its release on June 1st, the Saturn V instantly sold out. I gave little hope of getting one this summer until I randomly went to amazon.com one evening and they happened to have restocked a few. After quickly putting in my order the status returned to sold out and has remained that way at all major retail stores as of mid July.
Having completed the build, while watching the documentary “When We Left The Earth”, I came away incredibly impressed with the care and accuracy put into this set. The details are precise, the colors are accurate and the three main stages are all represented along with the service, lunar and command modules. It even includes three perfectly scaled astronaut figures. At 1,969 pieces (see what they did there) and 1:110 scale (1 meter tall) the finished result is an impressive sight that can be displayed either vertically or horizontally on the provided stands. Regardless of your interest in LEGO, this is a wonderful collectors item for those interested in the Apollo Era.
If you are looking for a basic starting point in astrophotography, a smartphone eyepiece adapter may be a good option. These adapters along with a dobsonian or other non-tracking telescope can provide nice video and images of the Moon and Planets.
I’ve found that it is best to connect the adapter to the eyepiece near a light source before putting the eyepiece into the telescope. This allowed me to adjust the iPhone directly over the eyepiece at the right distance and angle to capture the light.
Most of these adapters can be found on Amazon for around 20 dollars. If you are interested in making some early steps into astrophotography, I would encourage you to check out this line of products.
This past summer, while reading Ron Chernow’s “Washington: A Life” a sudden thought came to me:
“I’d really like to read a book on the Apollo program.”
Maybe it was the patriotism, heroism and difficulty Washington experienced throughout his life that spurred these thoughts towards Apollo. Or, maybe I just think a lot about space. Either way, I was sure that when I finished the Washington biography, it would be on to the moon for my next read. A quick search of amazon.com revealed that there is no shortage of biographies and autobiographies detailing specific missions from the Apollo Era. Having read Jim Lovell and Jeffrey Kruger’s “Lost Moon,” I was more interested in a single volume telling of the lunar landing saga from the tragedy of Apollo 1 to the triumphant conclusion of Apollo 17. It soon became clear that to satisfy this goal, Andrew Chaikin’s “A Man on the Moon: The Voyages of the Apollo Astronauts” was going to be my best bet.
“Earth Rise”, Apollo 8
Chaikin begins with the launchpad fire of Apollo 1, giving detailed and graphic descriptions of this horrific accident that took the lives of three astronauts and nearly ended the Apollo program. The inner workings of NASA quickly become apparent early on in the book, from the selection process for the Astronauts to how Deke Slayton chose who would fly each mission. As Apollo 7, 8, 9 and 10 took significant steps towards the first moon landing, Chaikin displays the emotional impact that these missions and others took on the families of the astronauts. With, Apollo 11, 12, 13 and 14 the challenge from John F. Kennedy was met, exploration began to expand, NASA showed its true excellence through a “successful failure,” and the first American in space returned to flight. The most knowledge I gained came from the descriptions of the geologic training and exploration that occurred during the missions of Apollo 15, 16 and 17. The astronauts of these missions, became lunar geologist almost as much as they were pilots. While the scientific terms were sometimes beyond my understanding, the detail that Chaikin provides in this section shows the immense scientific discovery that occurred on the moon.
Buzz Aldrin, Apollo 11
Alan Shepard, after being grounded for so many years due to an ear disorder, finally made it to the moon, looked up at the Earth and began to cry. Edgar Mitchell secretly attempted an ESP experiment with psychics on Earth as he headed towards the moon at over 25,000 mph. Buzz Aldrin, took communion on the moon after he and Neil Armstrong landed the Eagle at The Sea of Tranquility. These stories are the greatest strengths of the book and often come from the access Chaikin was granted for interviews with 23 of the 24 astronauts who traveled to the moon. Their insightful recollections and sometimes emotional reveals provide the heart to what could otherwise be a rote retelling of process and checklists akin to an Apollo flight plan.
The book ends with a look at the various impact this journey had on the astronauts who undertook it. Neil Armstrong largely receded from public life following his “small steps,” becoming a college professor. Buzz Aldrin, under the pressure and stress of the public eye, fell into manic depression and suffered from alcoholism. Gene Cernan, through his exuberant personality, did public speaking tours around the world telling of his experiences on the lunar surface. The impact of the Apollo program on these men is best displayed by an insightful quote from Al Bean. Bean, who became an artist after leaving NASA, said “I think that everyone who went to the moon came back more like they already were.”
“I’ve been there. Chaikin took me back.”
Gene Cernan, the last man to walk on the moon, wrote these words in praise of Andrew Chaikin. While reading through the challenges and triumphs of Apollo, I felt like I was right there with him.
Oh, the eyepiece filter! So much, hope. So much, promise. So much, confusion.
When I was in high school, I bought my first set of filters. They were a planetary set and I hoped they would add much-needed color to my views of Saturn and Jupiter through the good ole Meade DS 114 Reflector. The filters arrived and to my dismay, they didn’t fit. Little did I know that my telescope used older 0.965 in. eyepieces while the planetary filters were for the now standard 1.25 in. eyepieces that come with virtually all telescopes today. What’s the point of this story, you may ask? Don’t just buy any filters! Be informed, understand their uses and above all…make sure they will fit!
What to Buy:
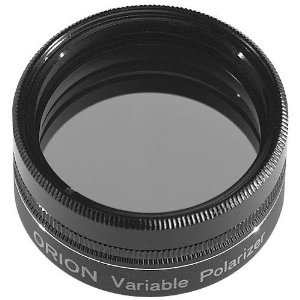
Lunar Filter While the Moon may be an unavoidable pain on some nights, it can also provide great views when it is observed at the right times and with the right equipment. One filter that I’ve gotten great use out of is the Variable Polarizing Filter. This filter allows you to adjust the amount of light that enters the eyepiece from 3% to 40% of normal brightness. While the best time to view the Moon is when it is less than half full, this will help to improve contrast and detail on nights when because of the glow of the moon you have little else to view!
Planetary Filters The main reason I had wanted those filters that didn’t fit was to give planets the color that I saw in many Hubble Space Telescope images. If this is your reasoning for buying filters, than you will be a bit disappointed. Planetary filters are not made to bring out the “natural” coloring of planets but are made to enhance various features that emit certain wave bands of light. They can also help to eliminate some of Earth’s atmospheric turbulence. Of the color filters I have the #21 orange has given me excellent views of Saturn and Mars. The Cassini Divide on Saturn looked razor-sharp and its cloud belt popped out more than usual while using this filter. On Mars, I was able to make out the polar ice cap and land features more distinctly as well.
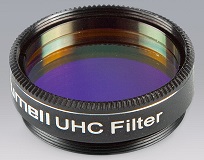
UHC Filter If viewing planetary nebula is a favorite pass time of yours, than the UHC filter is exactly what you have been looking for! This filter will block out certain light waves that cause light pollution, while allowing light from emission and planetary nebulae, leaving a darkened background sky and light from certain objects that you want to see. Without it, I could not see the Owl Nebula from my moderately light polluted location. With it, this planetary nebula popped into view right where it was supposed to be.
Buying Suggestions: I have continuously found Orion from Telescope.com and Zhumell and Meade from Telescopes.com to be trusted name brands with great quality and good pricing. For those looking to make the jump into filters, I would suggest these offers:
Astronomy does not have to be a hobby that breaks your wallet. As much as some may say, and as great as they may be, you do not have to buy eyepieces that are more expensive than your telescope to enjoy the beauty of the night sky. Reading Astronomy Forums, researching what to buy for my first 2 in eyepiece, I was given suggestions such as the Televue Nagler Eyepiece Series which receives rave reviews for its quality but also costs between 350 and 570 dollars. I began to worry that I would never be able to afford a nice high quality eyepiece and that I would notice the optical flaws mentioned so often in forums of cheaper designed eyepieces. Putting those fears aside, and after extensive internet searching and reviews read, I decided to buy the 2in. Orion 38mm Q70 Eyepiece. I considered this to be my first “premium/high dollar eyepiece” purchase. With Orion holding a post Christmas 10 percent off sale in January, 90 dollars got me this wide angle, low powered 2in. eyepiece.
Optical Quality
Peering through the large 2 in. eyepiece for the first time gave me the perception of looking out the window of a space ship. The field of view was tremendous, showing just over 2 degrees of space. One of the main reasons, I had wanted this eyepiece was to view large area objects such as the Pleiades Open Star Cluster. The seven stars of this cluster appeared beautifully, with ghostly hints of the Nebula of Taurus around several of them, as they only could in binoculars or an ultra wide eyepiece design. Not being a super high dollar eyepiece design, there is some astigmatism present (star stretching) near the extreme 5 to 10 percent of view, but it is something that would probably go unnoticed to most casual observers and is only noticeable to me when I think to look for it.
Use I find myself using this eyepiece most often when hunting for deep sky objects (Nebulae, Star Clusters and Galaxies). A few days ago, I used it nearly exclusively when hunting down some messier objects and doing detailed viewing of the Veil Nebula and Dumbbell Nebula. Most often though, I enjoy putting in this eyepiece and just slowly scanning parts of the Milky Way.
Build Quality The 5 element aluminum design weighs in at 1.3lb and feels as sturdy as it looks in promotional images. Blackened lens egdes and a fully multi-coated design means that you will recieve maximum light transparency with little to no glaring or ghosting of dim or bright objects. This is by far the biggest eyepiece in my collection, make sure your telescope and carrying case can accommodate a 2 in eyepiece before buying.
With the amount of money put into this new product, I was anxious that the higher quality I felt I had paid for might not be apparent. After nearly 6 months of use I can thankfully say that this, my first “premium/high dollar” eyepiece, has given me the quality that I hoped for and more importantly it has amazed me with its wide open views, as though I am looking through a portal, into the impressive sights of our universe.