It’s a busy December as we explore the incredible things in our night sky! Let’s look at the so called “Devil Comet”, the always impressive Geminids Meteor Shower and the beautiful Orion Nebula. Be sure to let us know what you’re excited to get out and see this month and clear skies!
Winter is my favorite time to observe and image the nighttime sky. Yes it’s bitterly cold for many of us, but the nights start early and last long throughout these months. Here is my list of the best Deep Sky Objects for you to hunt down and observe or image during this time of year. For more about what’s going on in the night sky please subscribe to my YouTube Channel where I cover major events in astronomy throughout the year in my monthly series “The Night Sky”.
While the best views of these objects beyond our Solar System will be with a telescope, most can also be spotted with a pair of binoculars and a few with even just the naked eye. Remember, darker skies, no Moonlight and larger telescopes will bring about better results for observing these distant objects. Begin the night by setting up your equipment right after sunset and give the sky a good hour to darken before you start your observing or imaging. This will allow your equipment to acclimate to the outdoor temperature while the sky gets nice and dark for your night out under the stars. The app I used to create these star charts is “SkySafari”. For more information on it, please visit skysafariastronomy.com
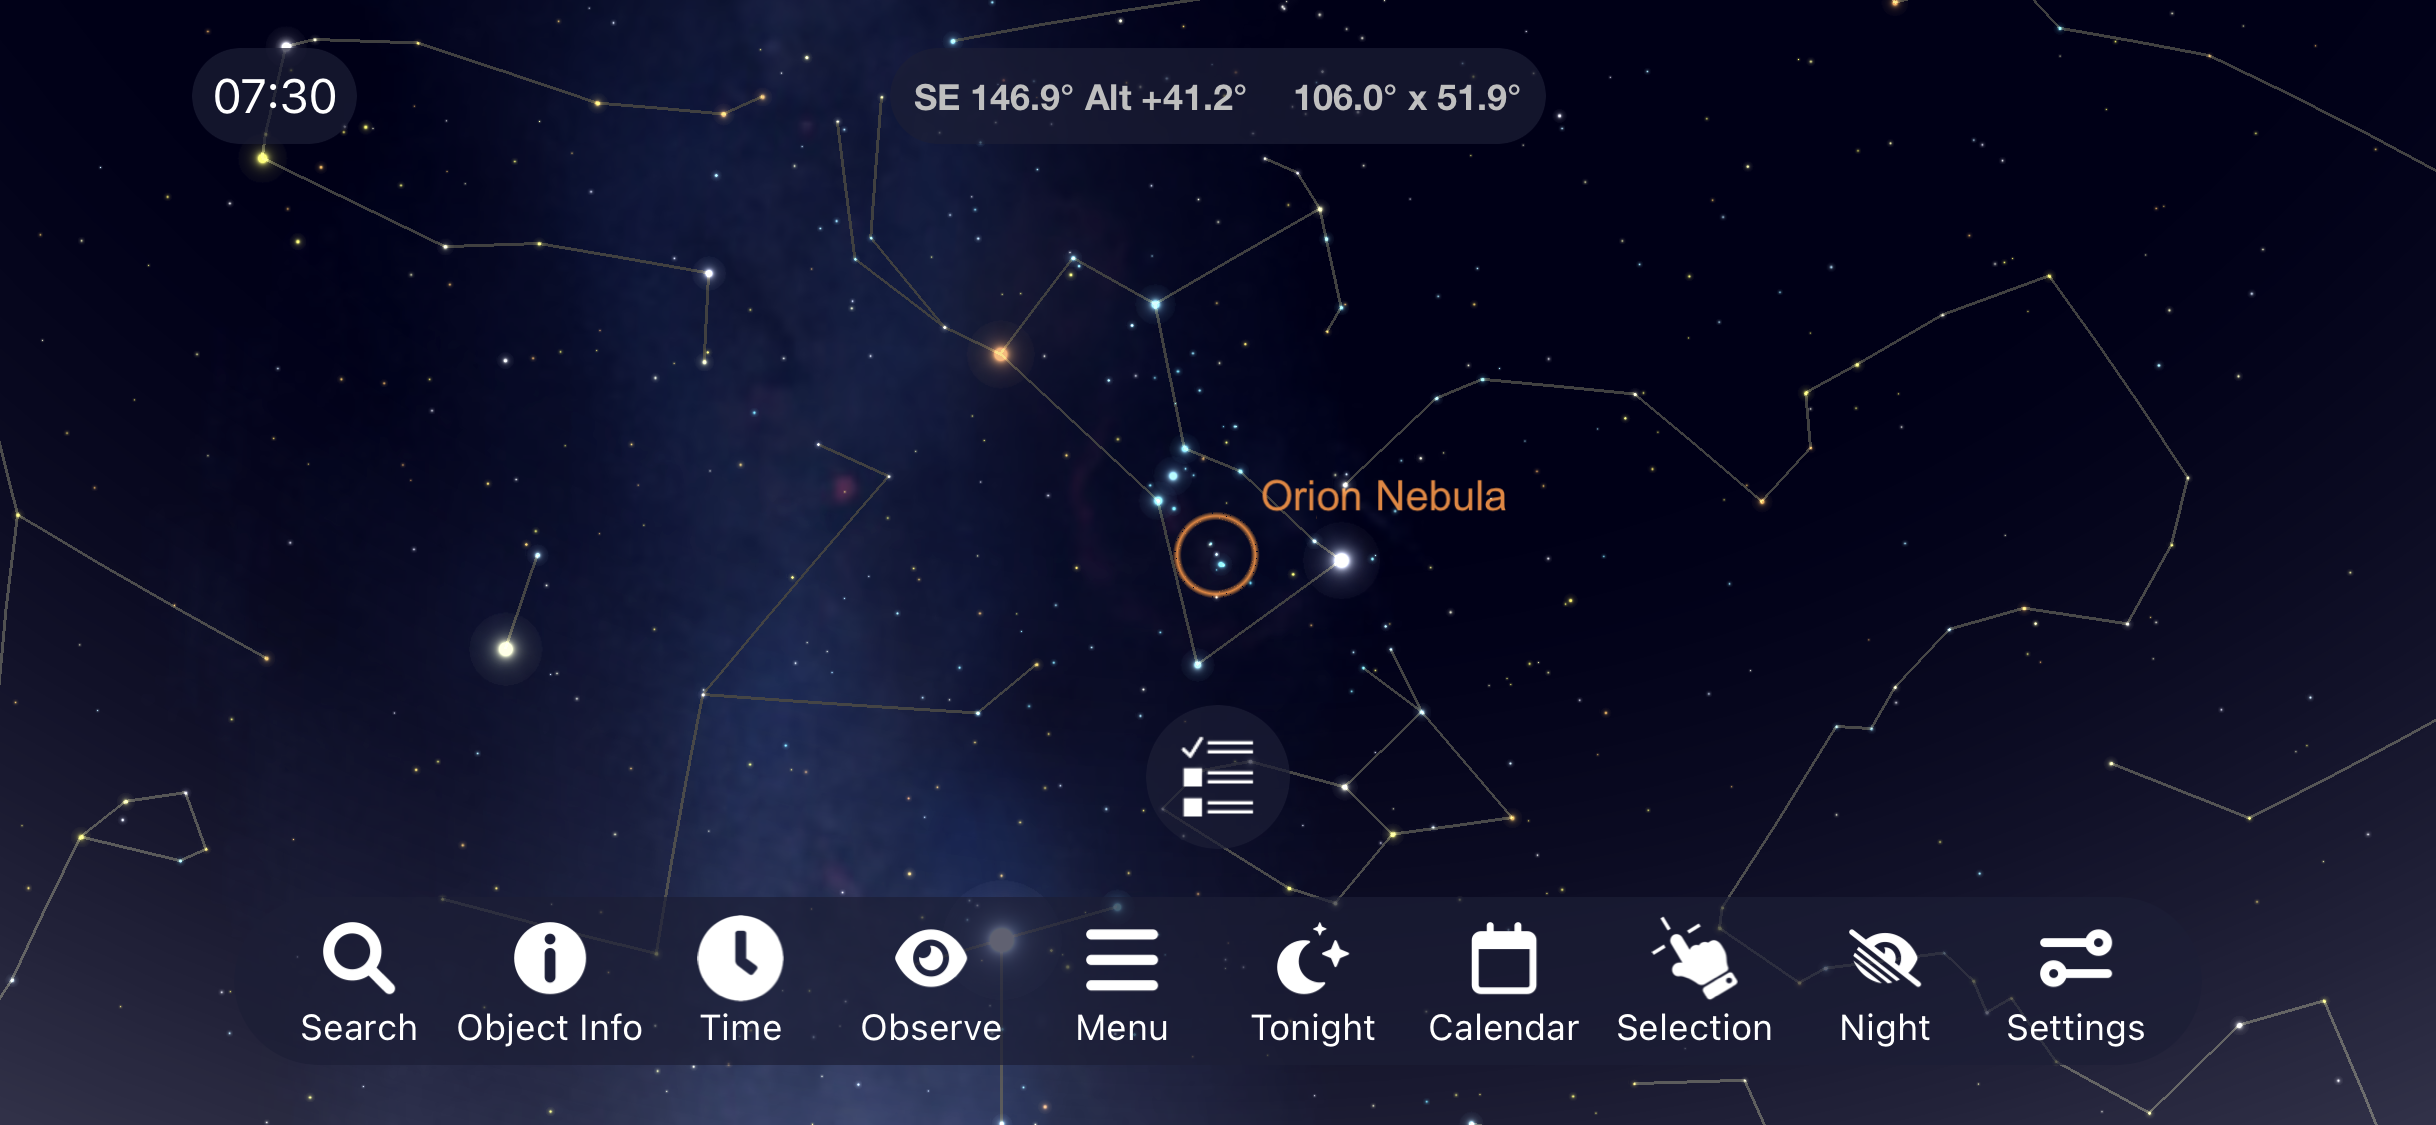
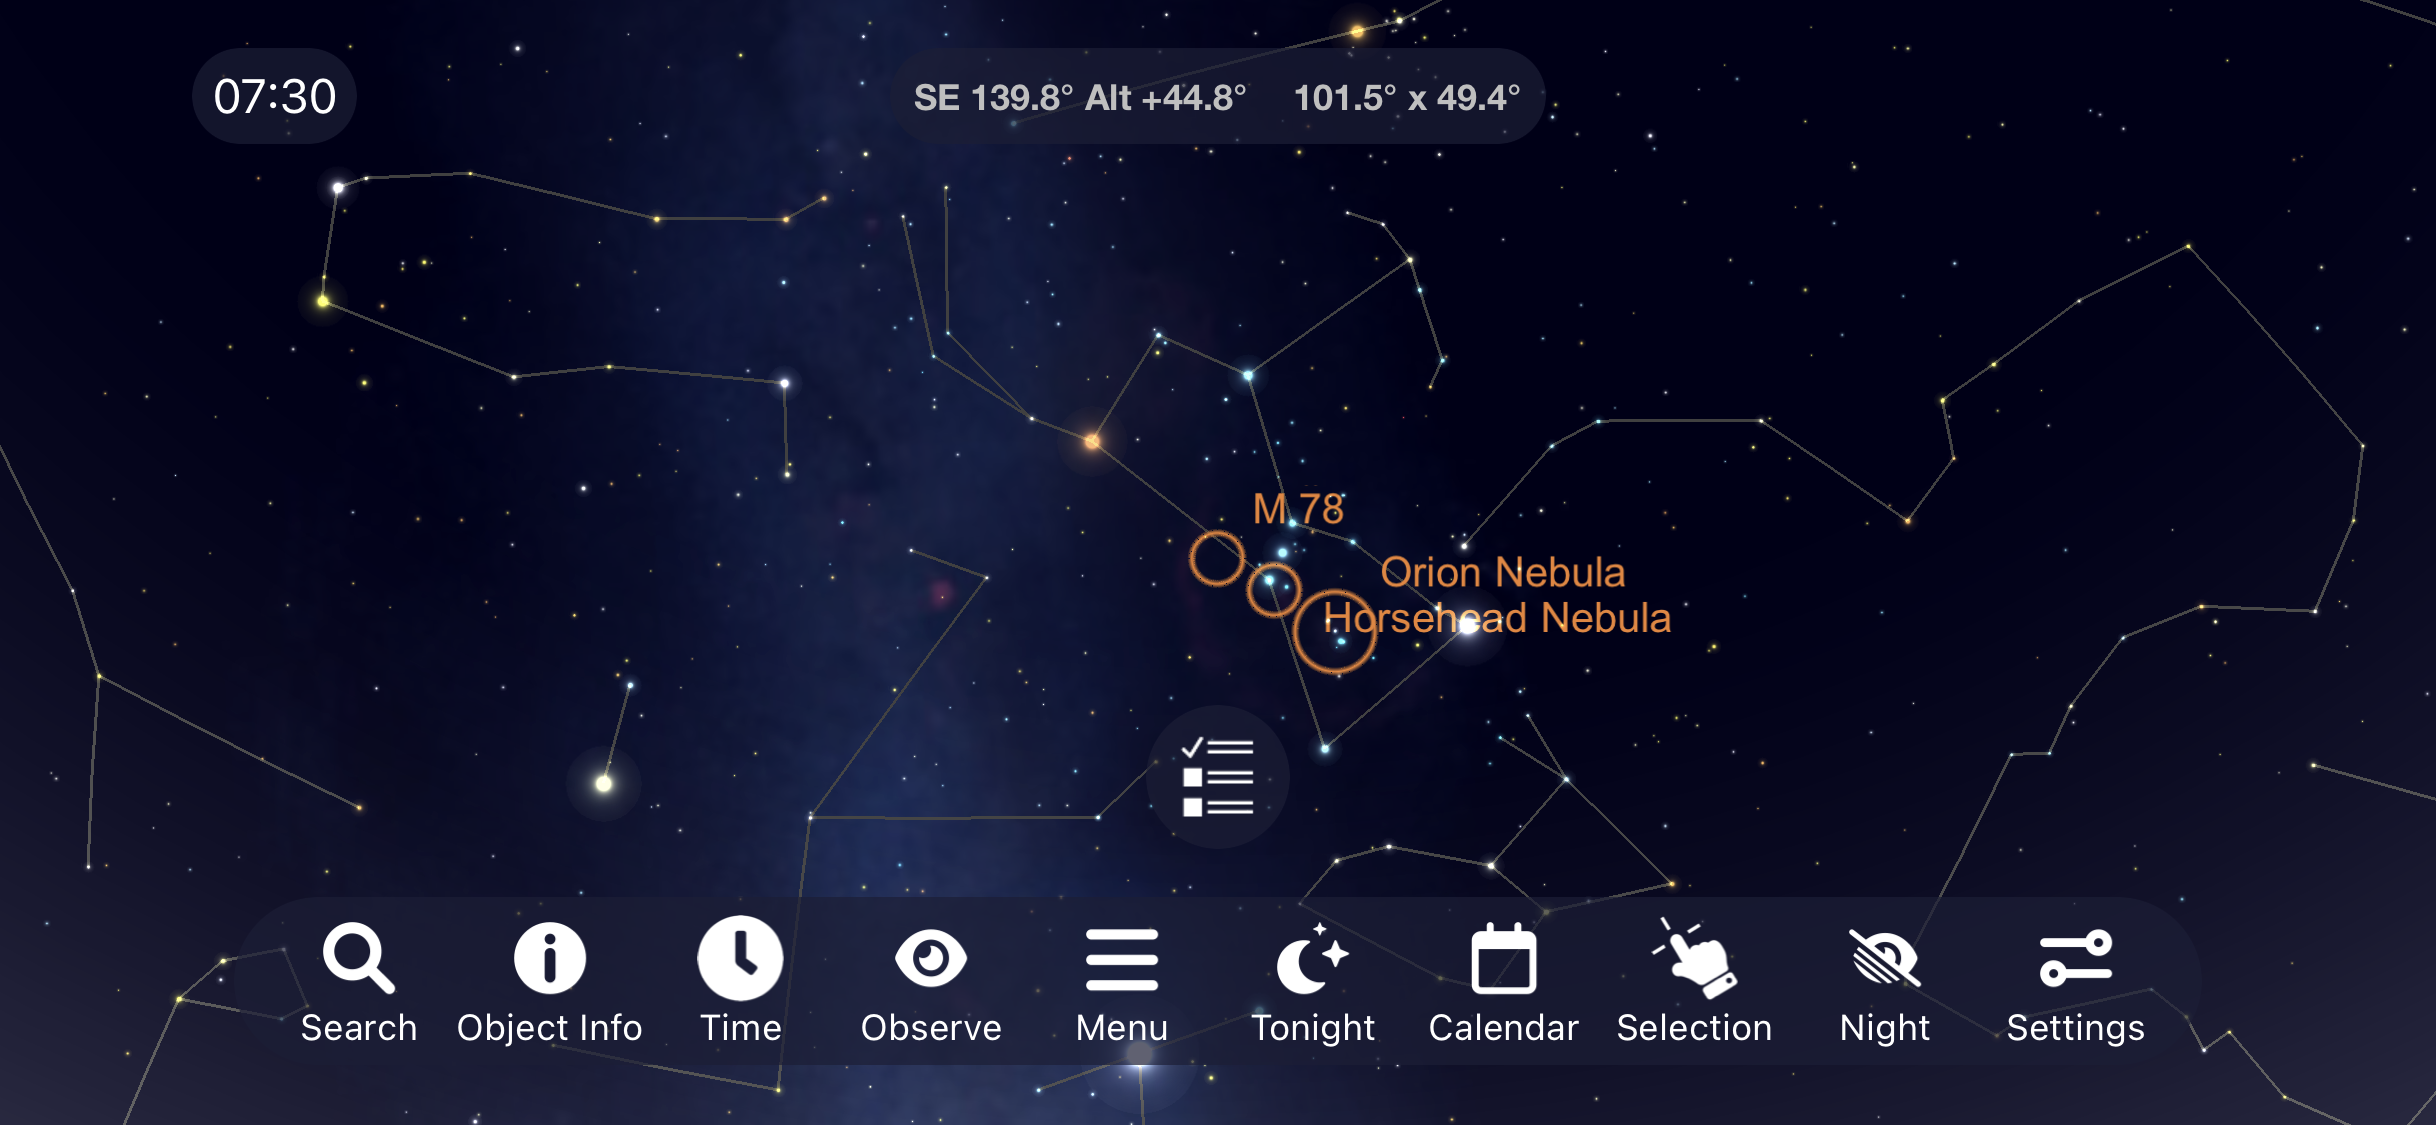
The Orion Nebula
Let’s begin our journey by facing towards the South East and looking up until you see the Constellation Orion. Start out with your finder scope and a low magnification eyepiece whenever you are looking for objects in the night sky. Star hop from bright star to bright star until you get to the Deep Sky Object you are looking for. Once you find it, then use a medium powered eyepiece to study the faint and fine details of the object. After finding the three stars that make up Orion’s belt, move down until you come across what looks like a patch of gray clouds floating in the sky. You have just found the gorgeous Orion Nebula and it’s stellar nursery of stars being born. Even with moderate light pollution, my 8 inch Dobsonian telescope can pick up a grayish teal color coming from this deep sky object.
Every year, I image the Orion Nebula in January or February. Here is one of my favorite shots taken with my Canon SL2, 135mm Samyang Lens and SkyGuider Pro Tracking Mount showing off arguably the best Deep Sky Object the night sky has to offer.
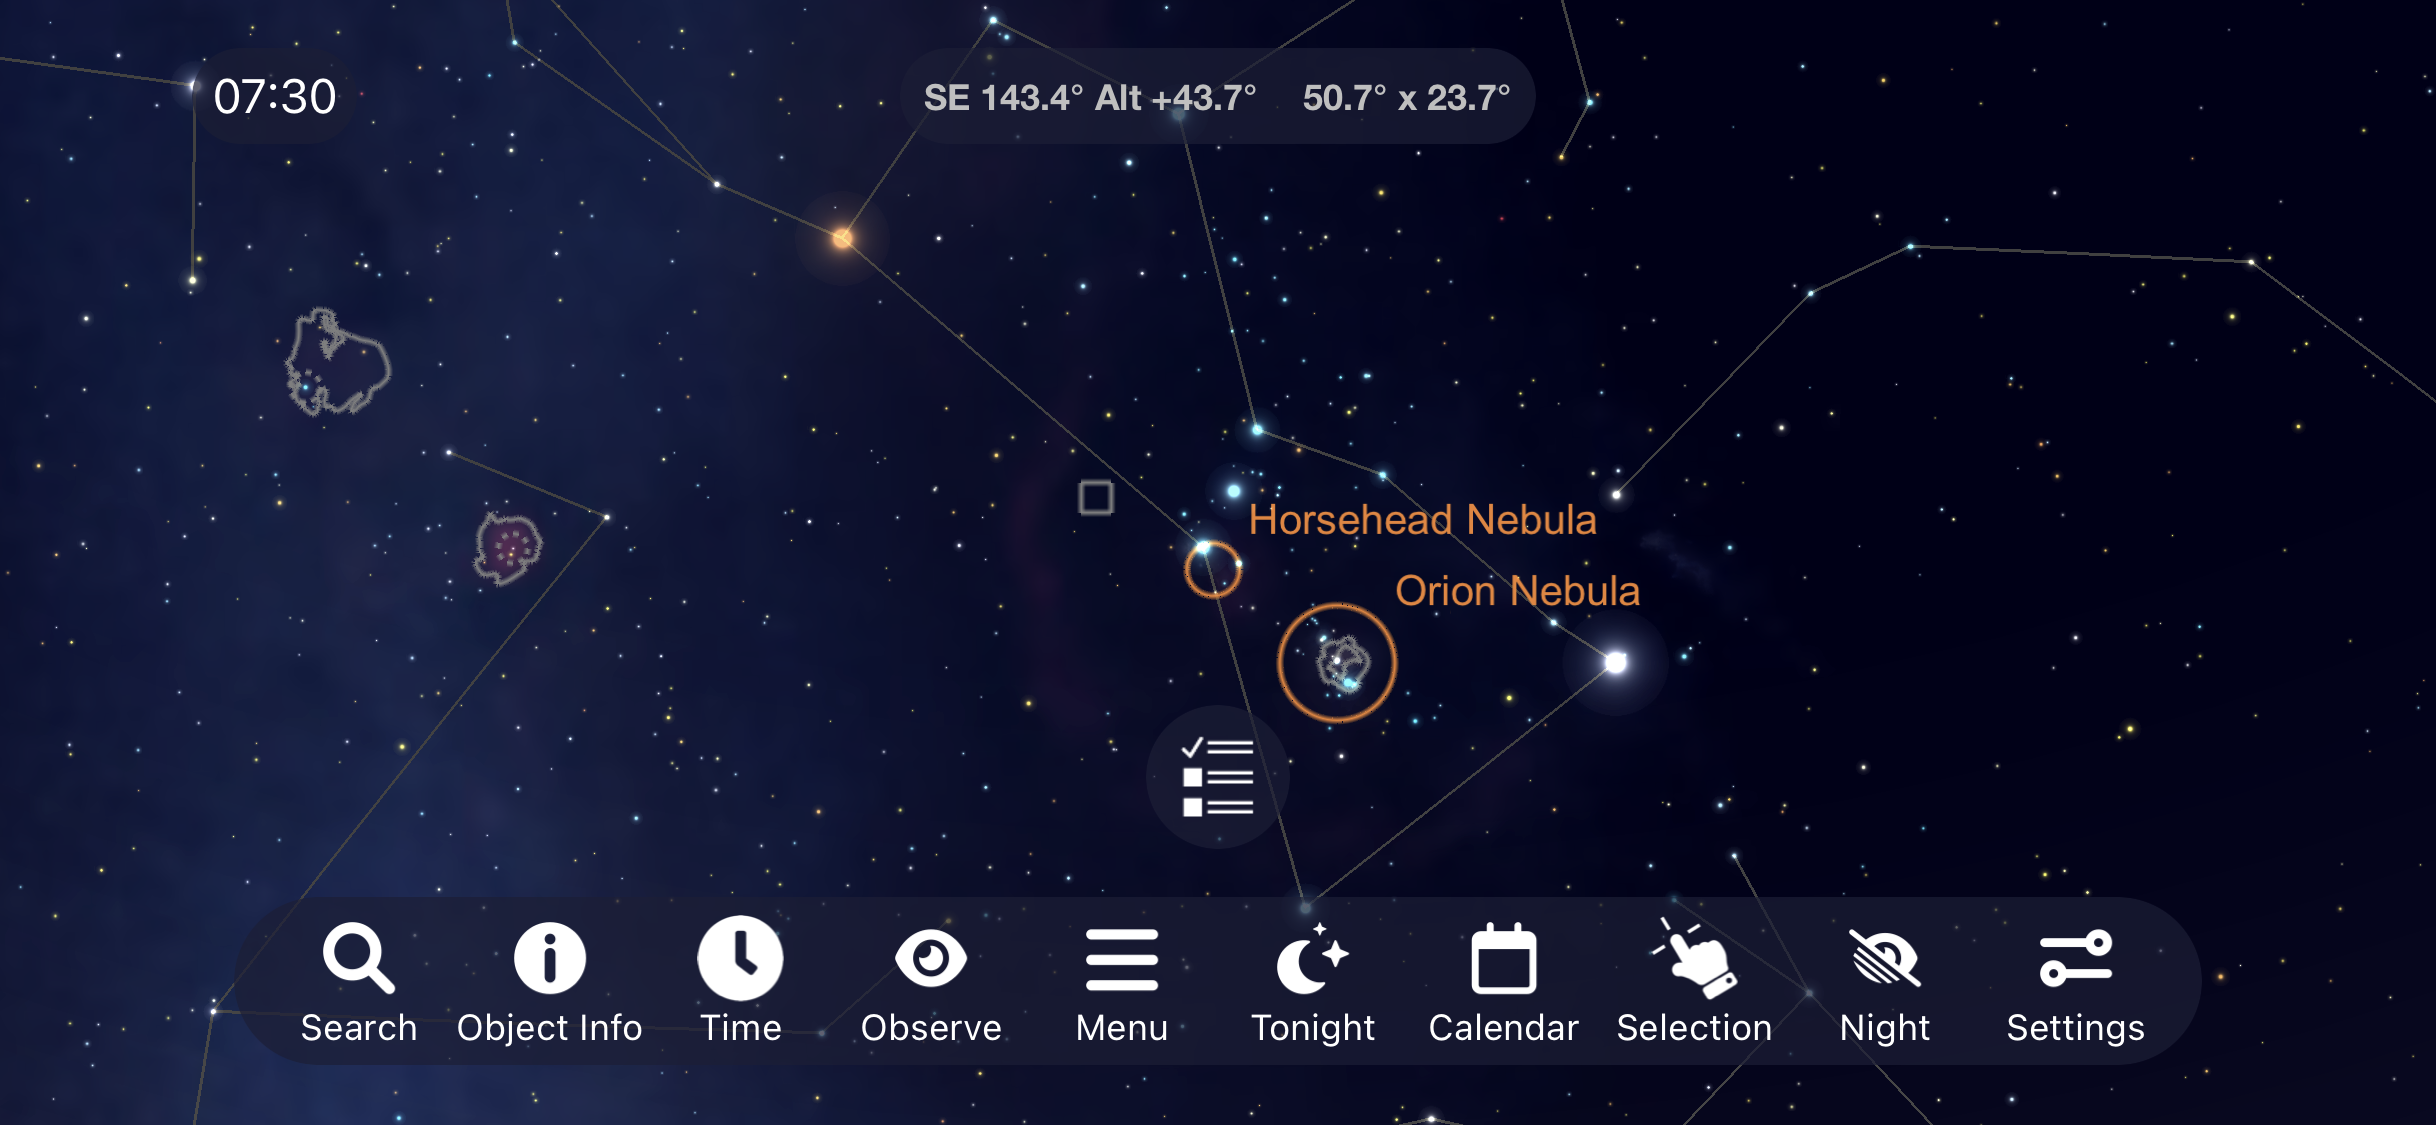
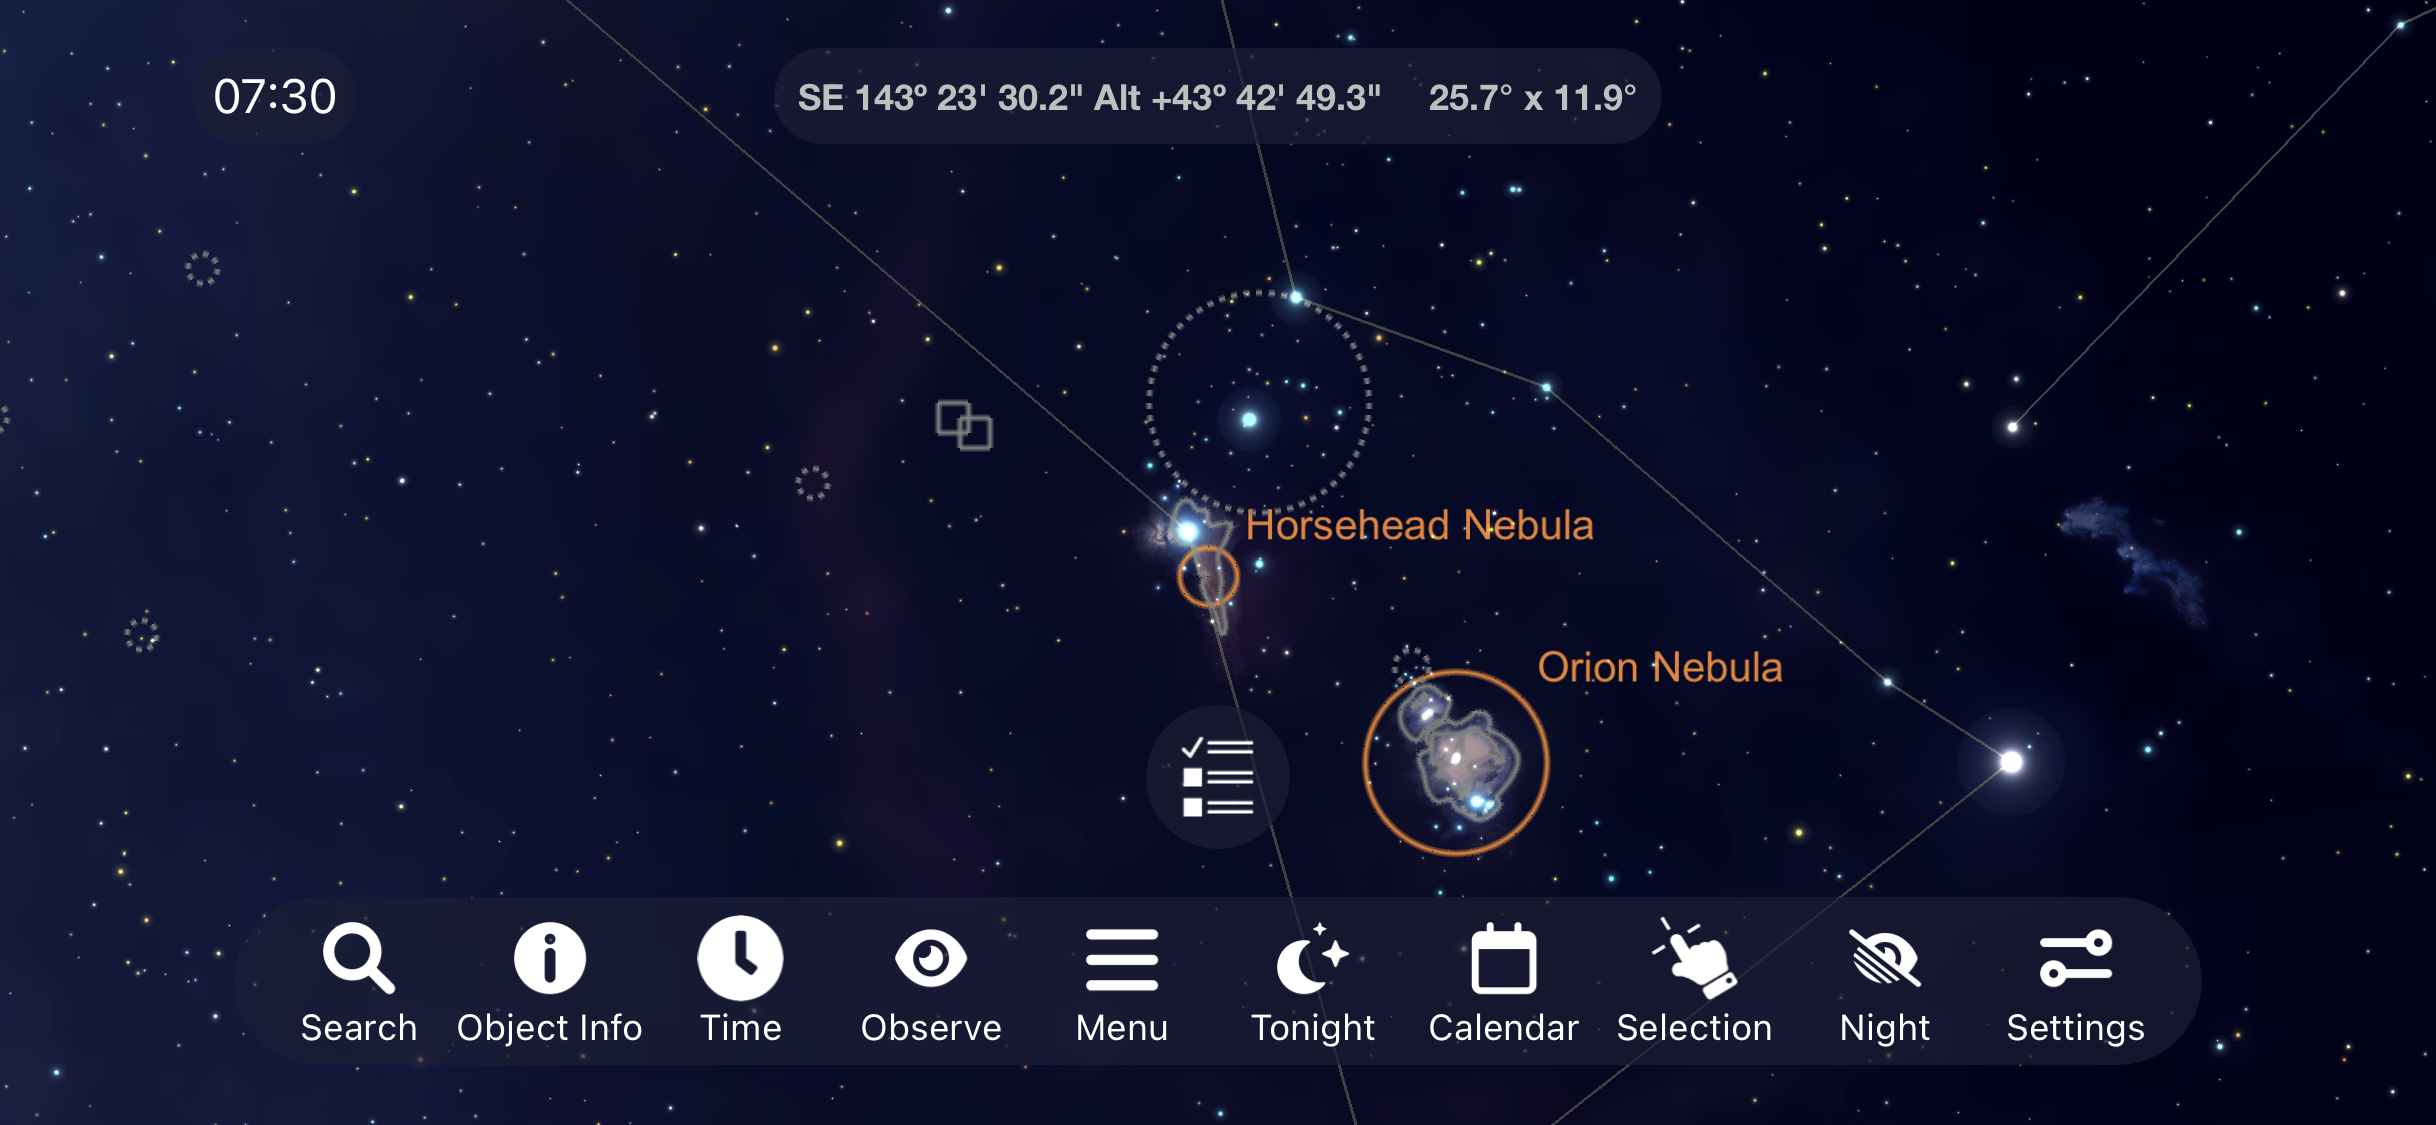
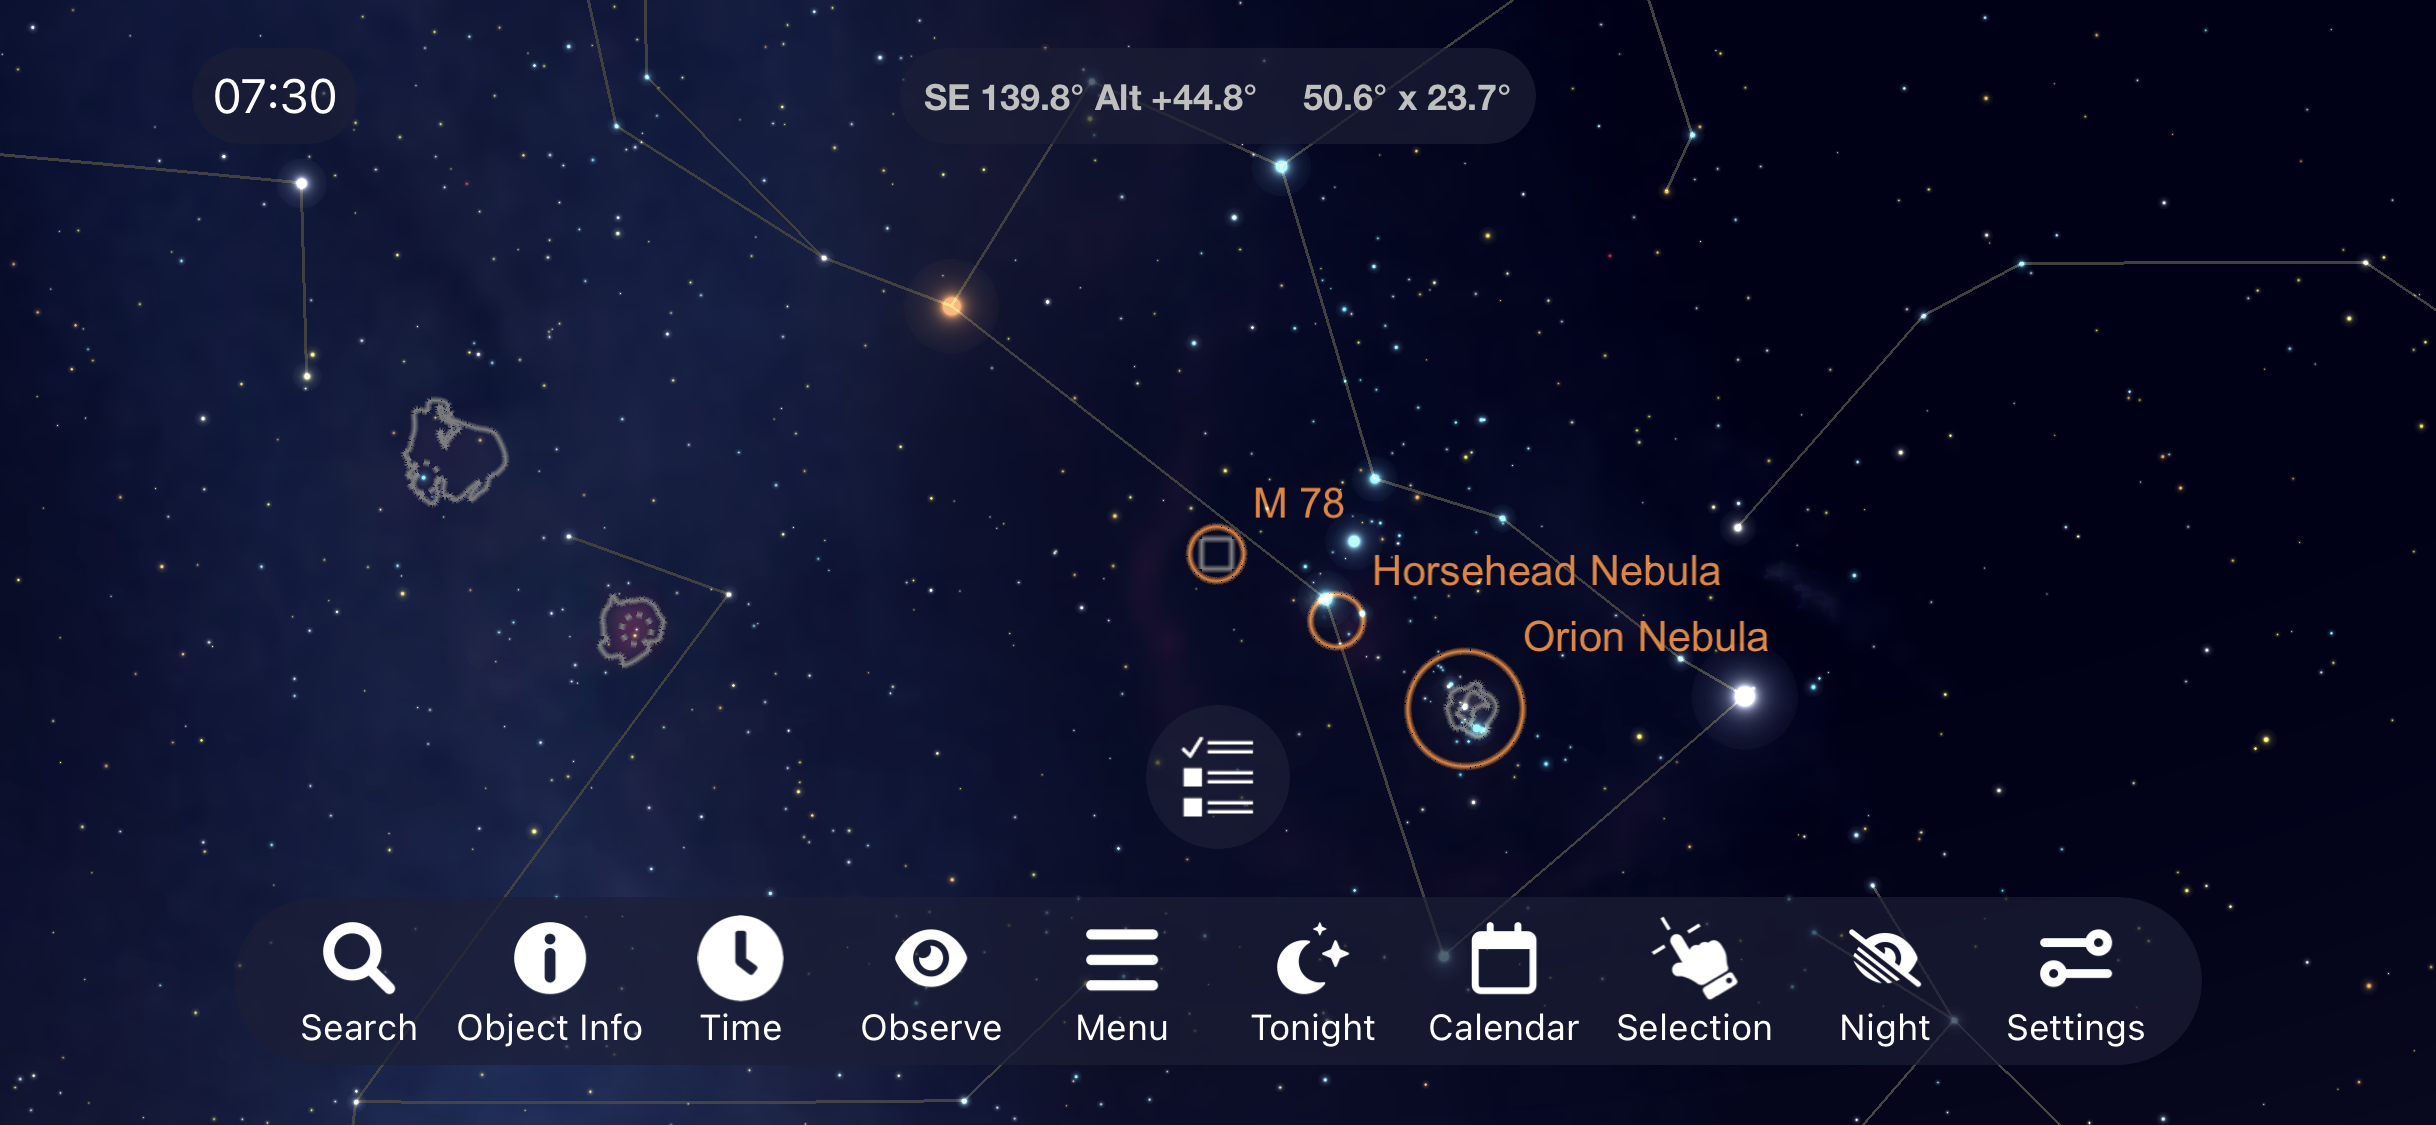
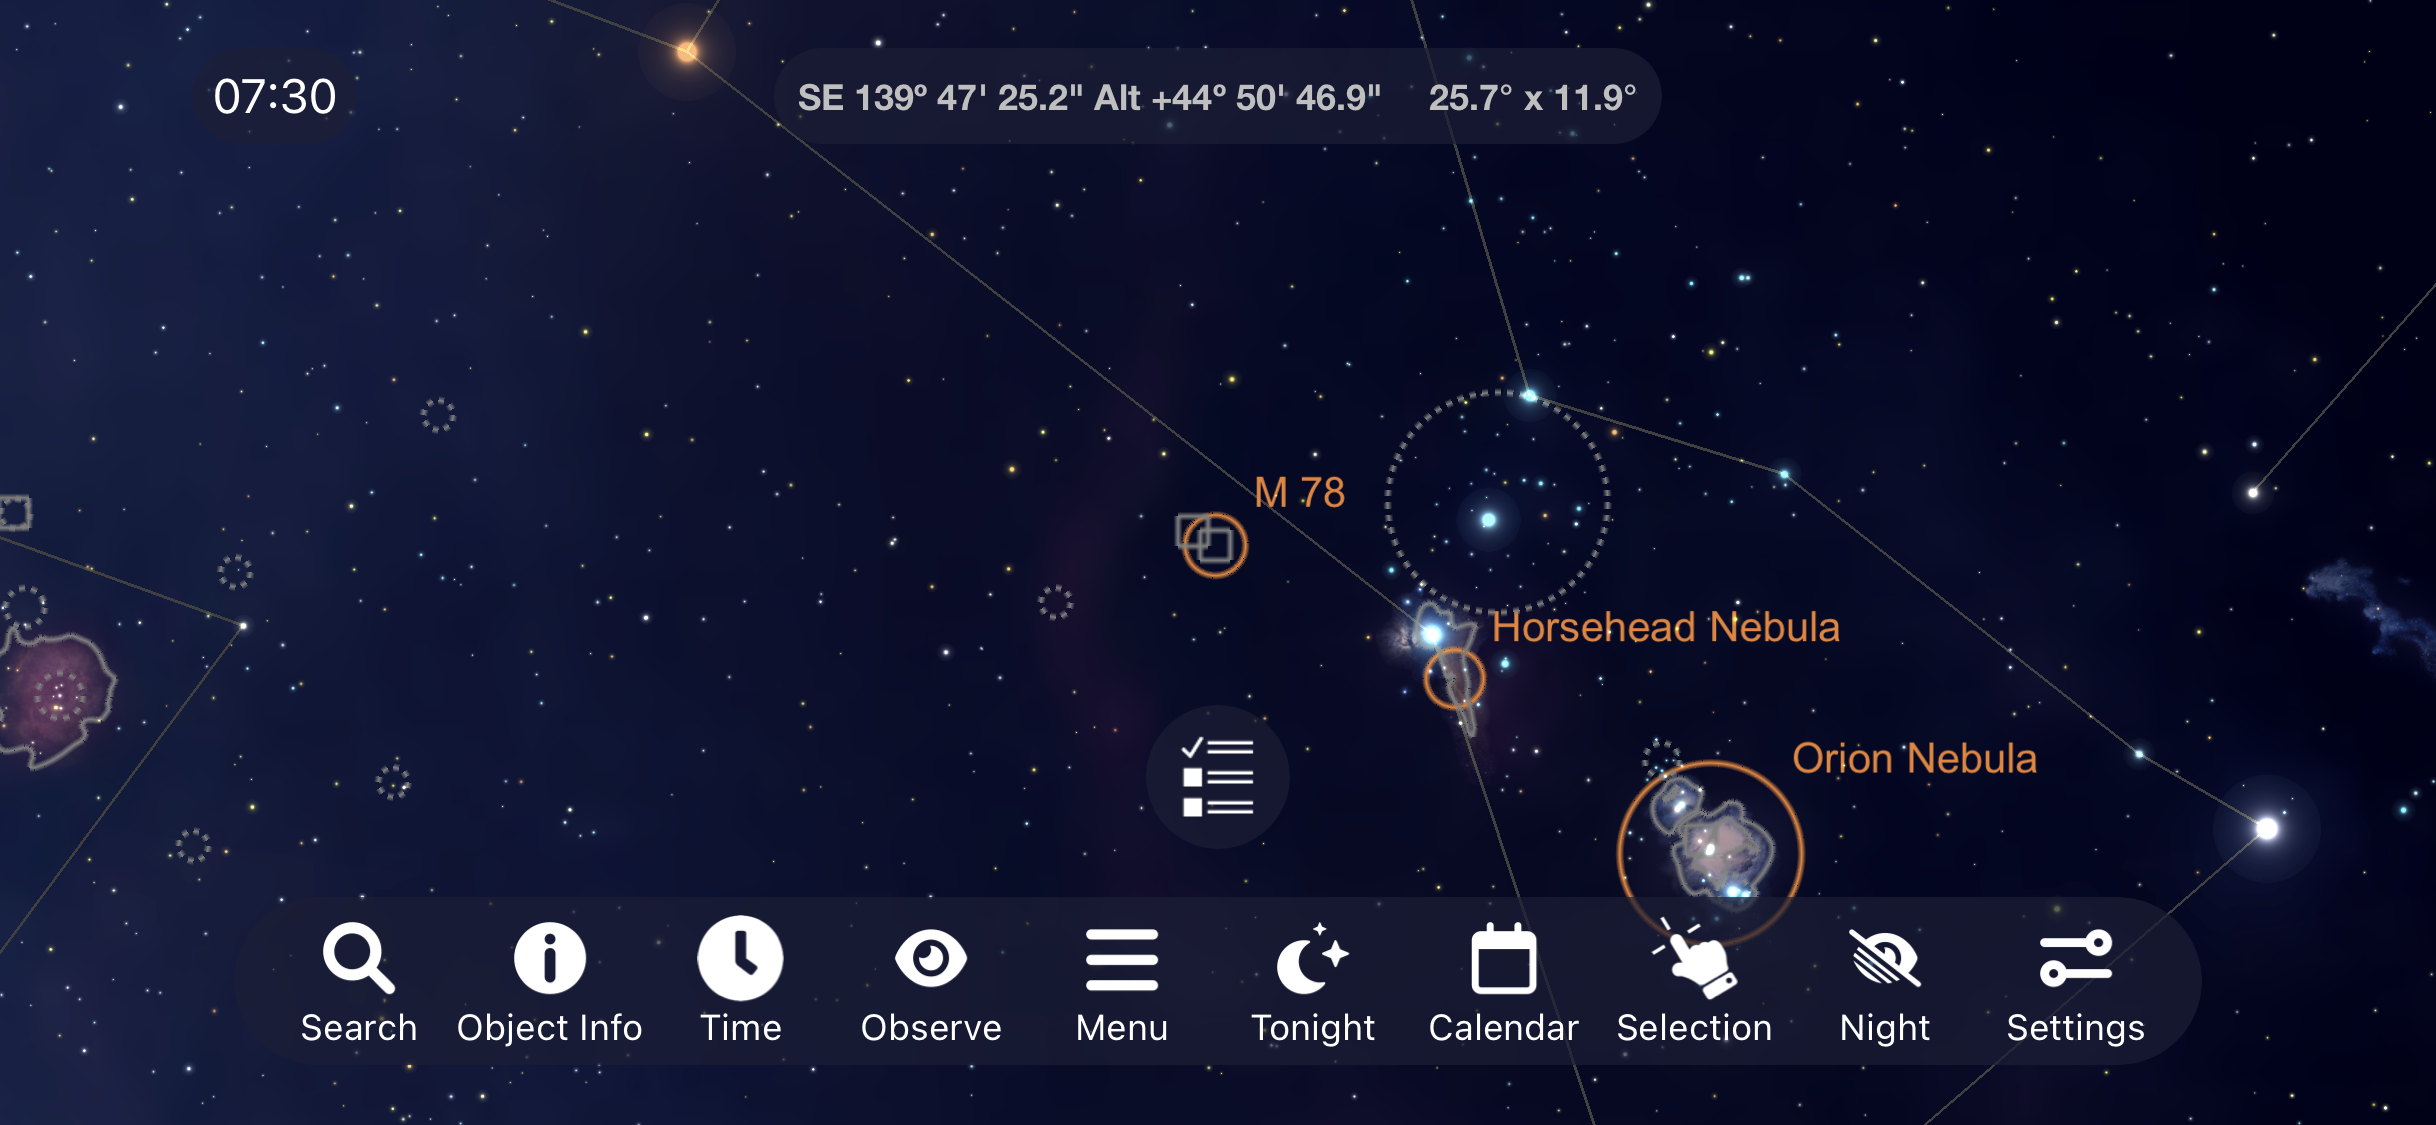
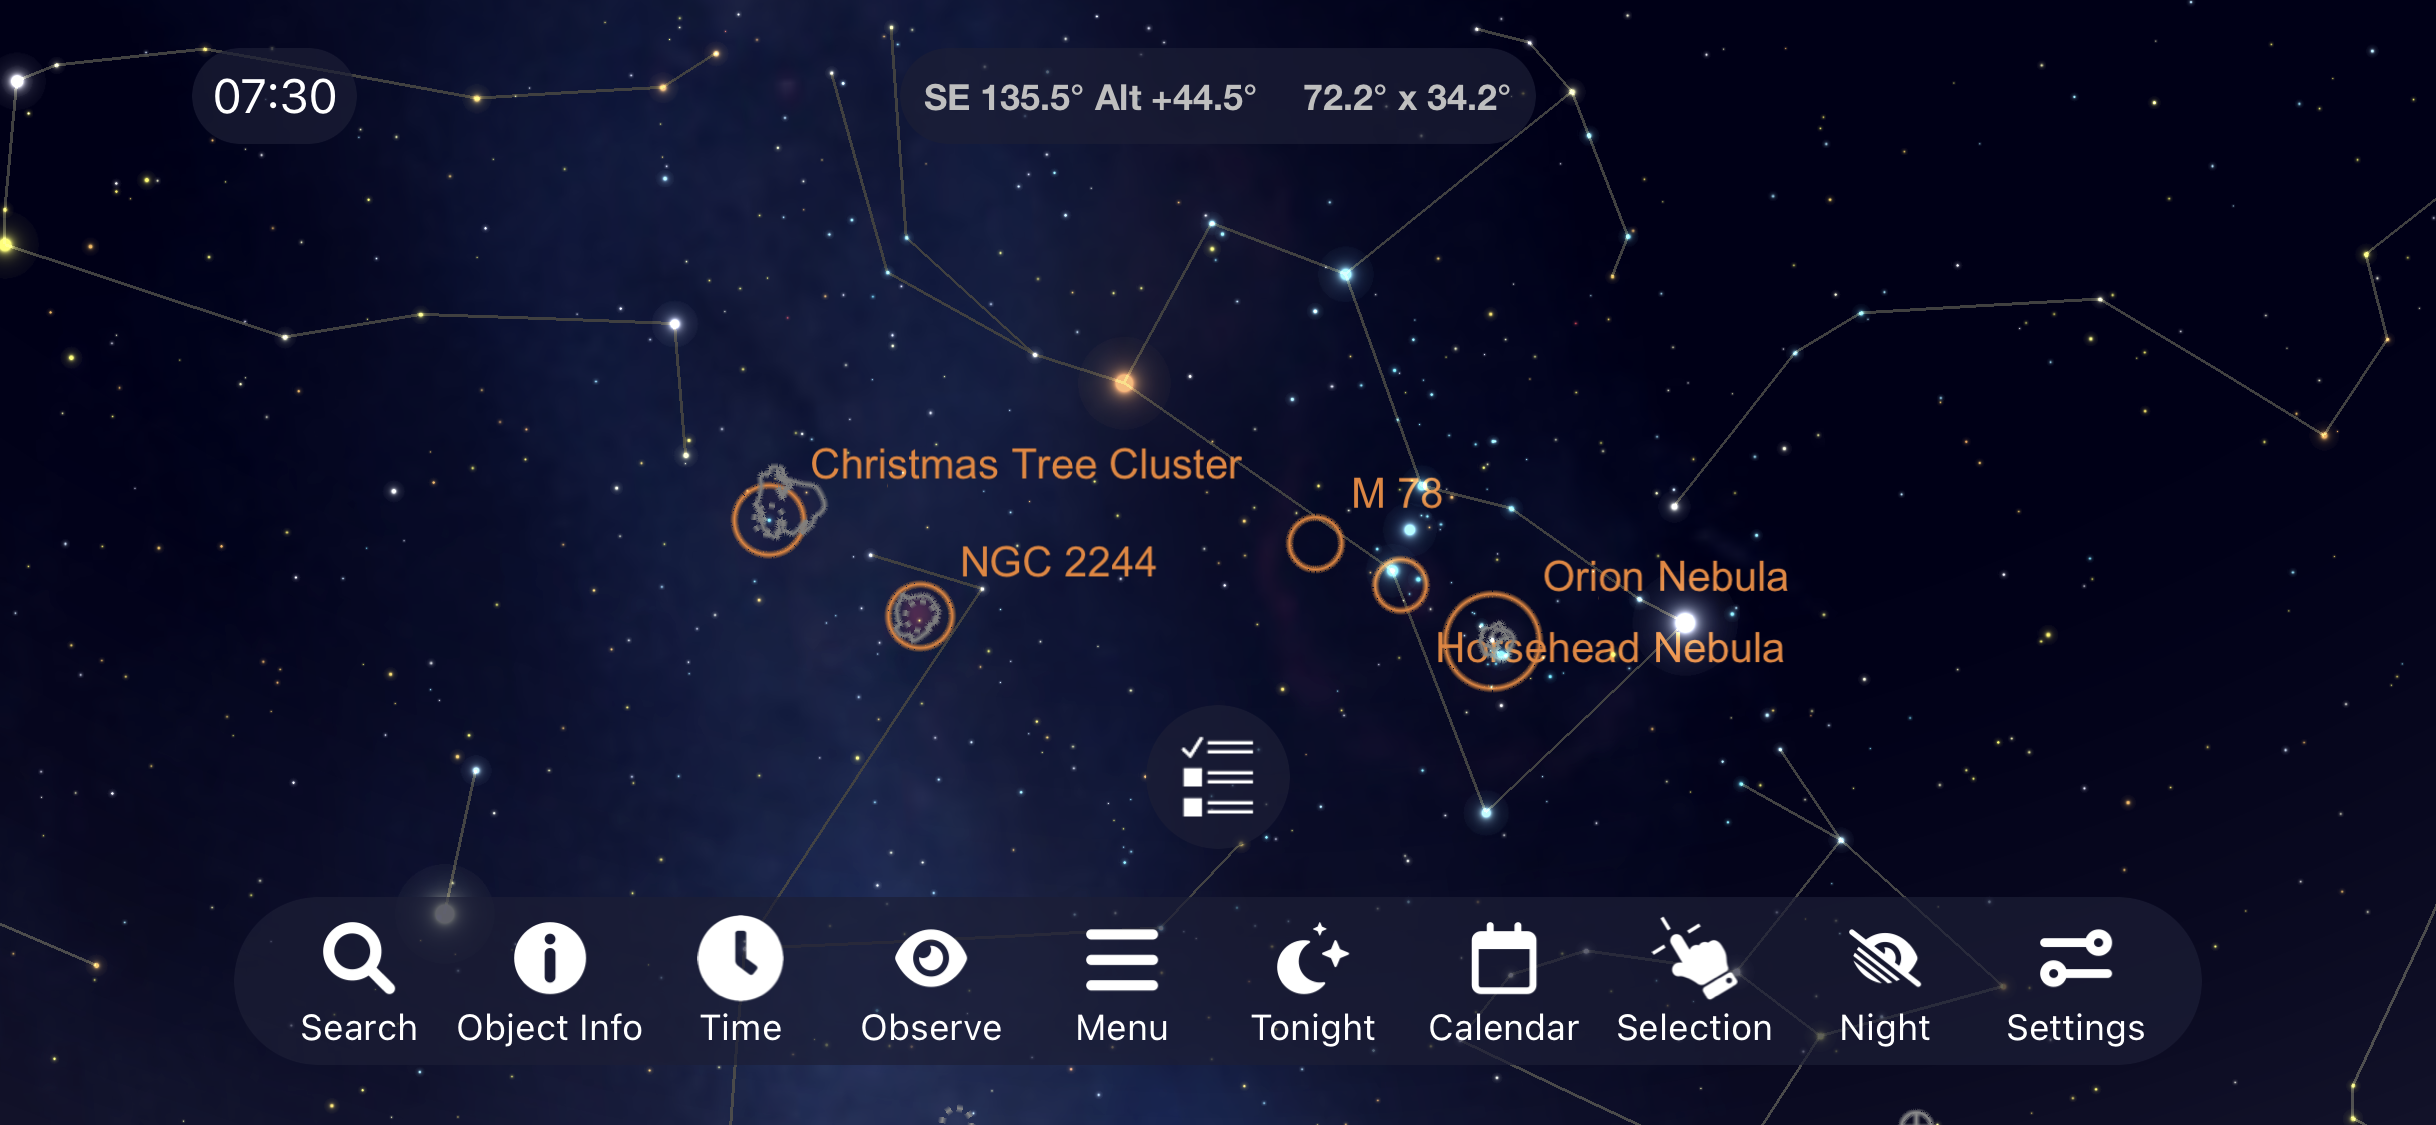
The Horsehead Nebula
The Constellation Orion is home to our next two targets as well. Move back up to Orion’s belt and you will come across the famous horsehead nebula which is a difficult target to see visually but one I love to image every year. To see it visually you will need very dark skies, a large telescope and probably the help of an H-Beta filter to enhance the contrast.
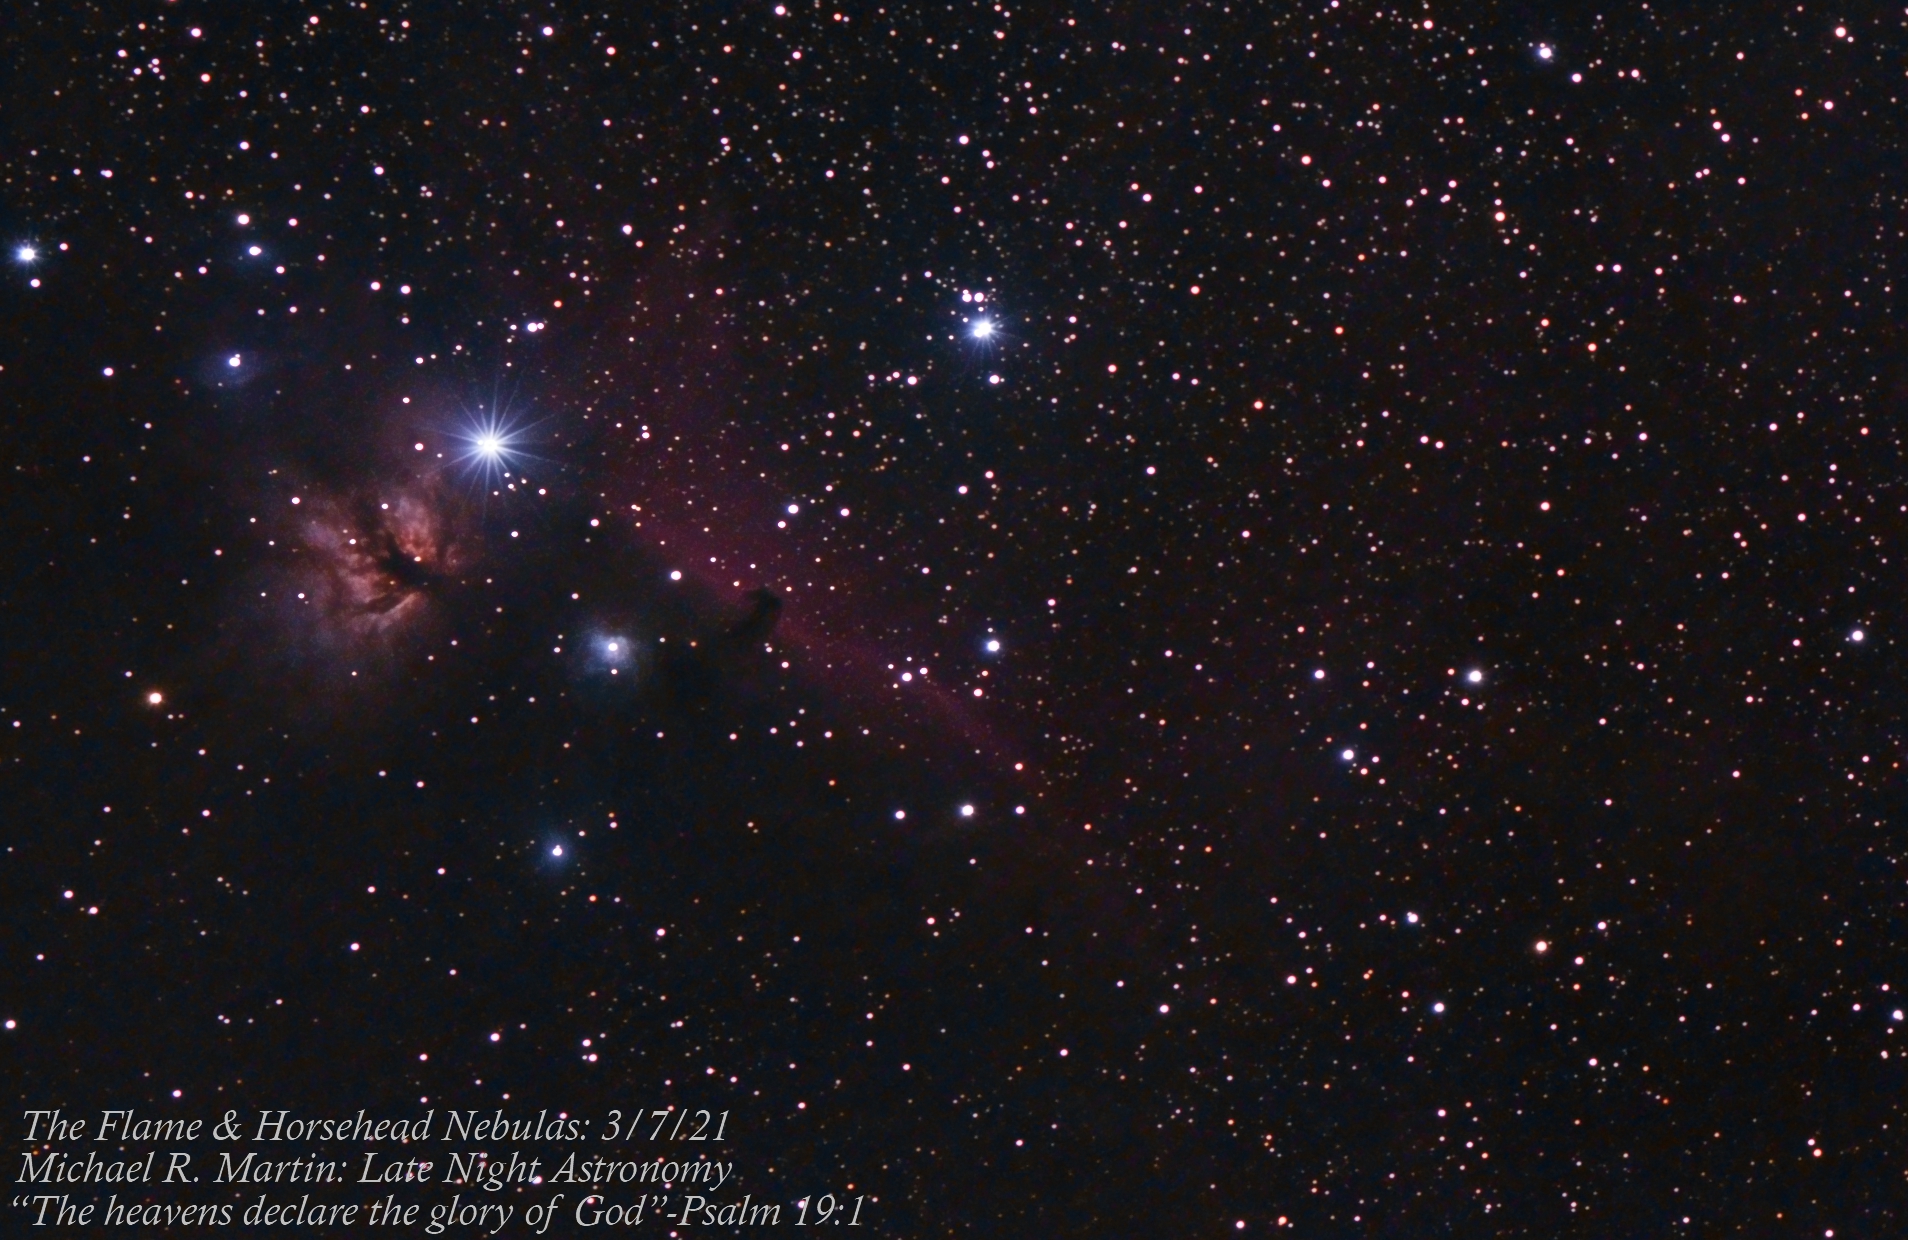
Even though I’ve never seen it with the naked eye, this long exposure image I took of the Horsehead nebula shows the incredible beauty of this dark nebula with the flame nebula parked right near it as an added bonus.
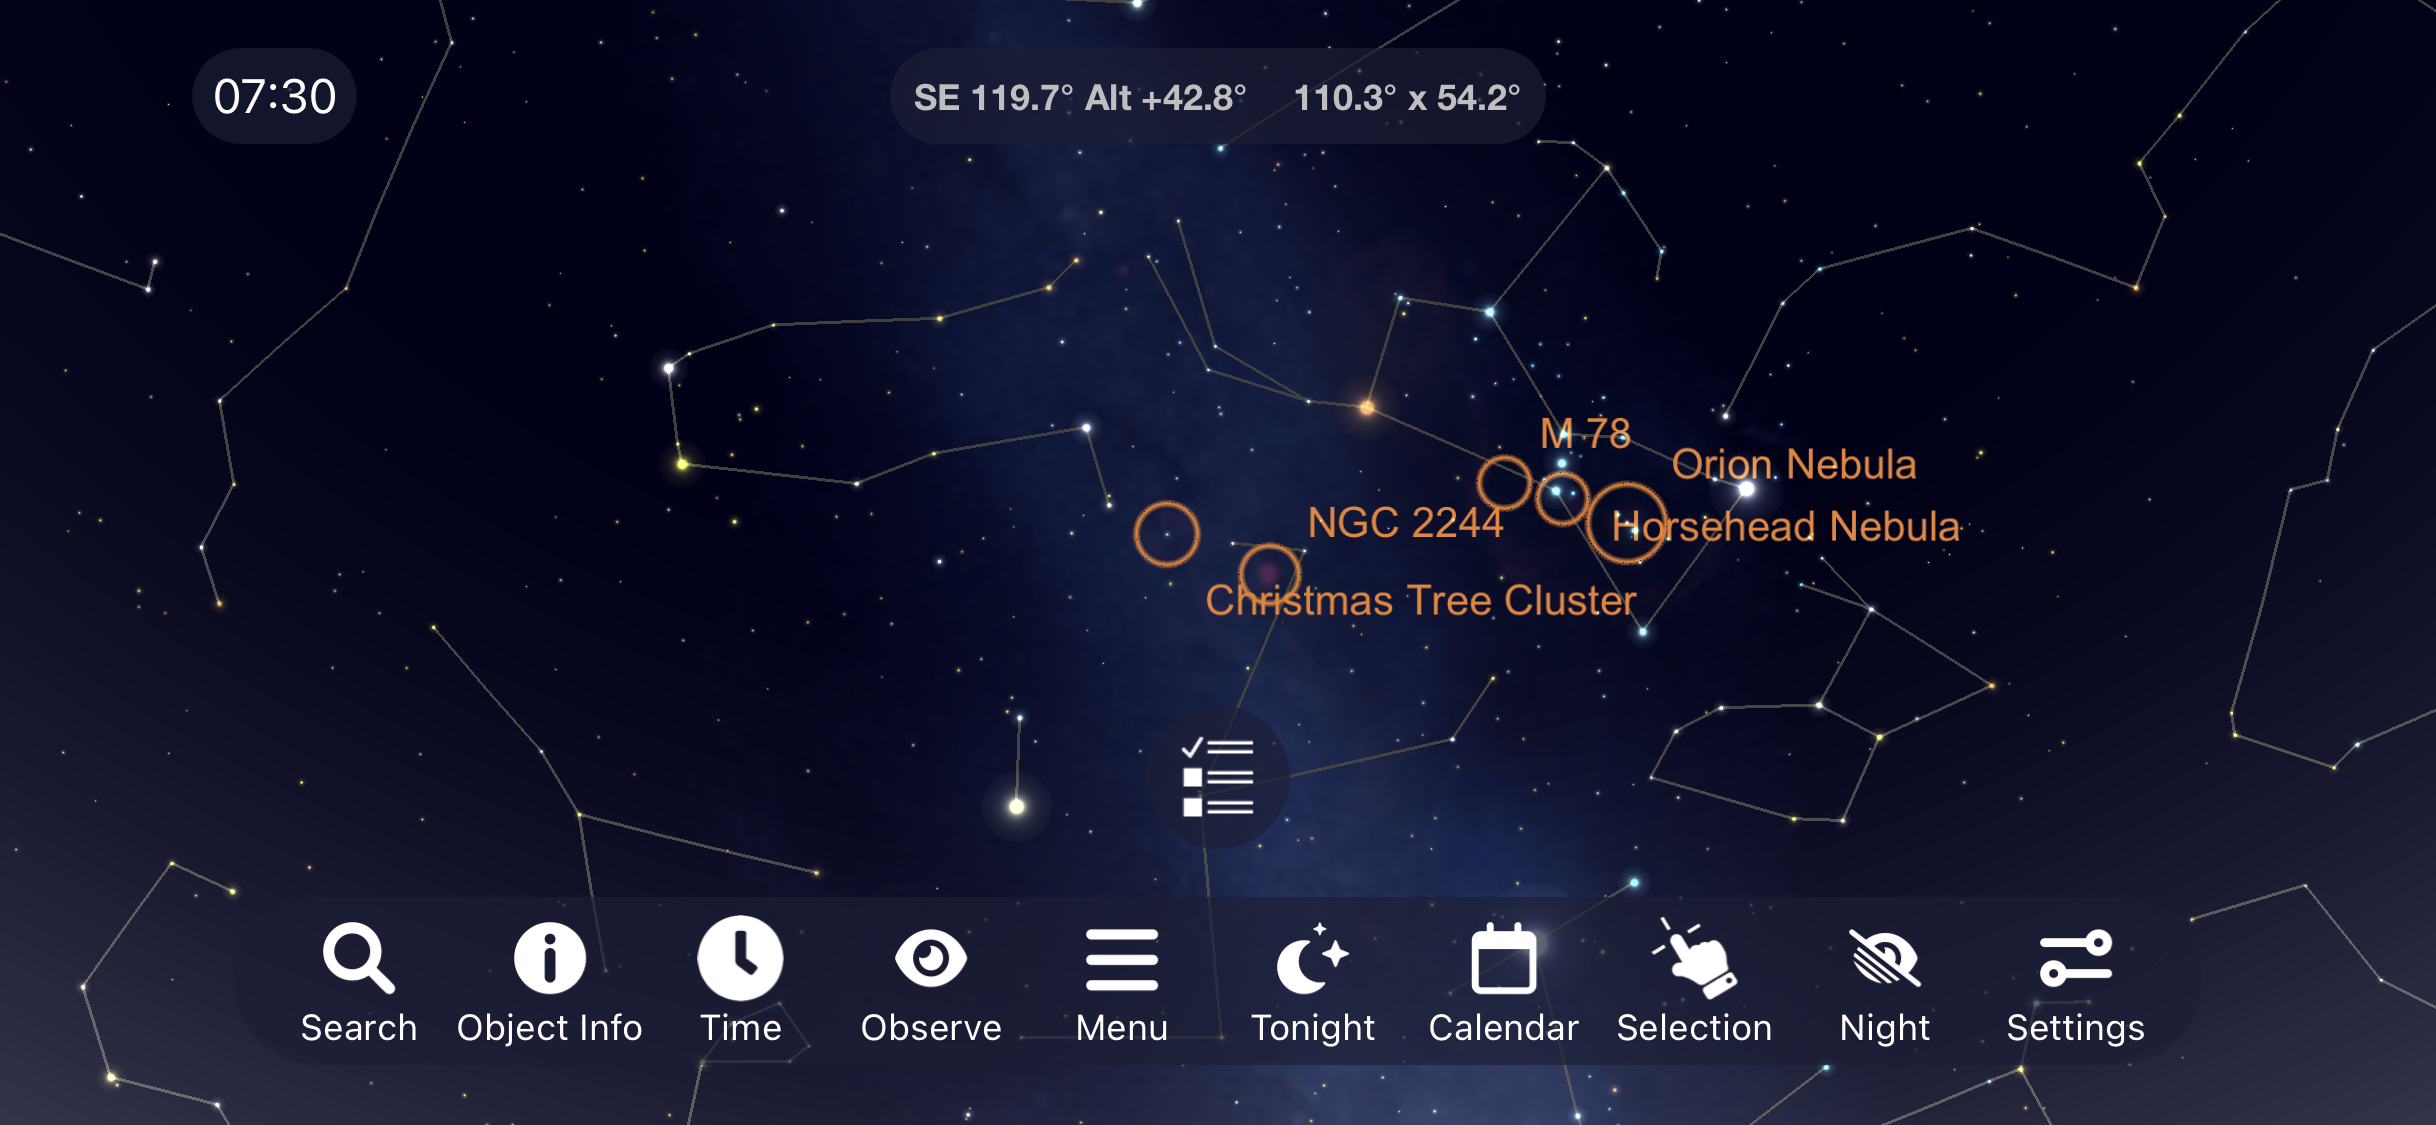
M78
Over from Orion’s Belt you will find one of the brightest reflection nebulas in the night sky, M78. I’ve only captured a few images of this target but it goes well with the impressive family of objects located within the Constellation Orion .
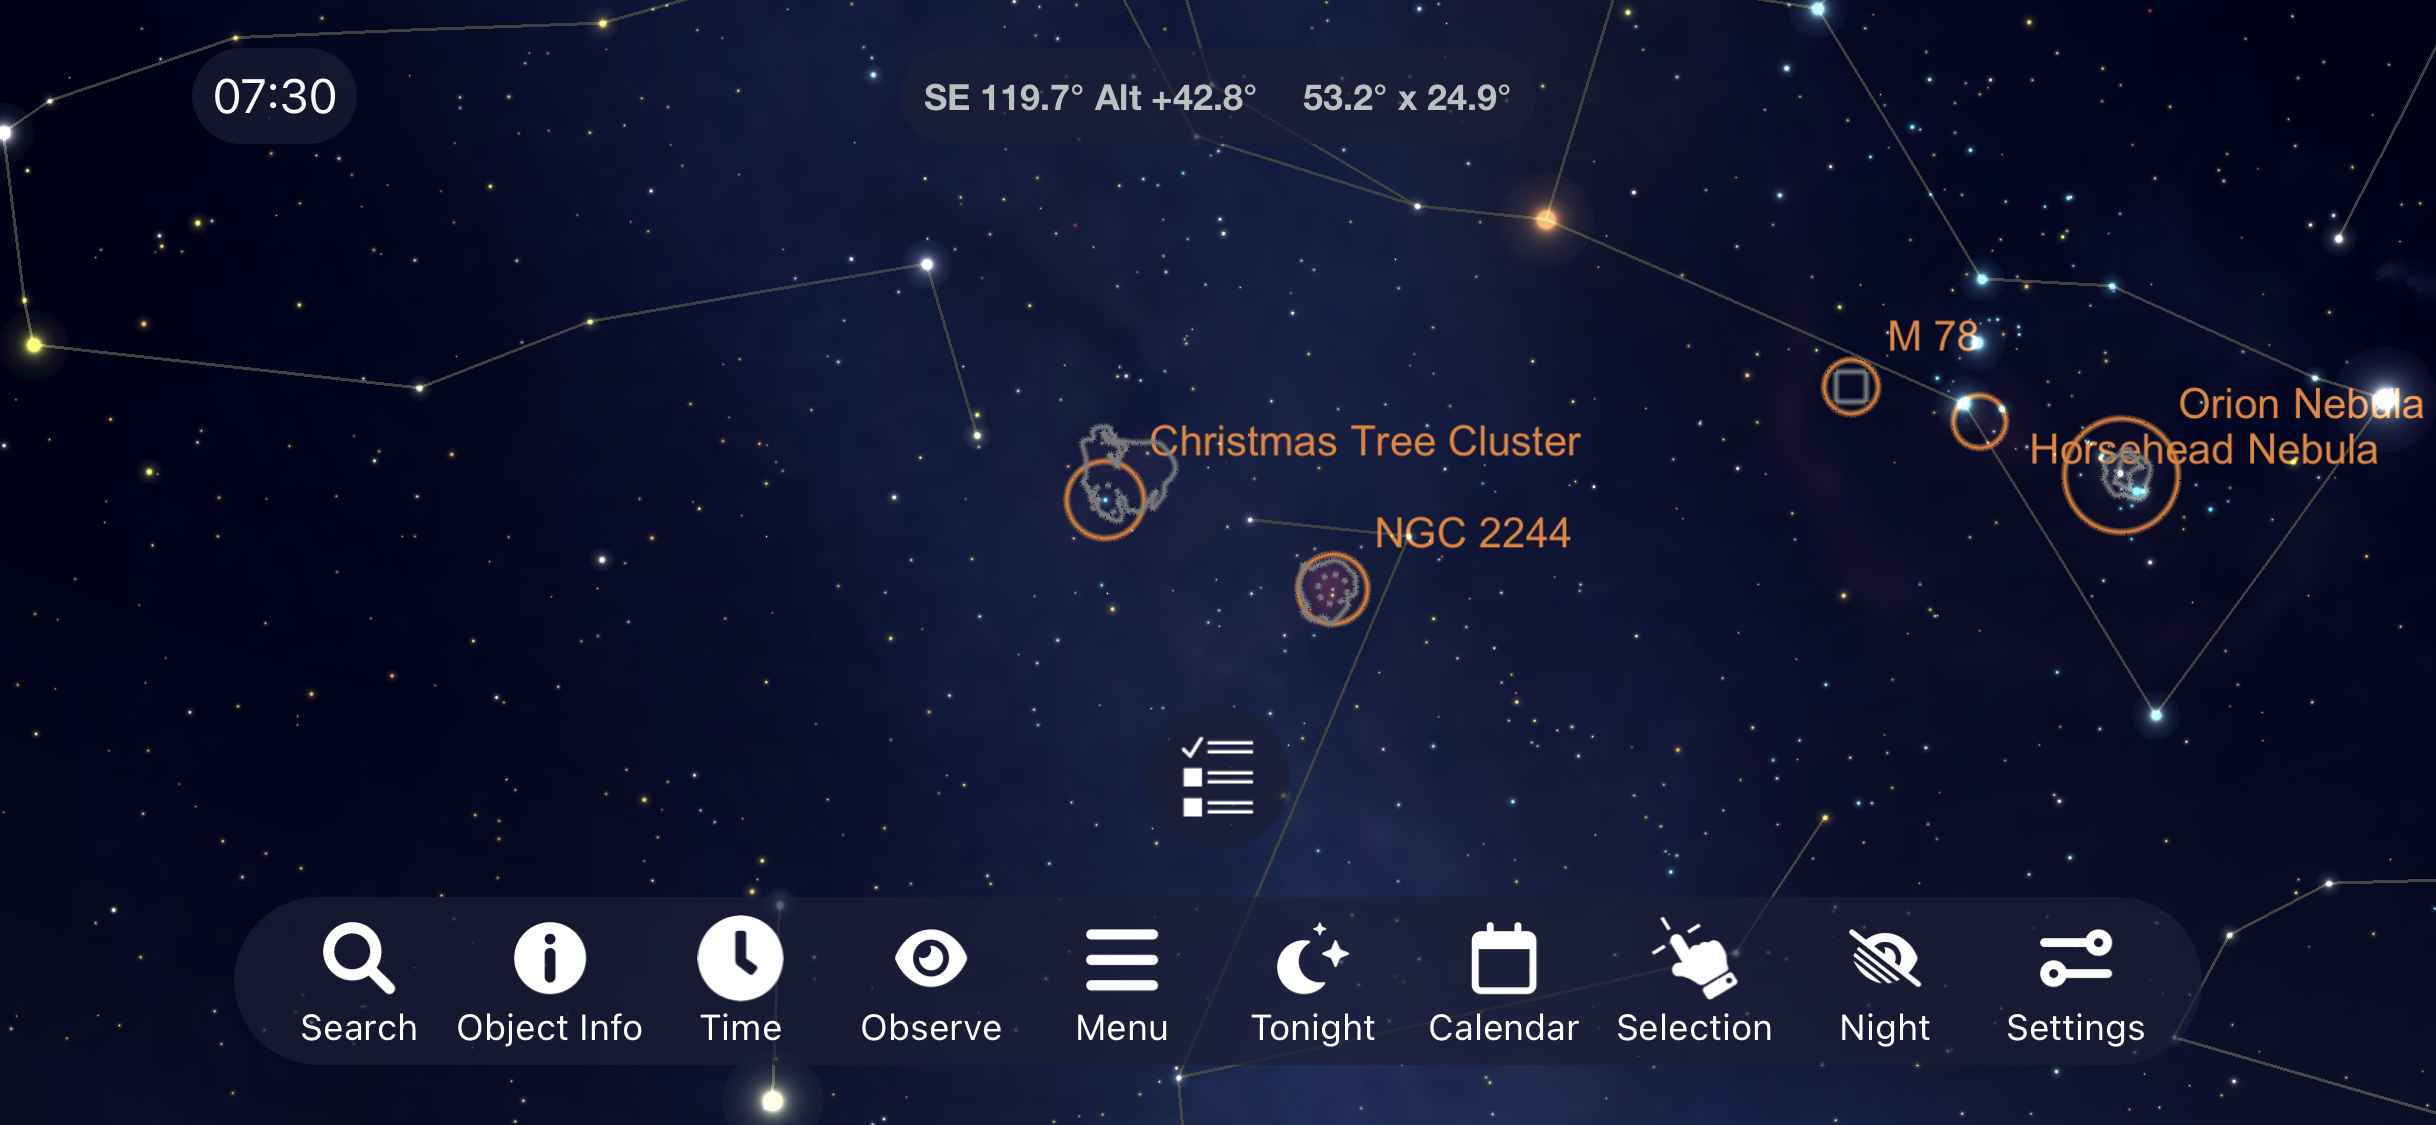
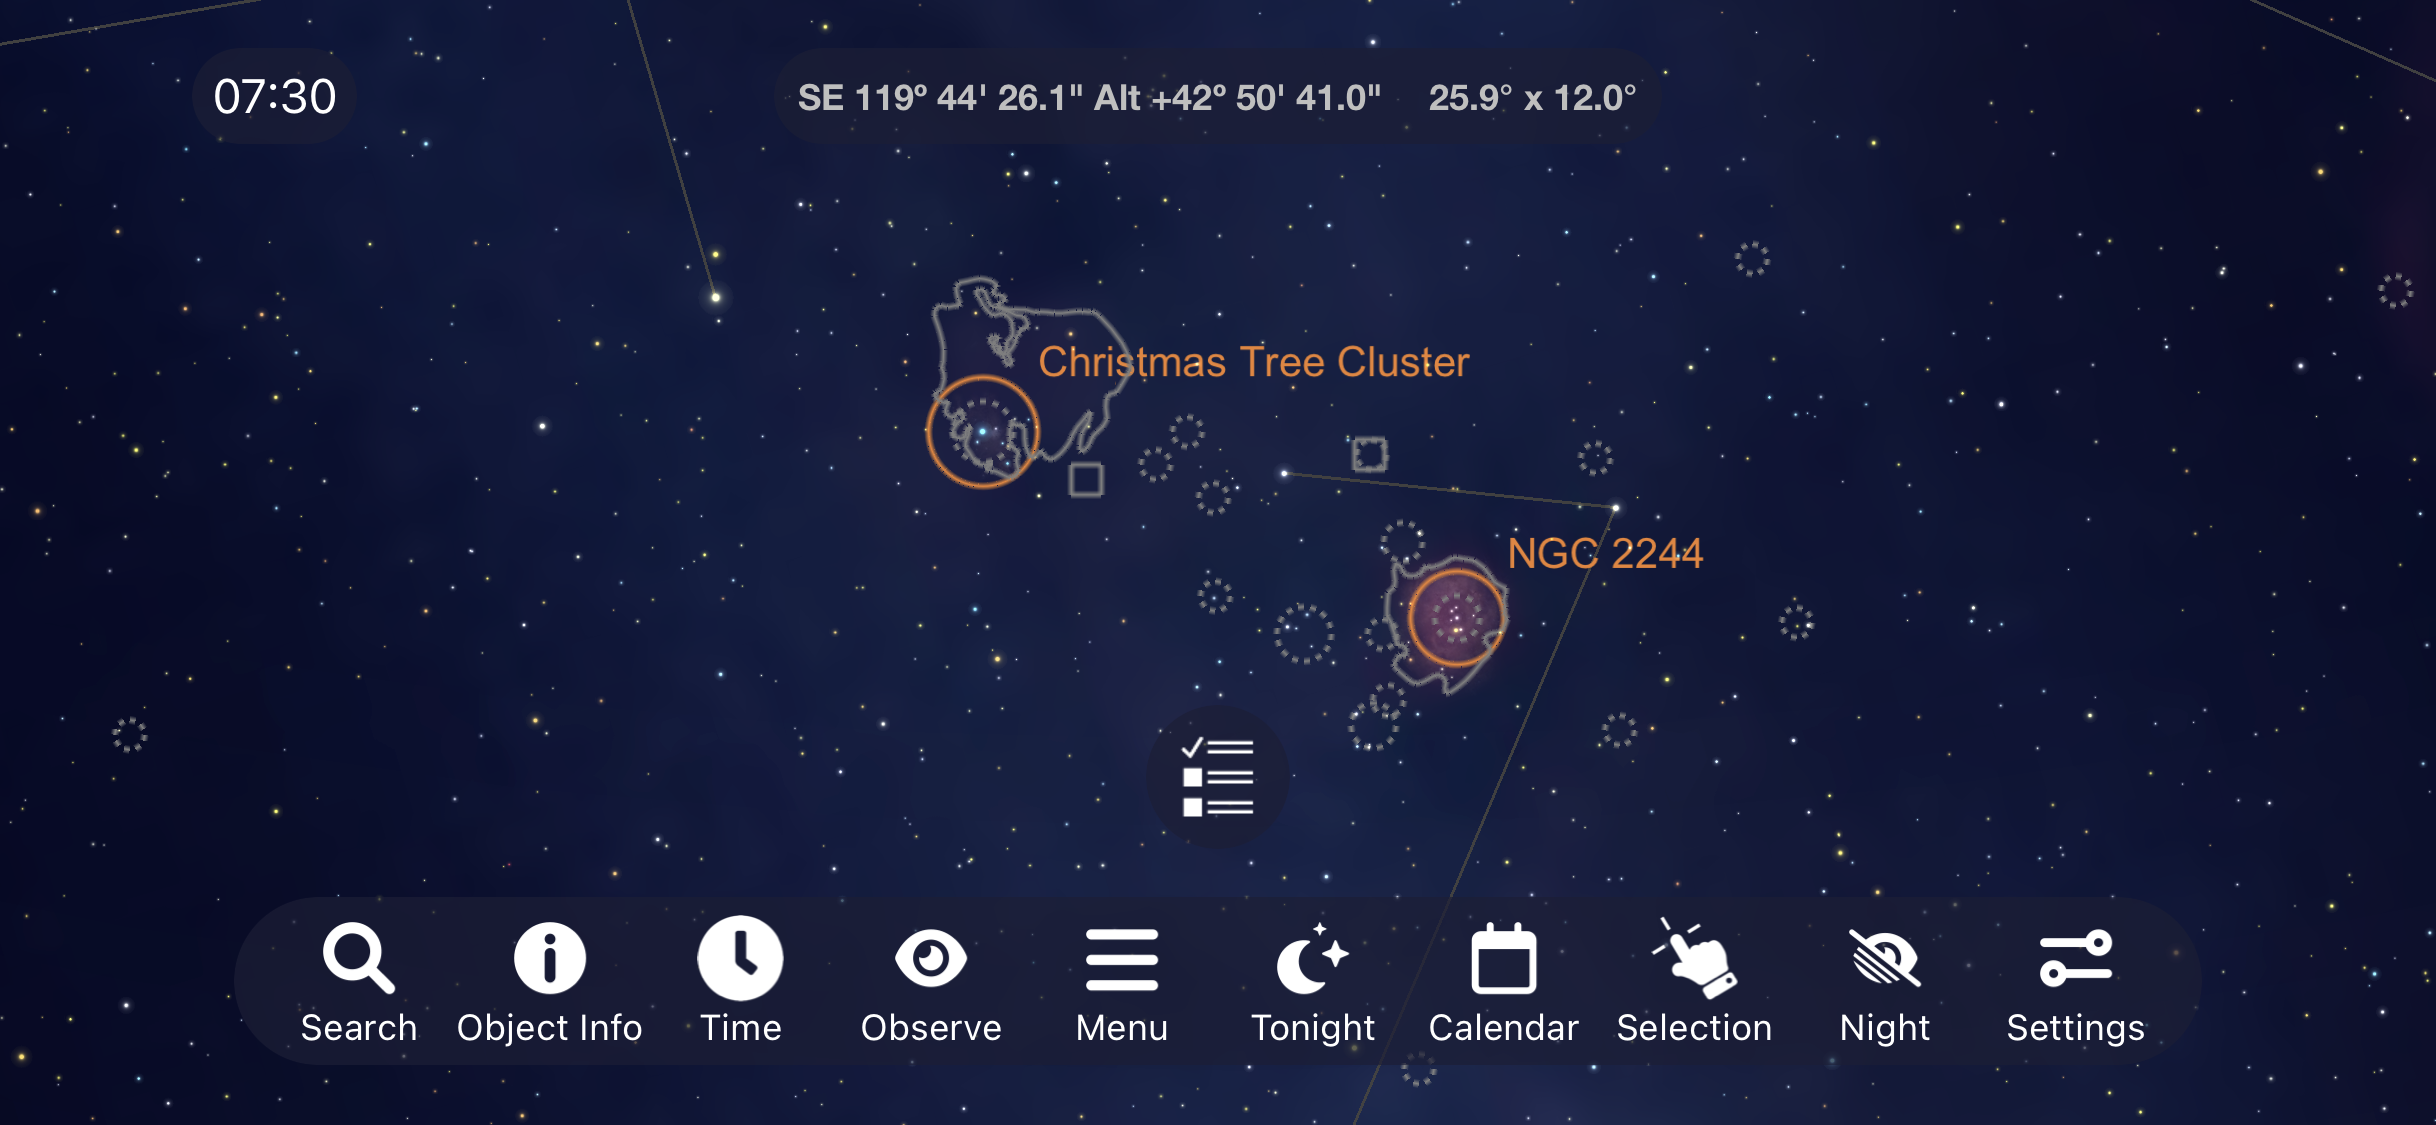
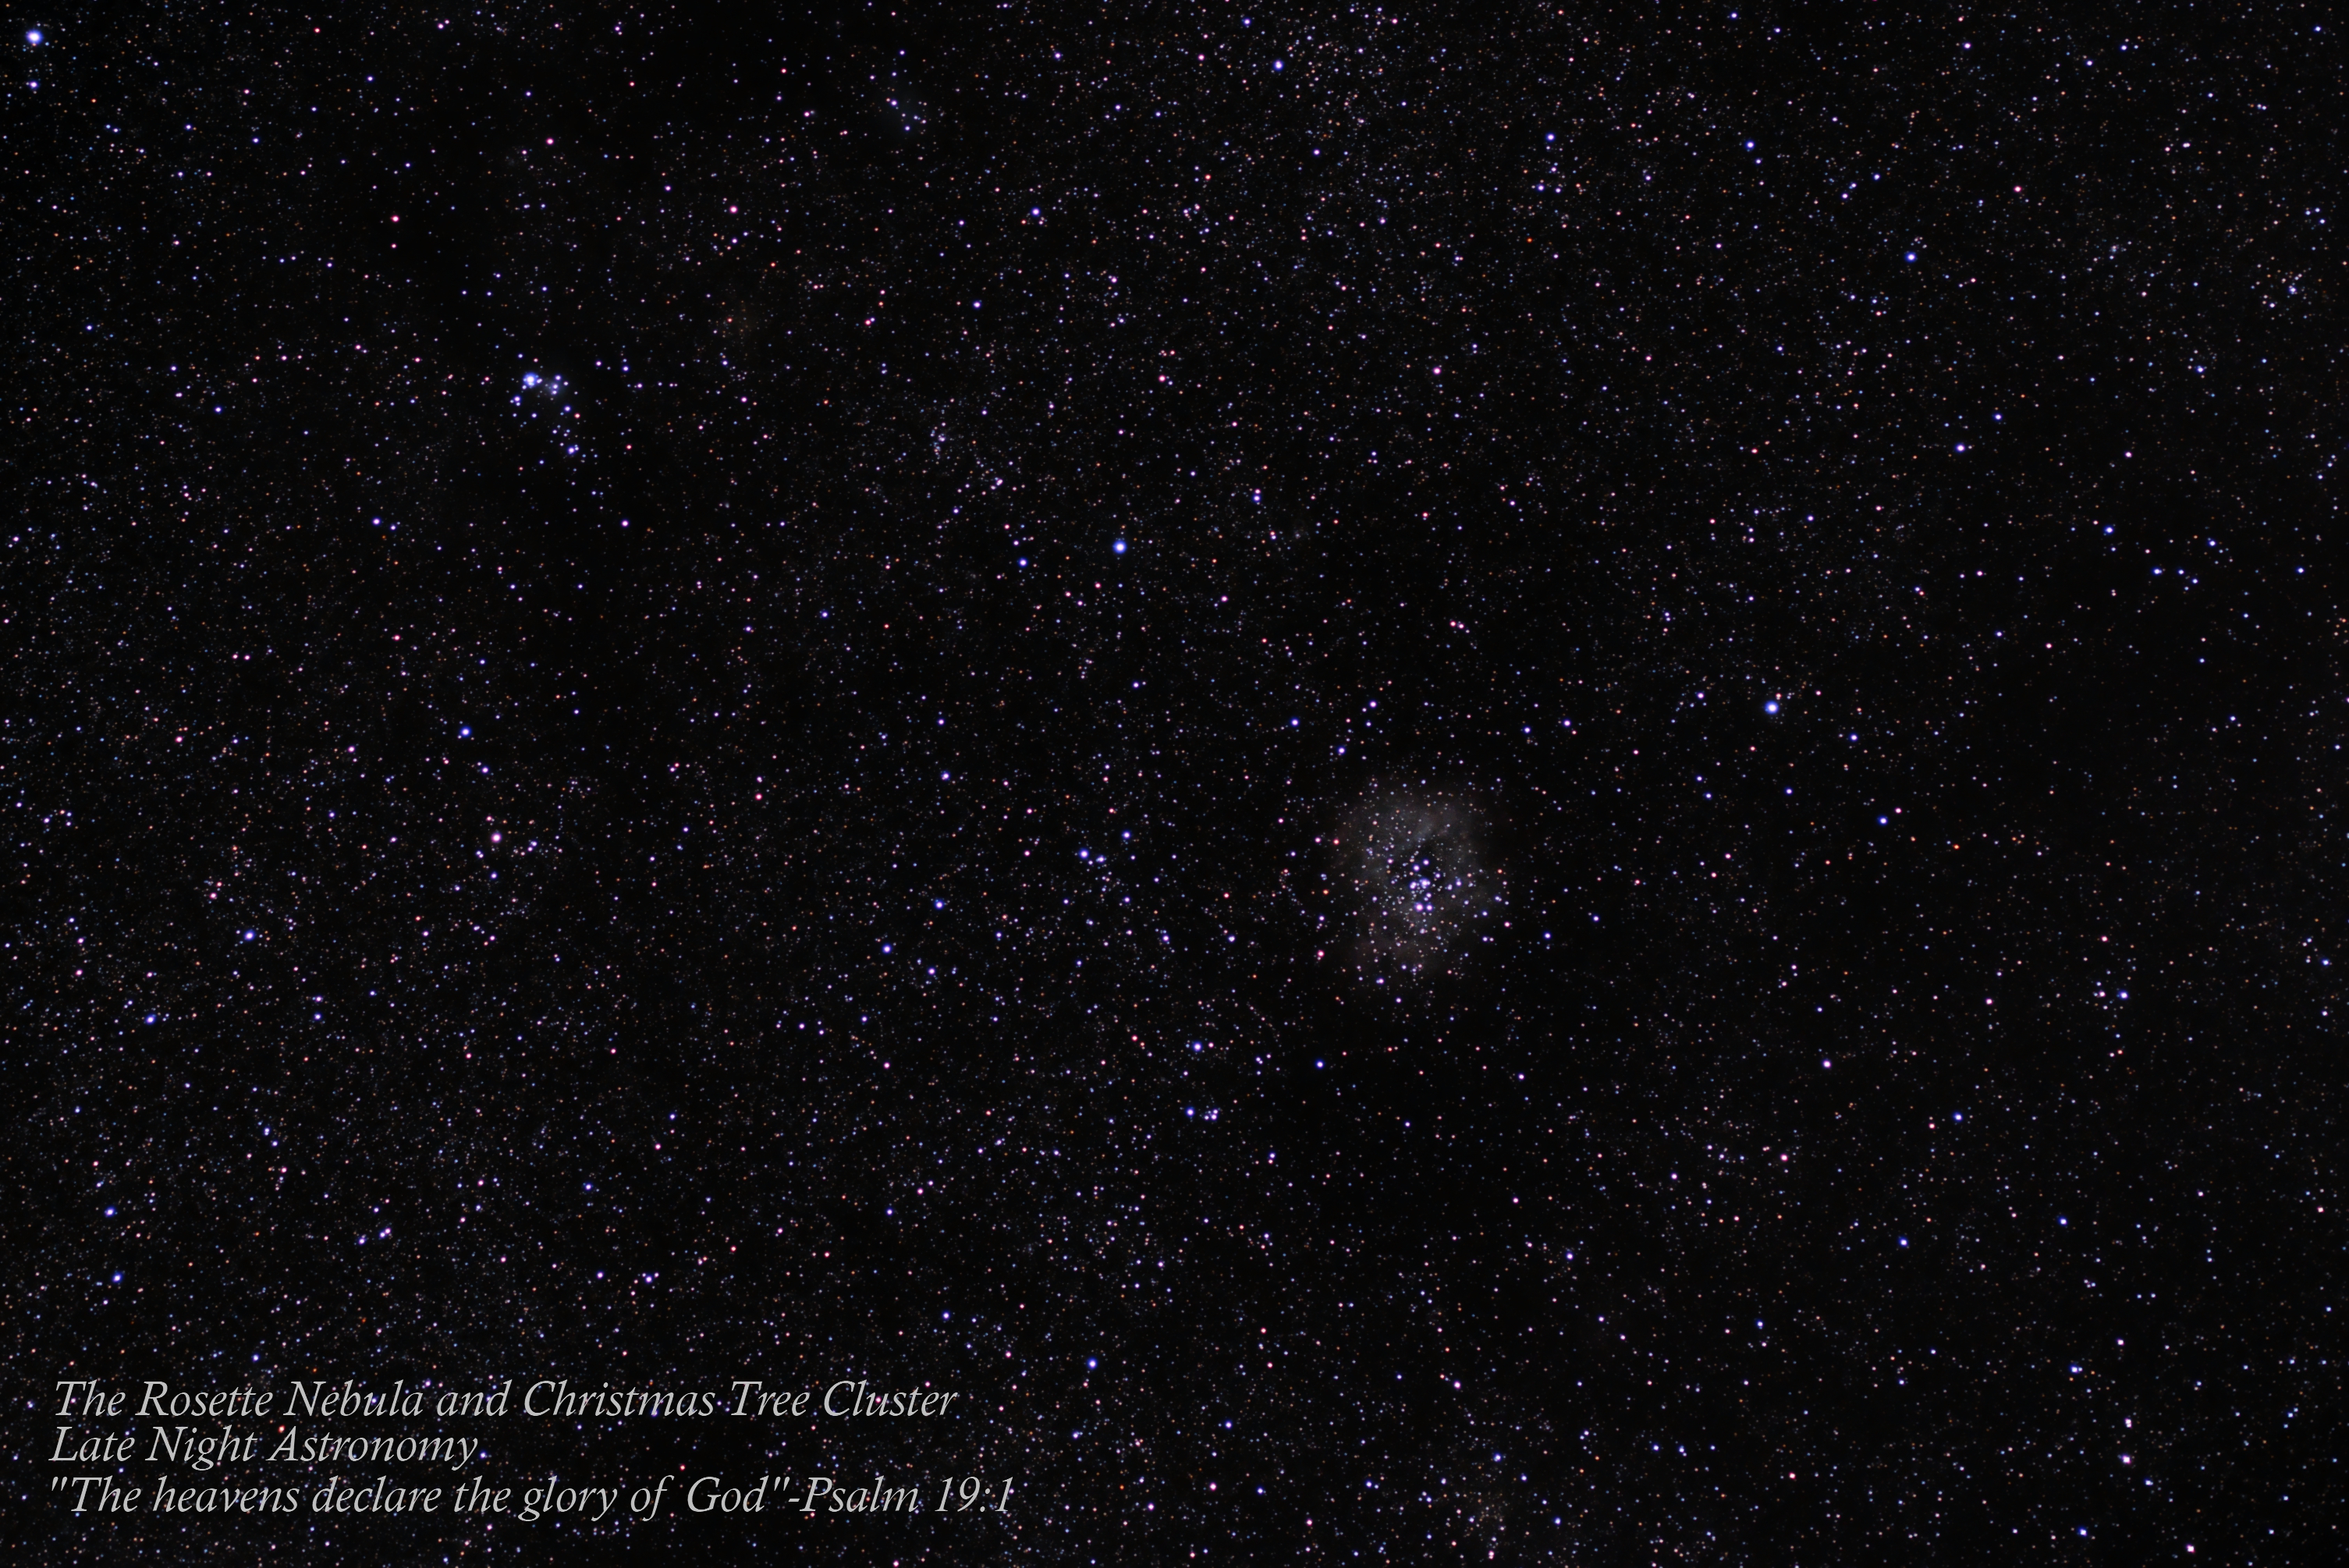
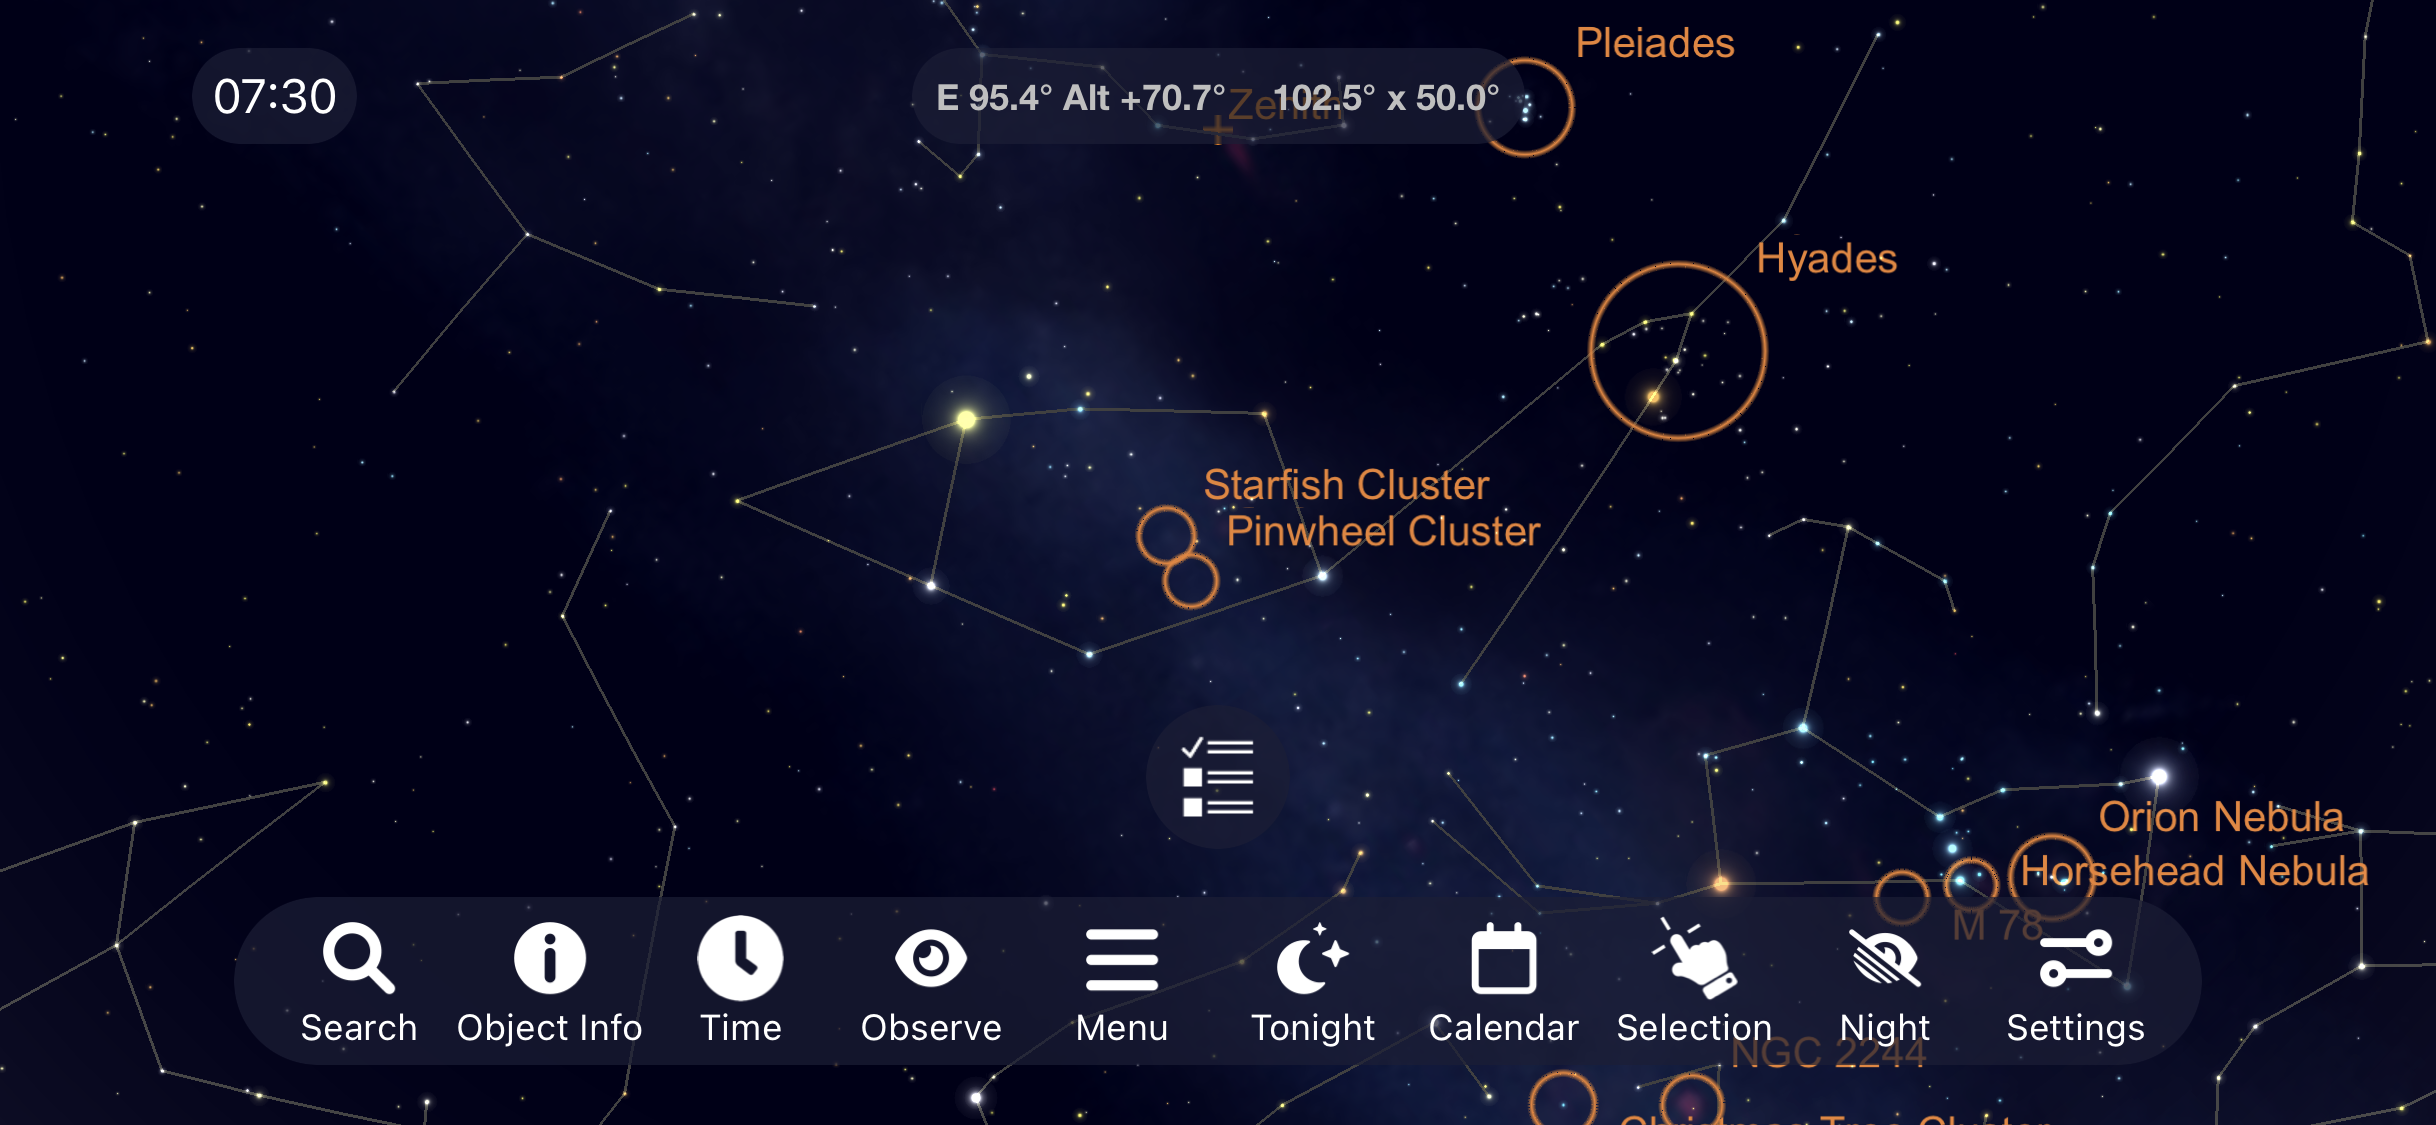
NGC 2244 & NGC 2264 The Christmas Tree Cluster
Let’s move out of the Constellation Orion and over to the Constellation Monoceros where you will find the open clusters NGC 2244 inside the Rosette Nebula and NGC 2264, the Christmas Tree Cluster, inside of the Cone Nebula. While these nebulas will be difficult to see through your telescope the two clusters within them are an enjoyable part of space to explore with a pair of binoculars or a telescope.
With faint hints of the Rosette Nebula showing up, this image shows off these two clusters but I didn’t quite have enough exposure time to pick up the famous red from this nebula.
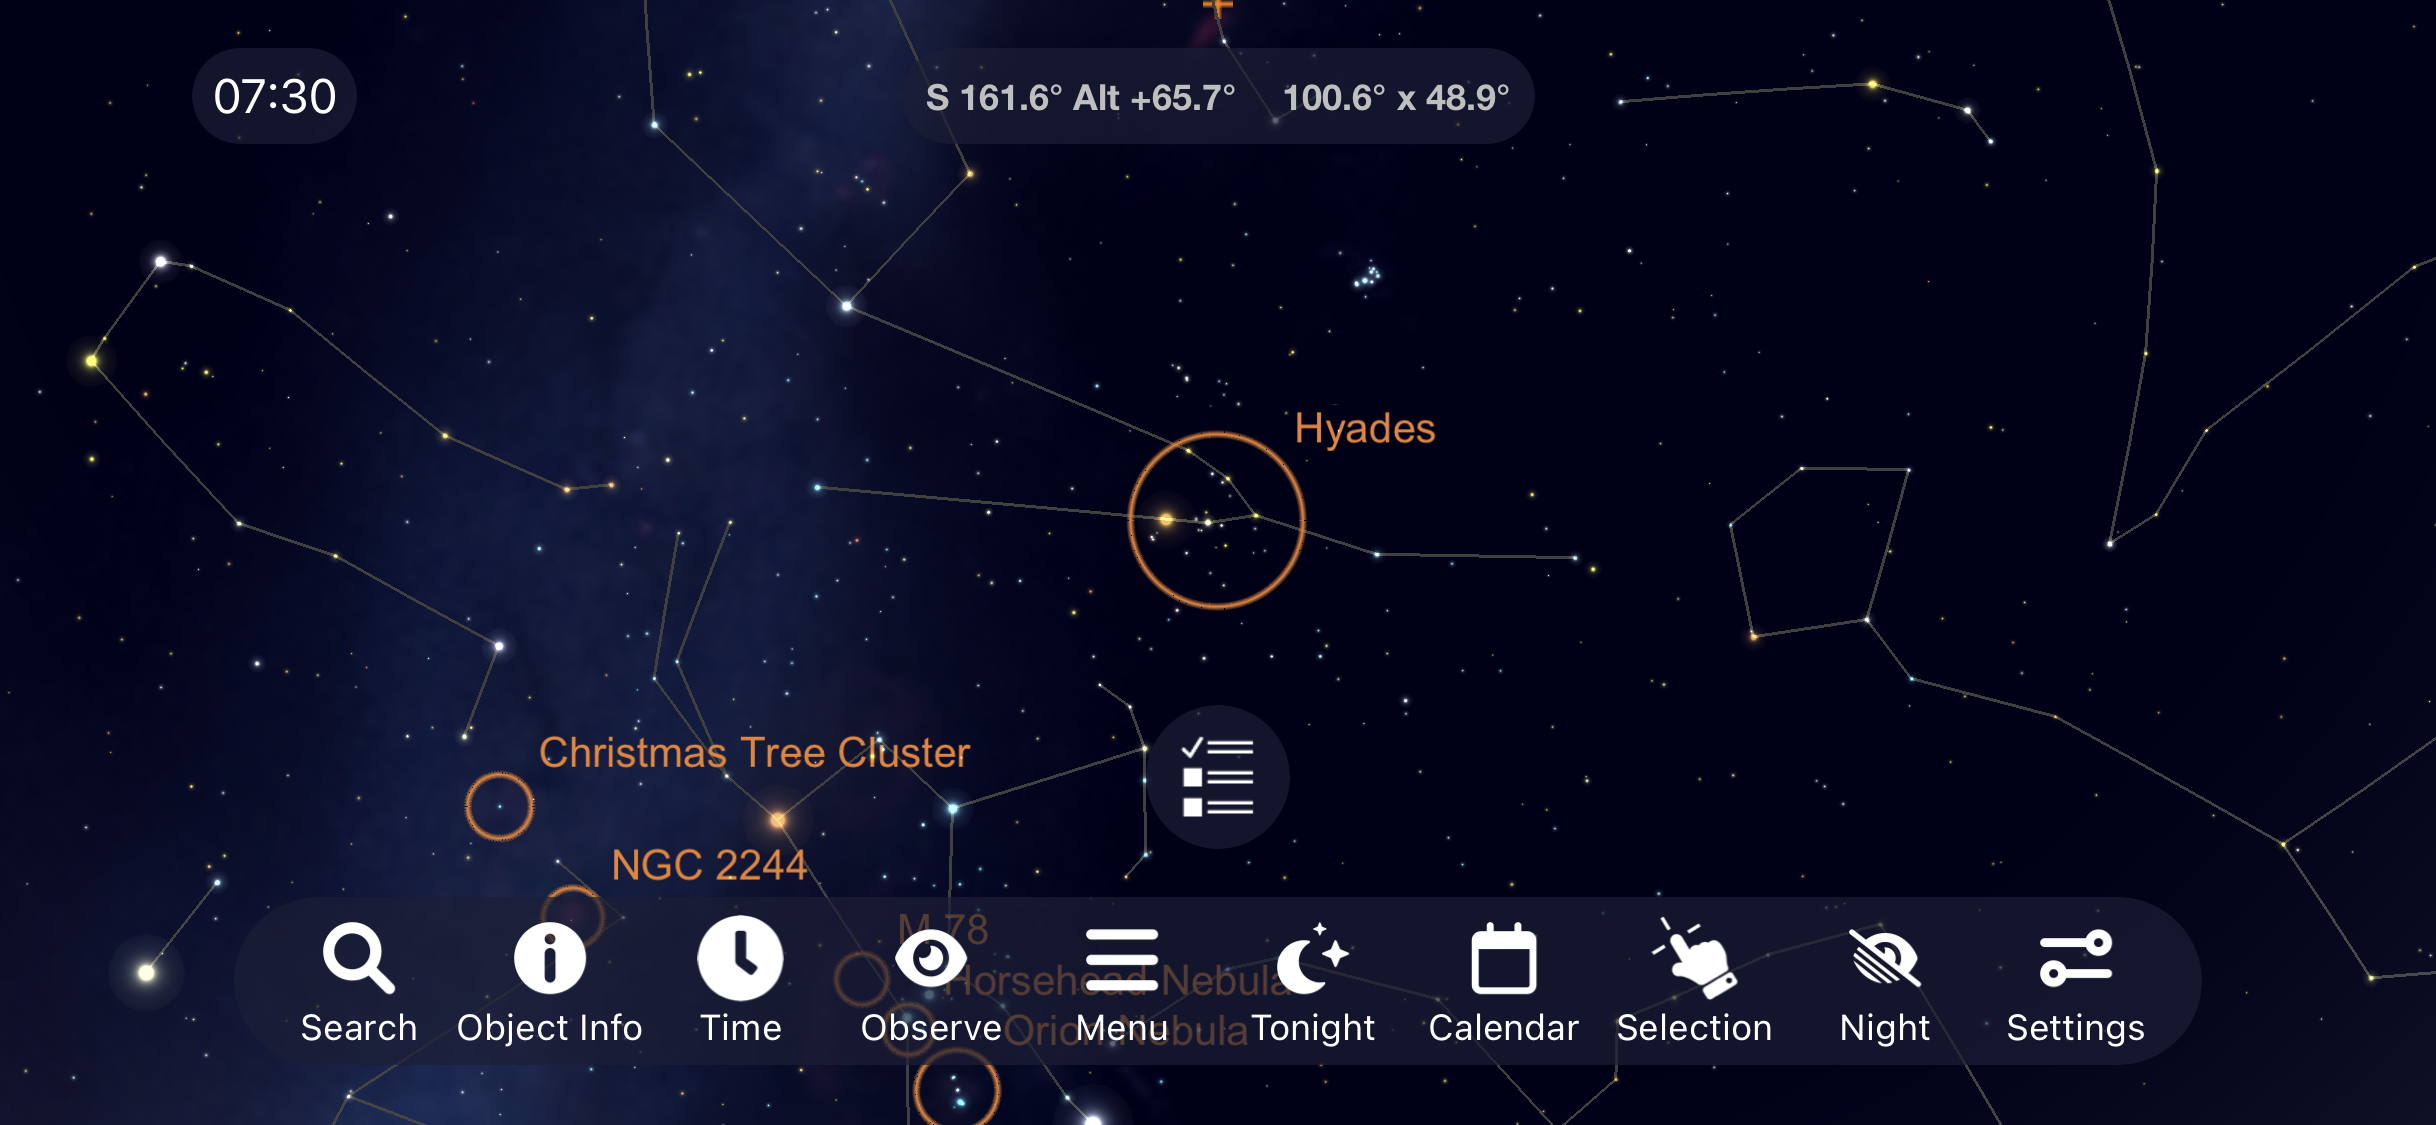
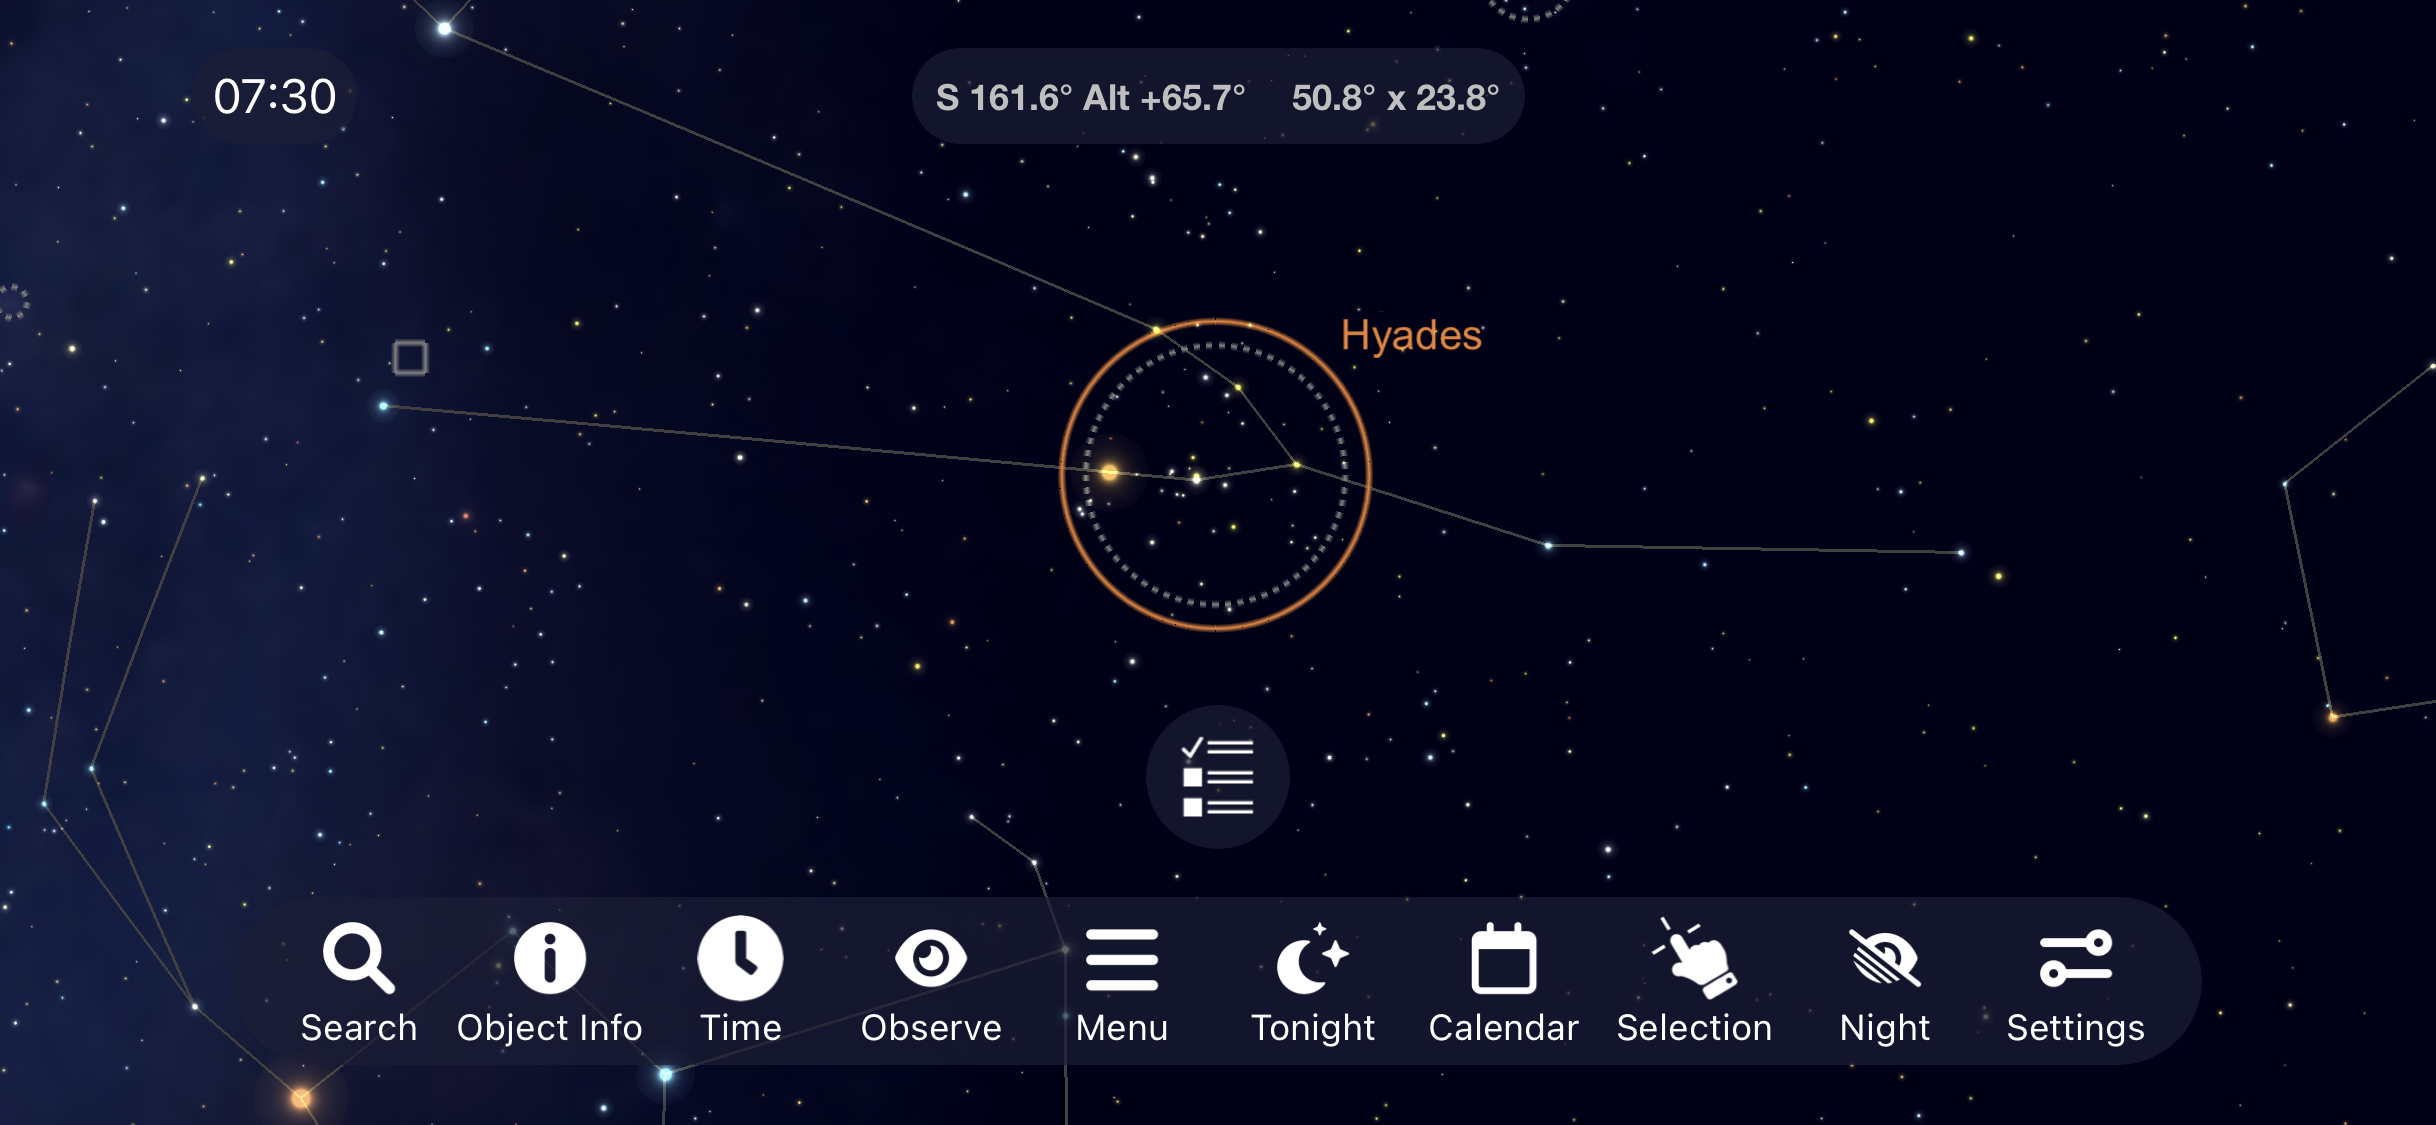
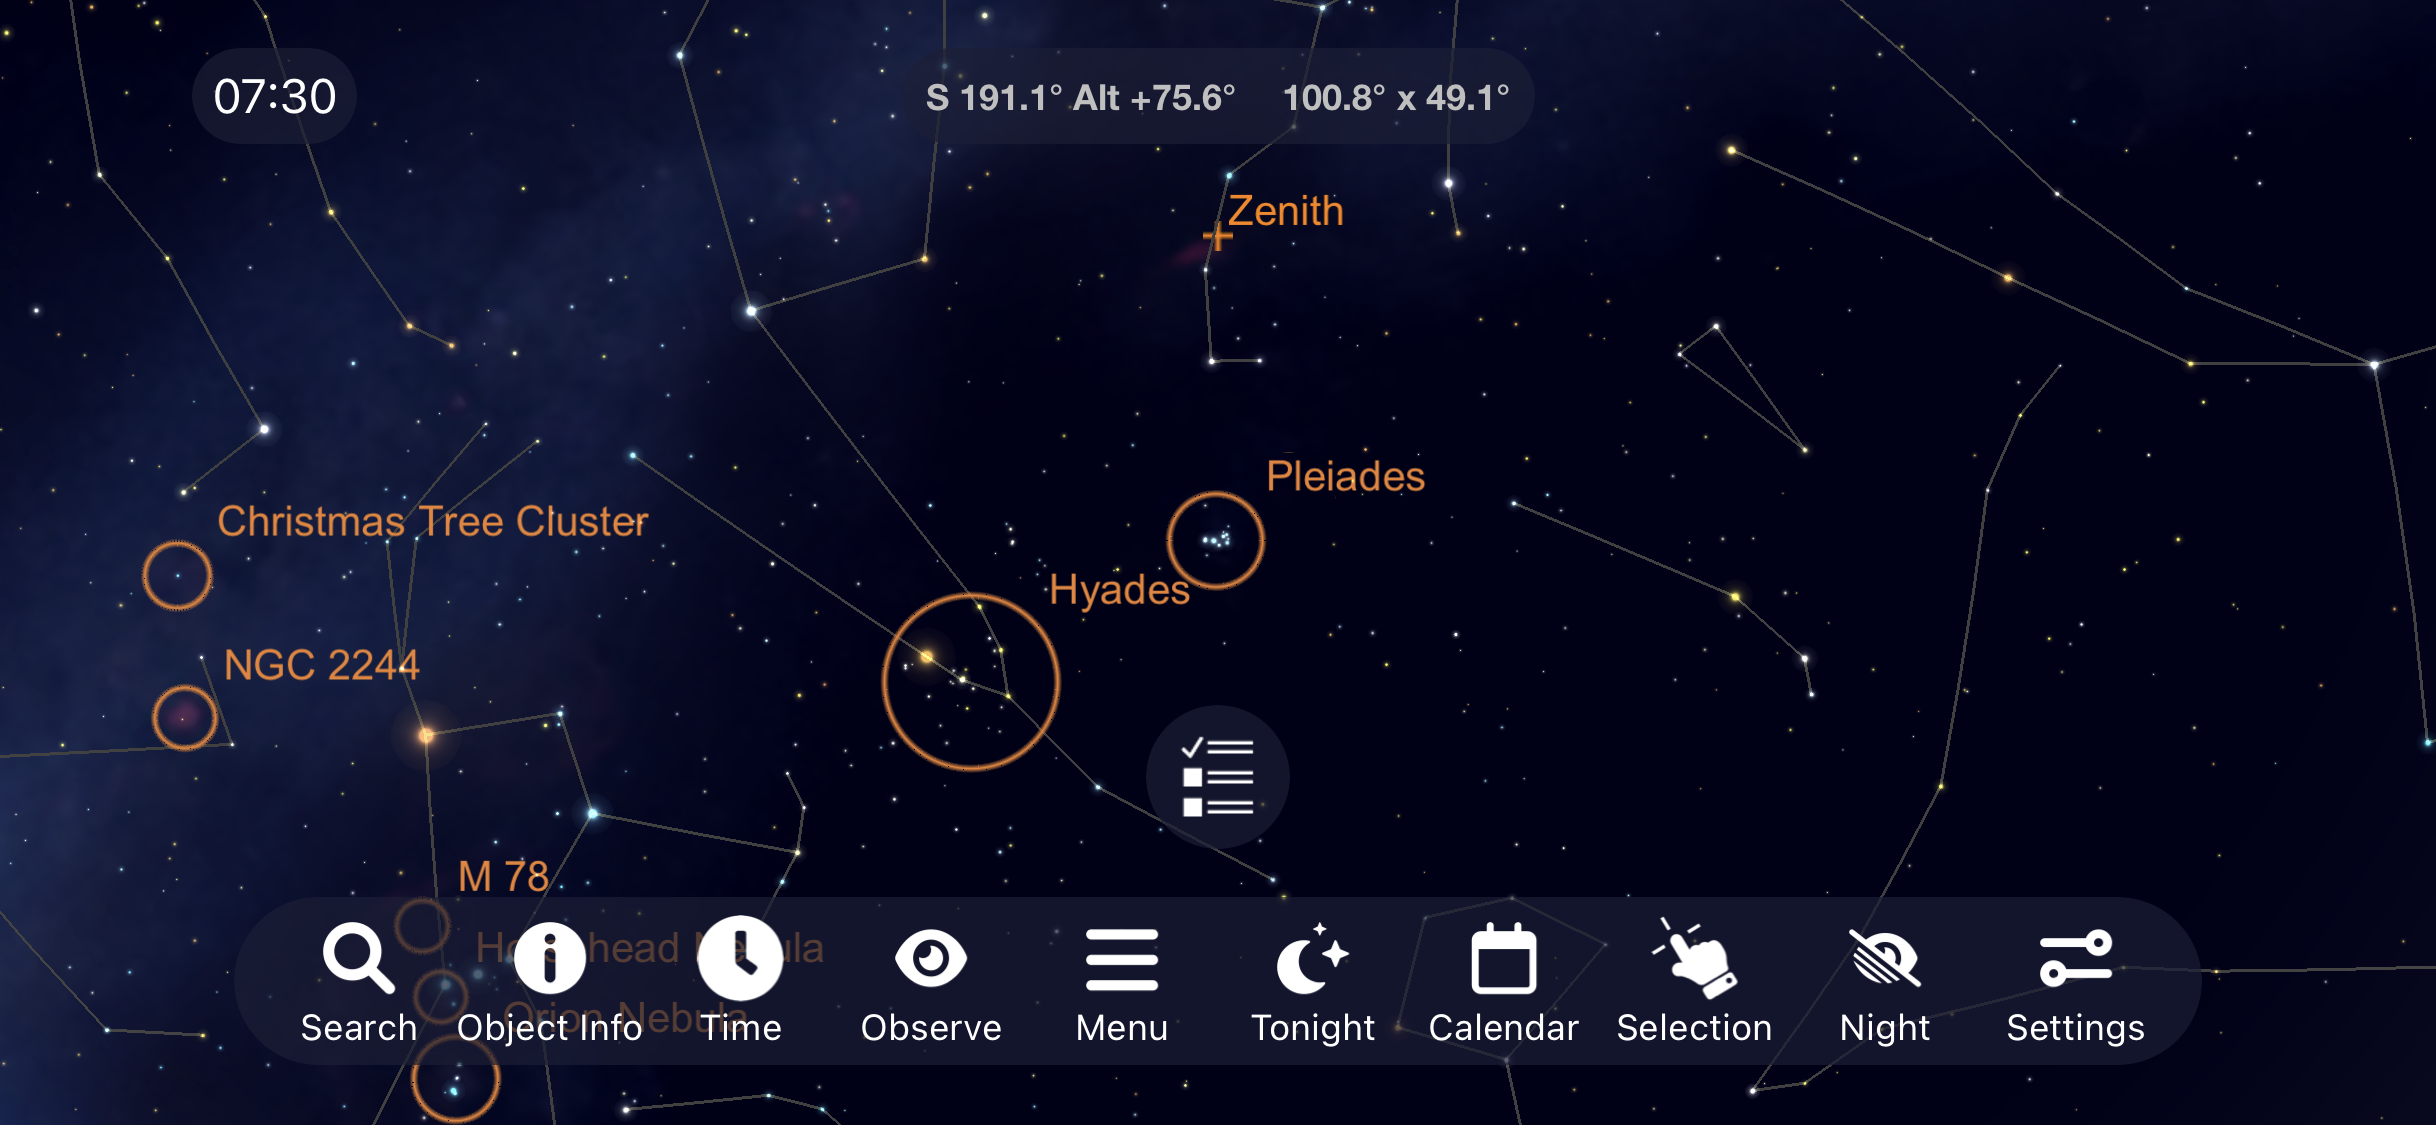
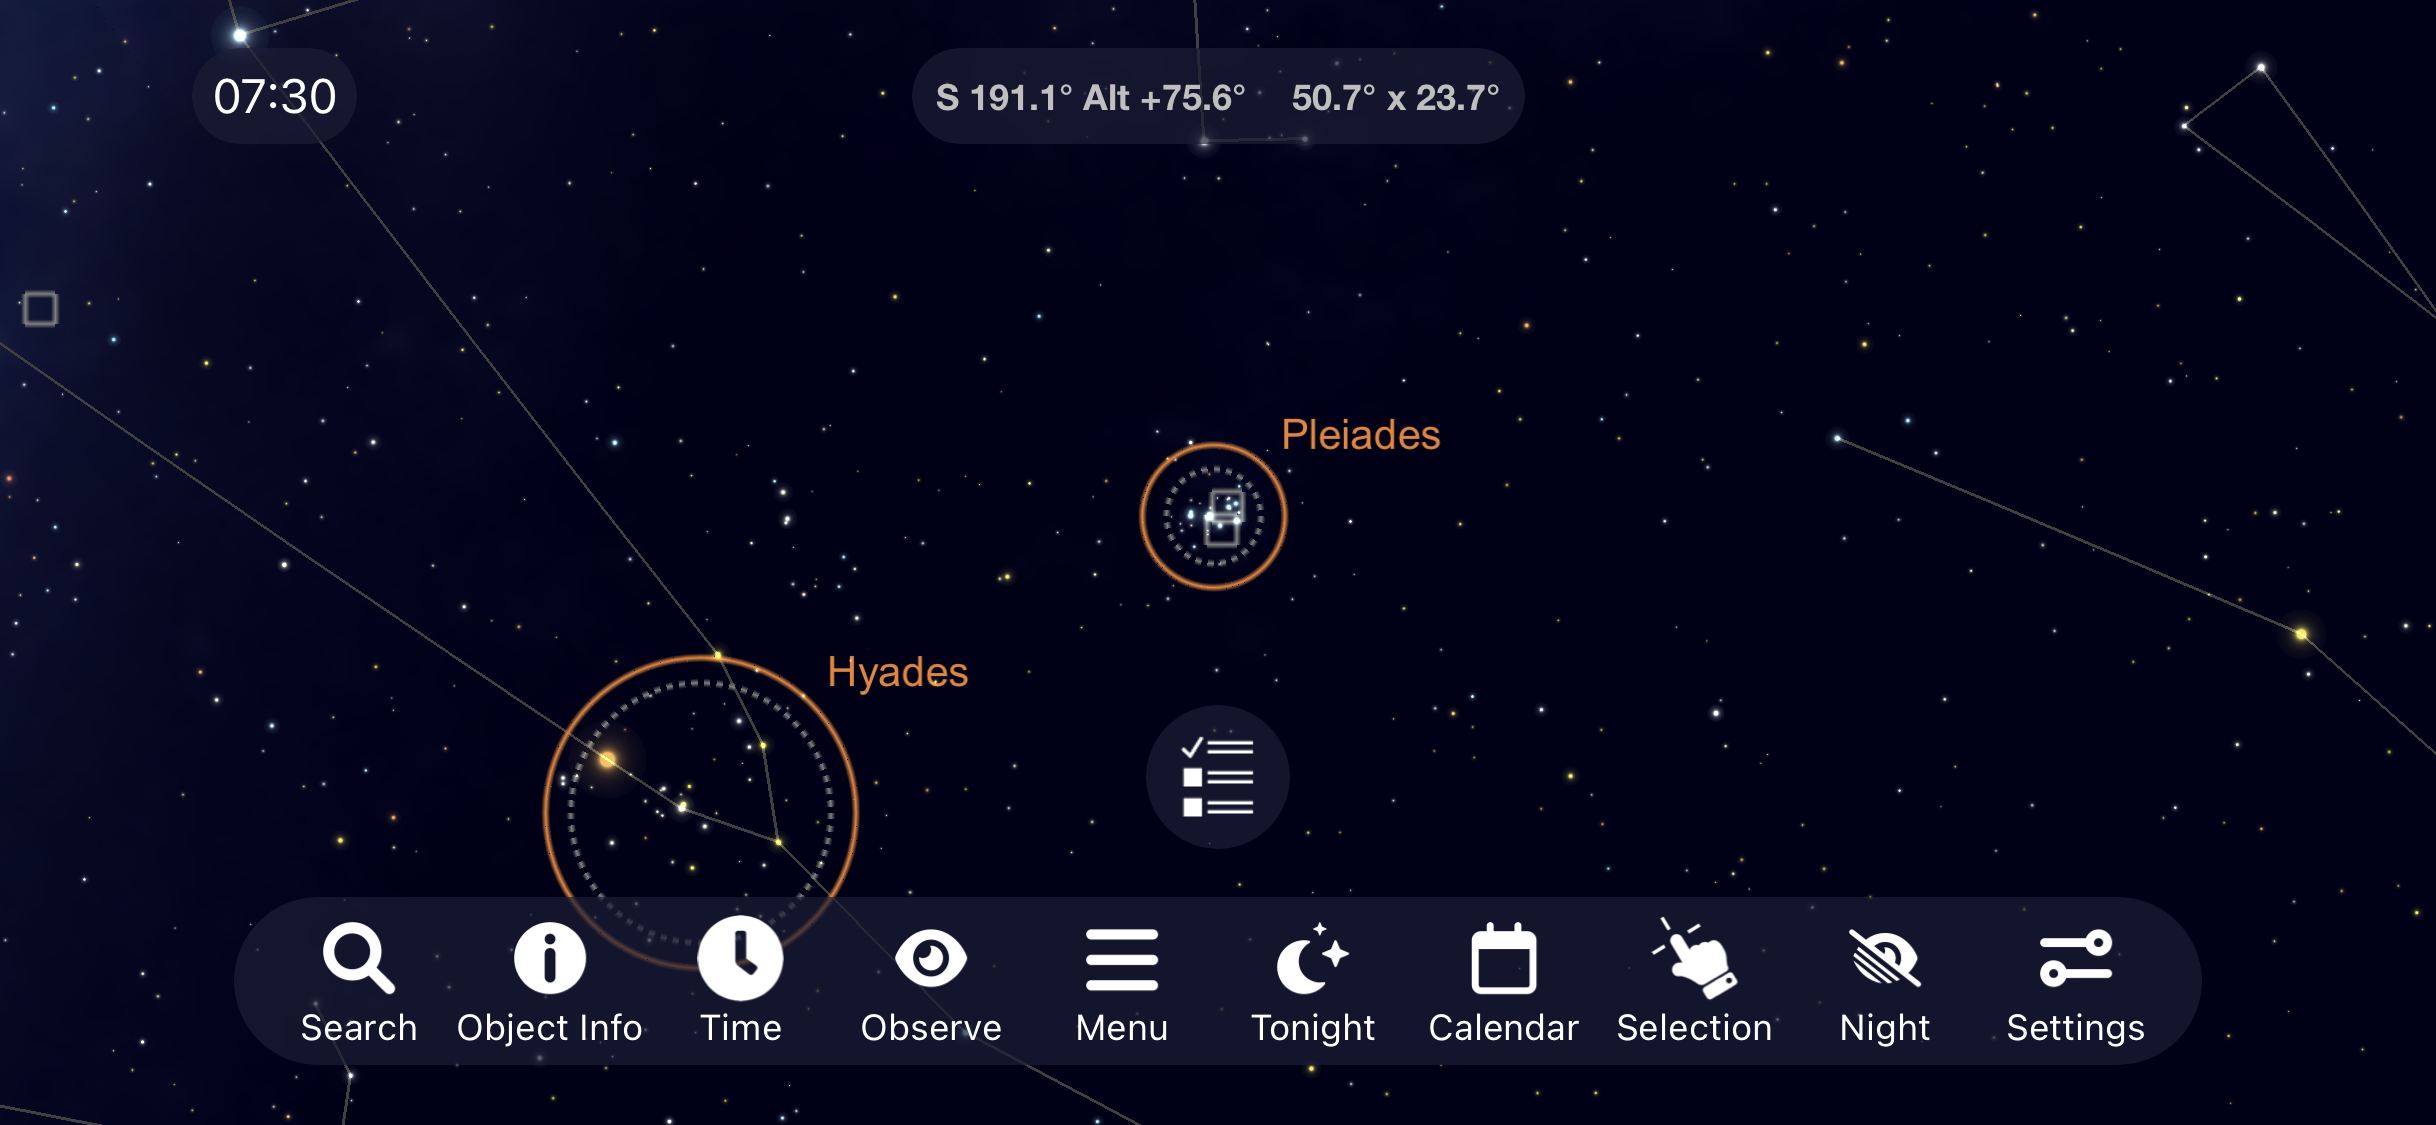
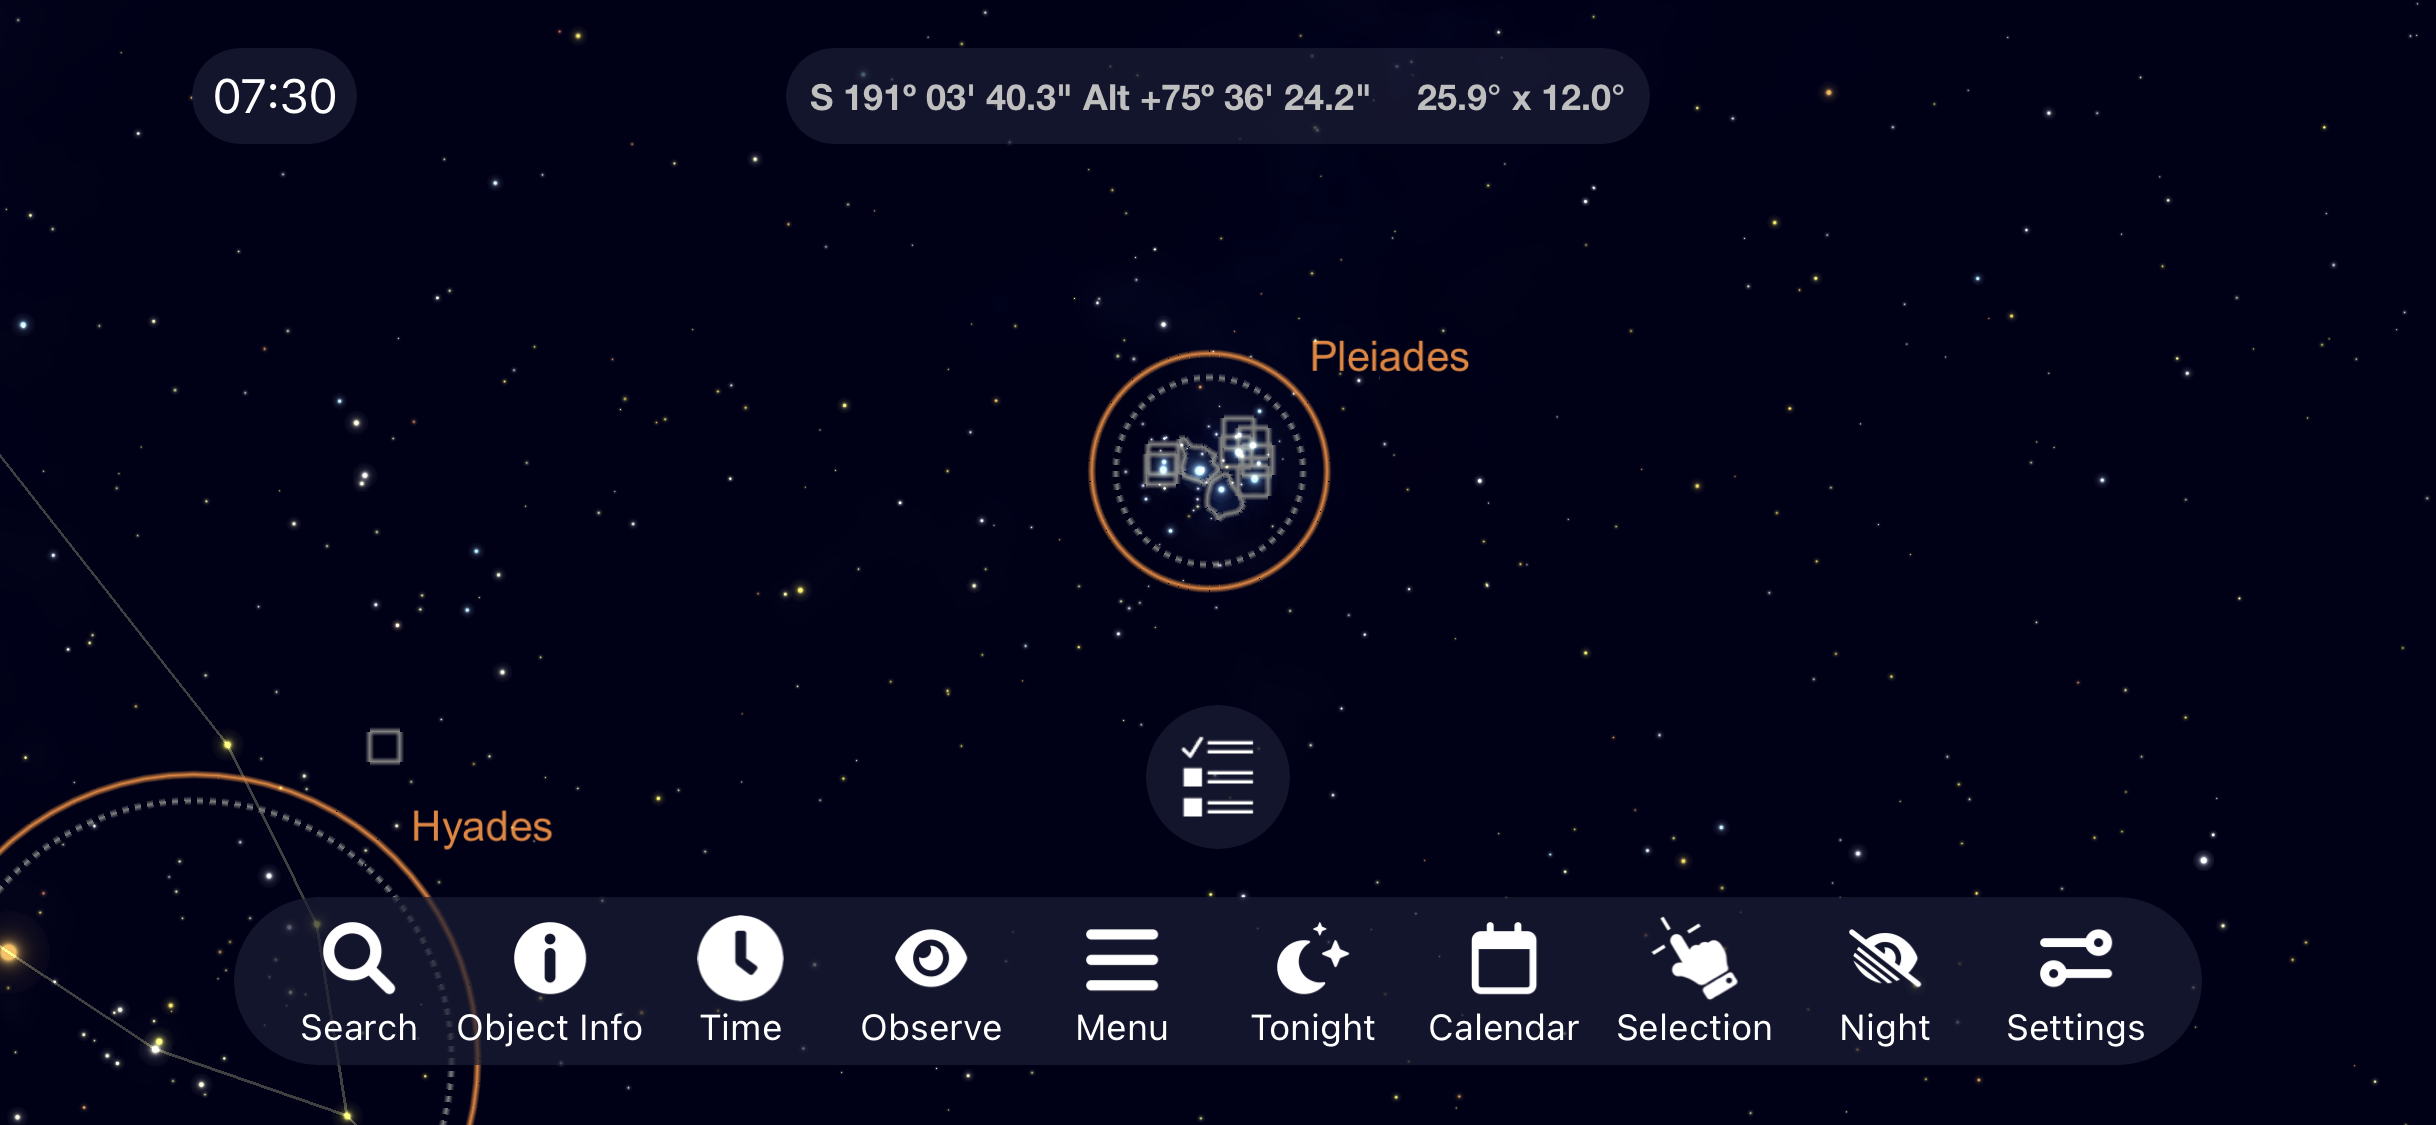
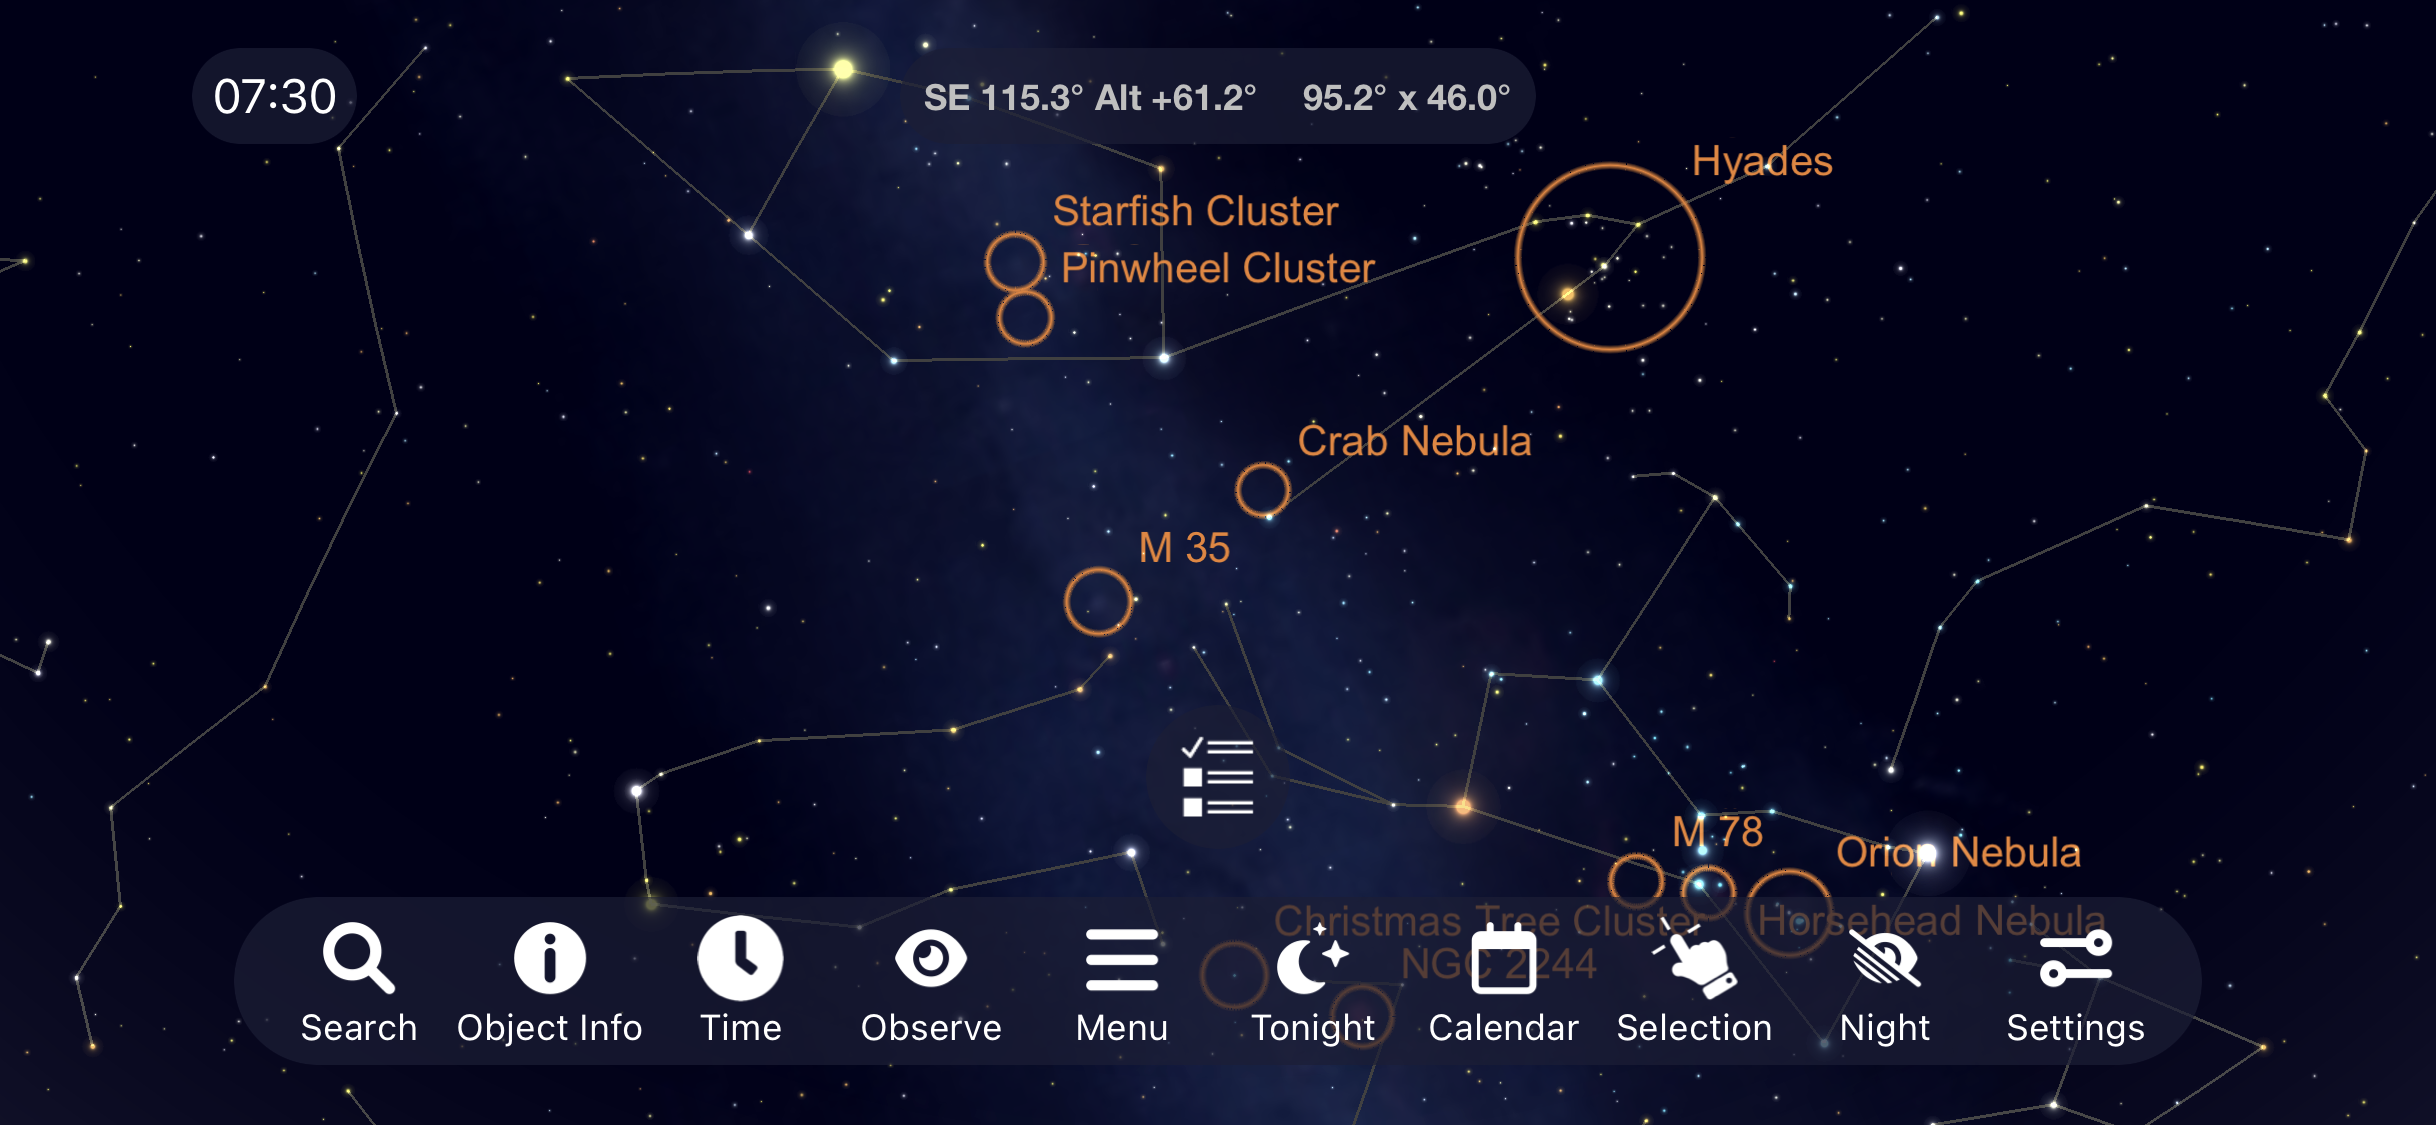
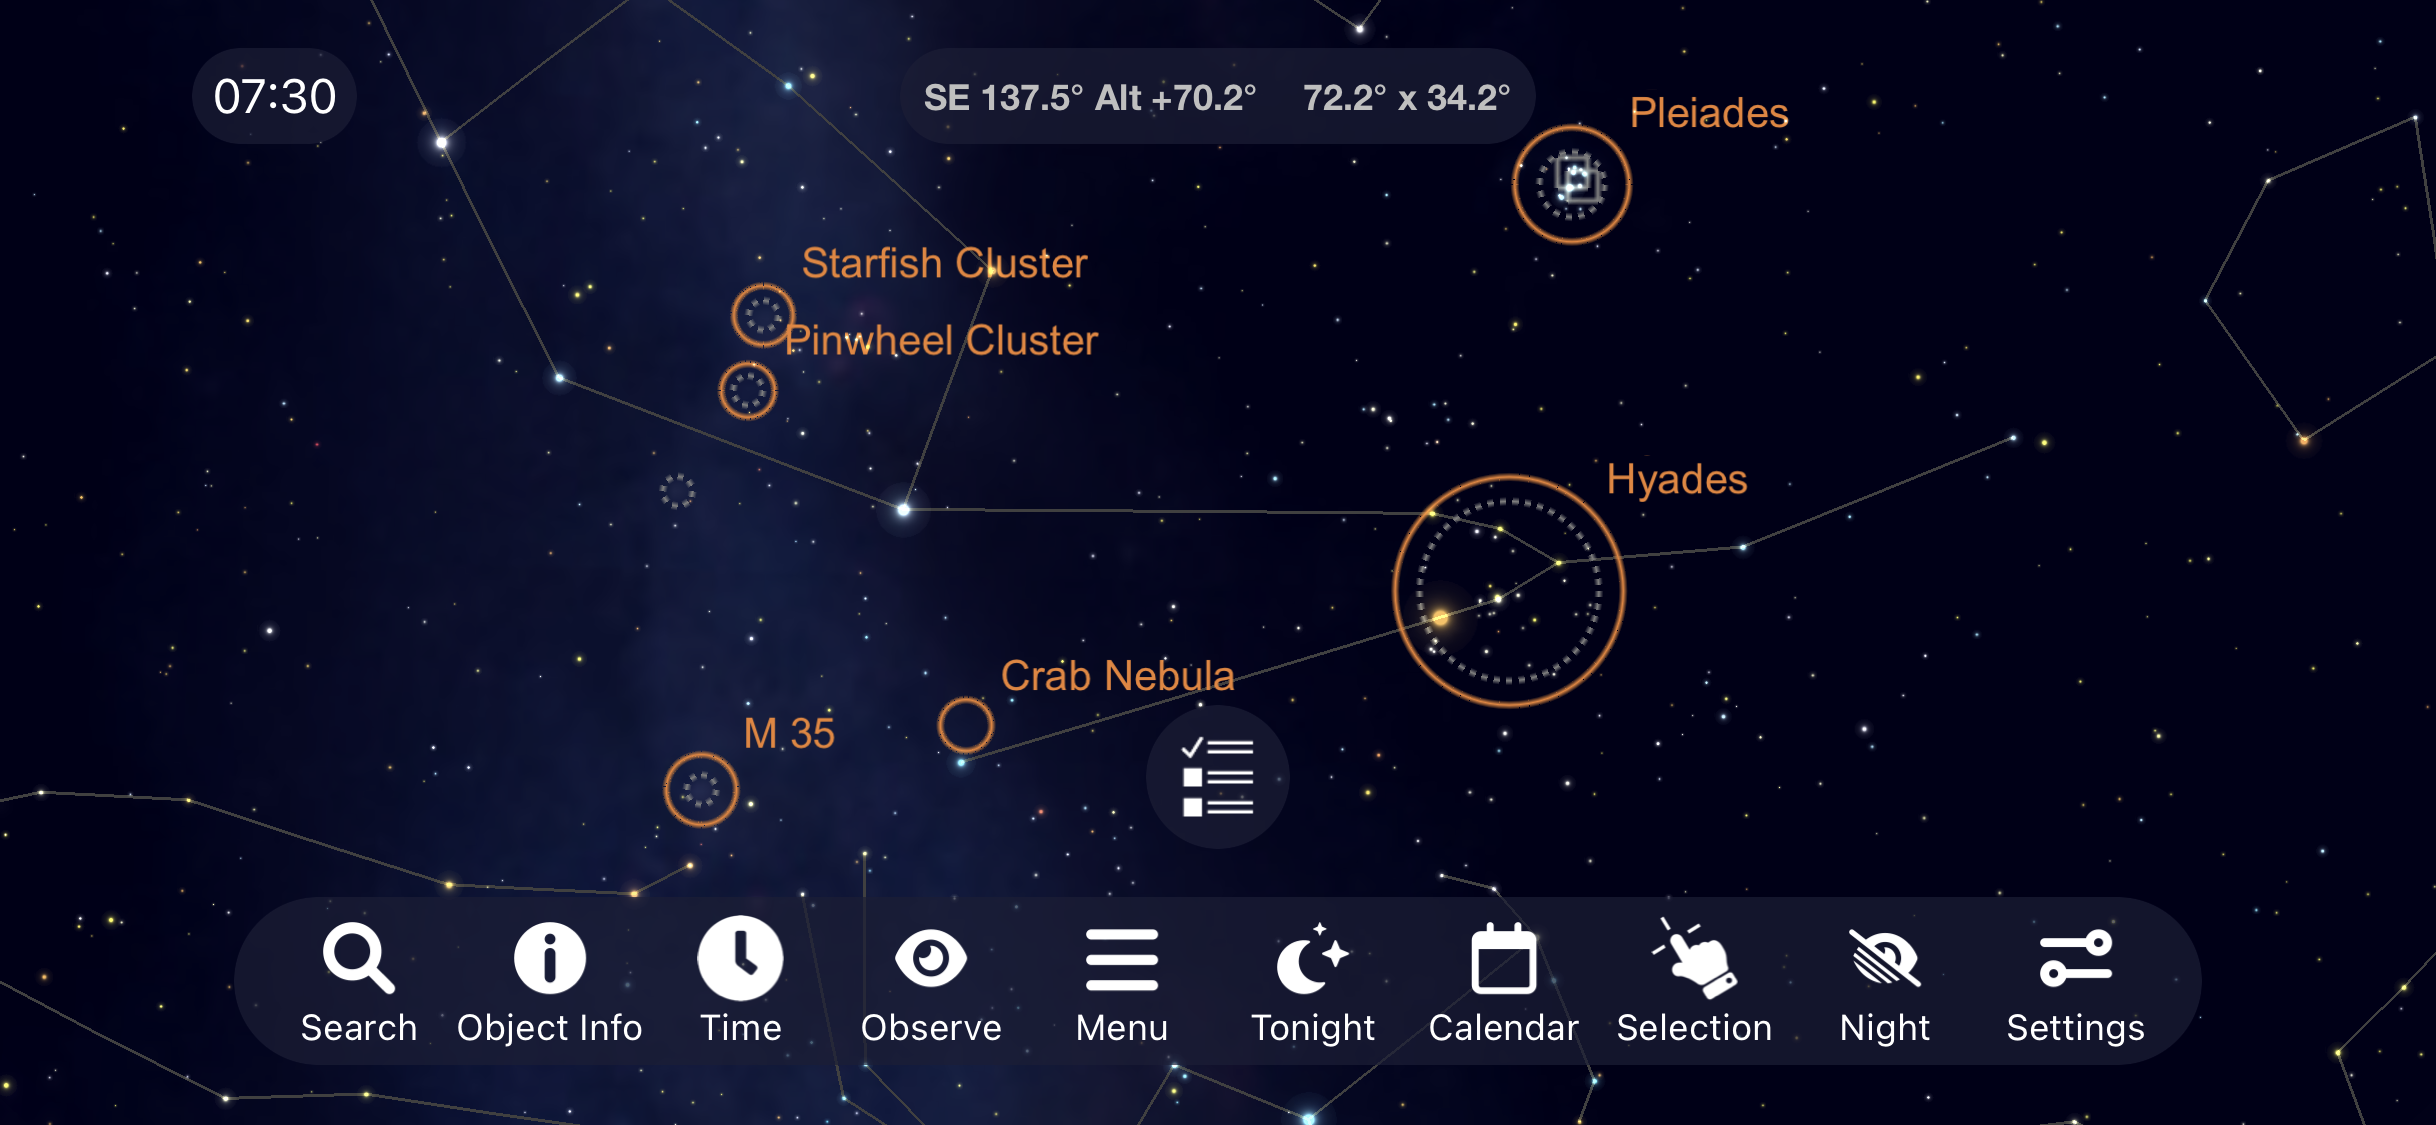
The Hyades
Just above Hyades, you will find the Pleiades. The seven sisters are another great naked eye and binocular target that will reveal more and more stars as you move your way Let’s move back to the Constellation Orion and then move up until we come to the Constellation Taurus. It’s here where you will find the open star cluster Hyades. Wider fields of view and low powered eyepiece will provide the best observing experience of this large object in the night sky.
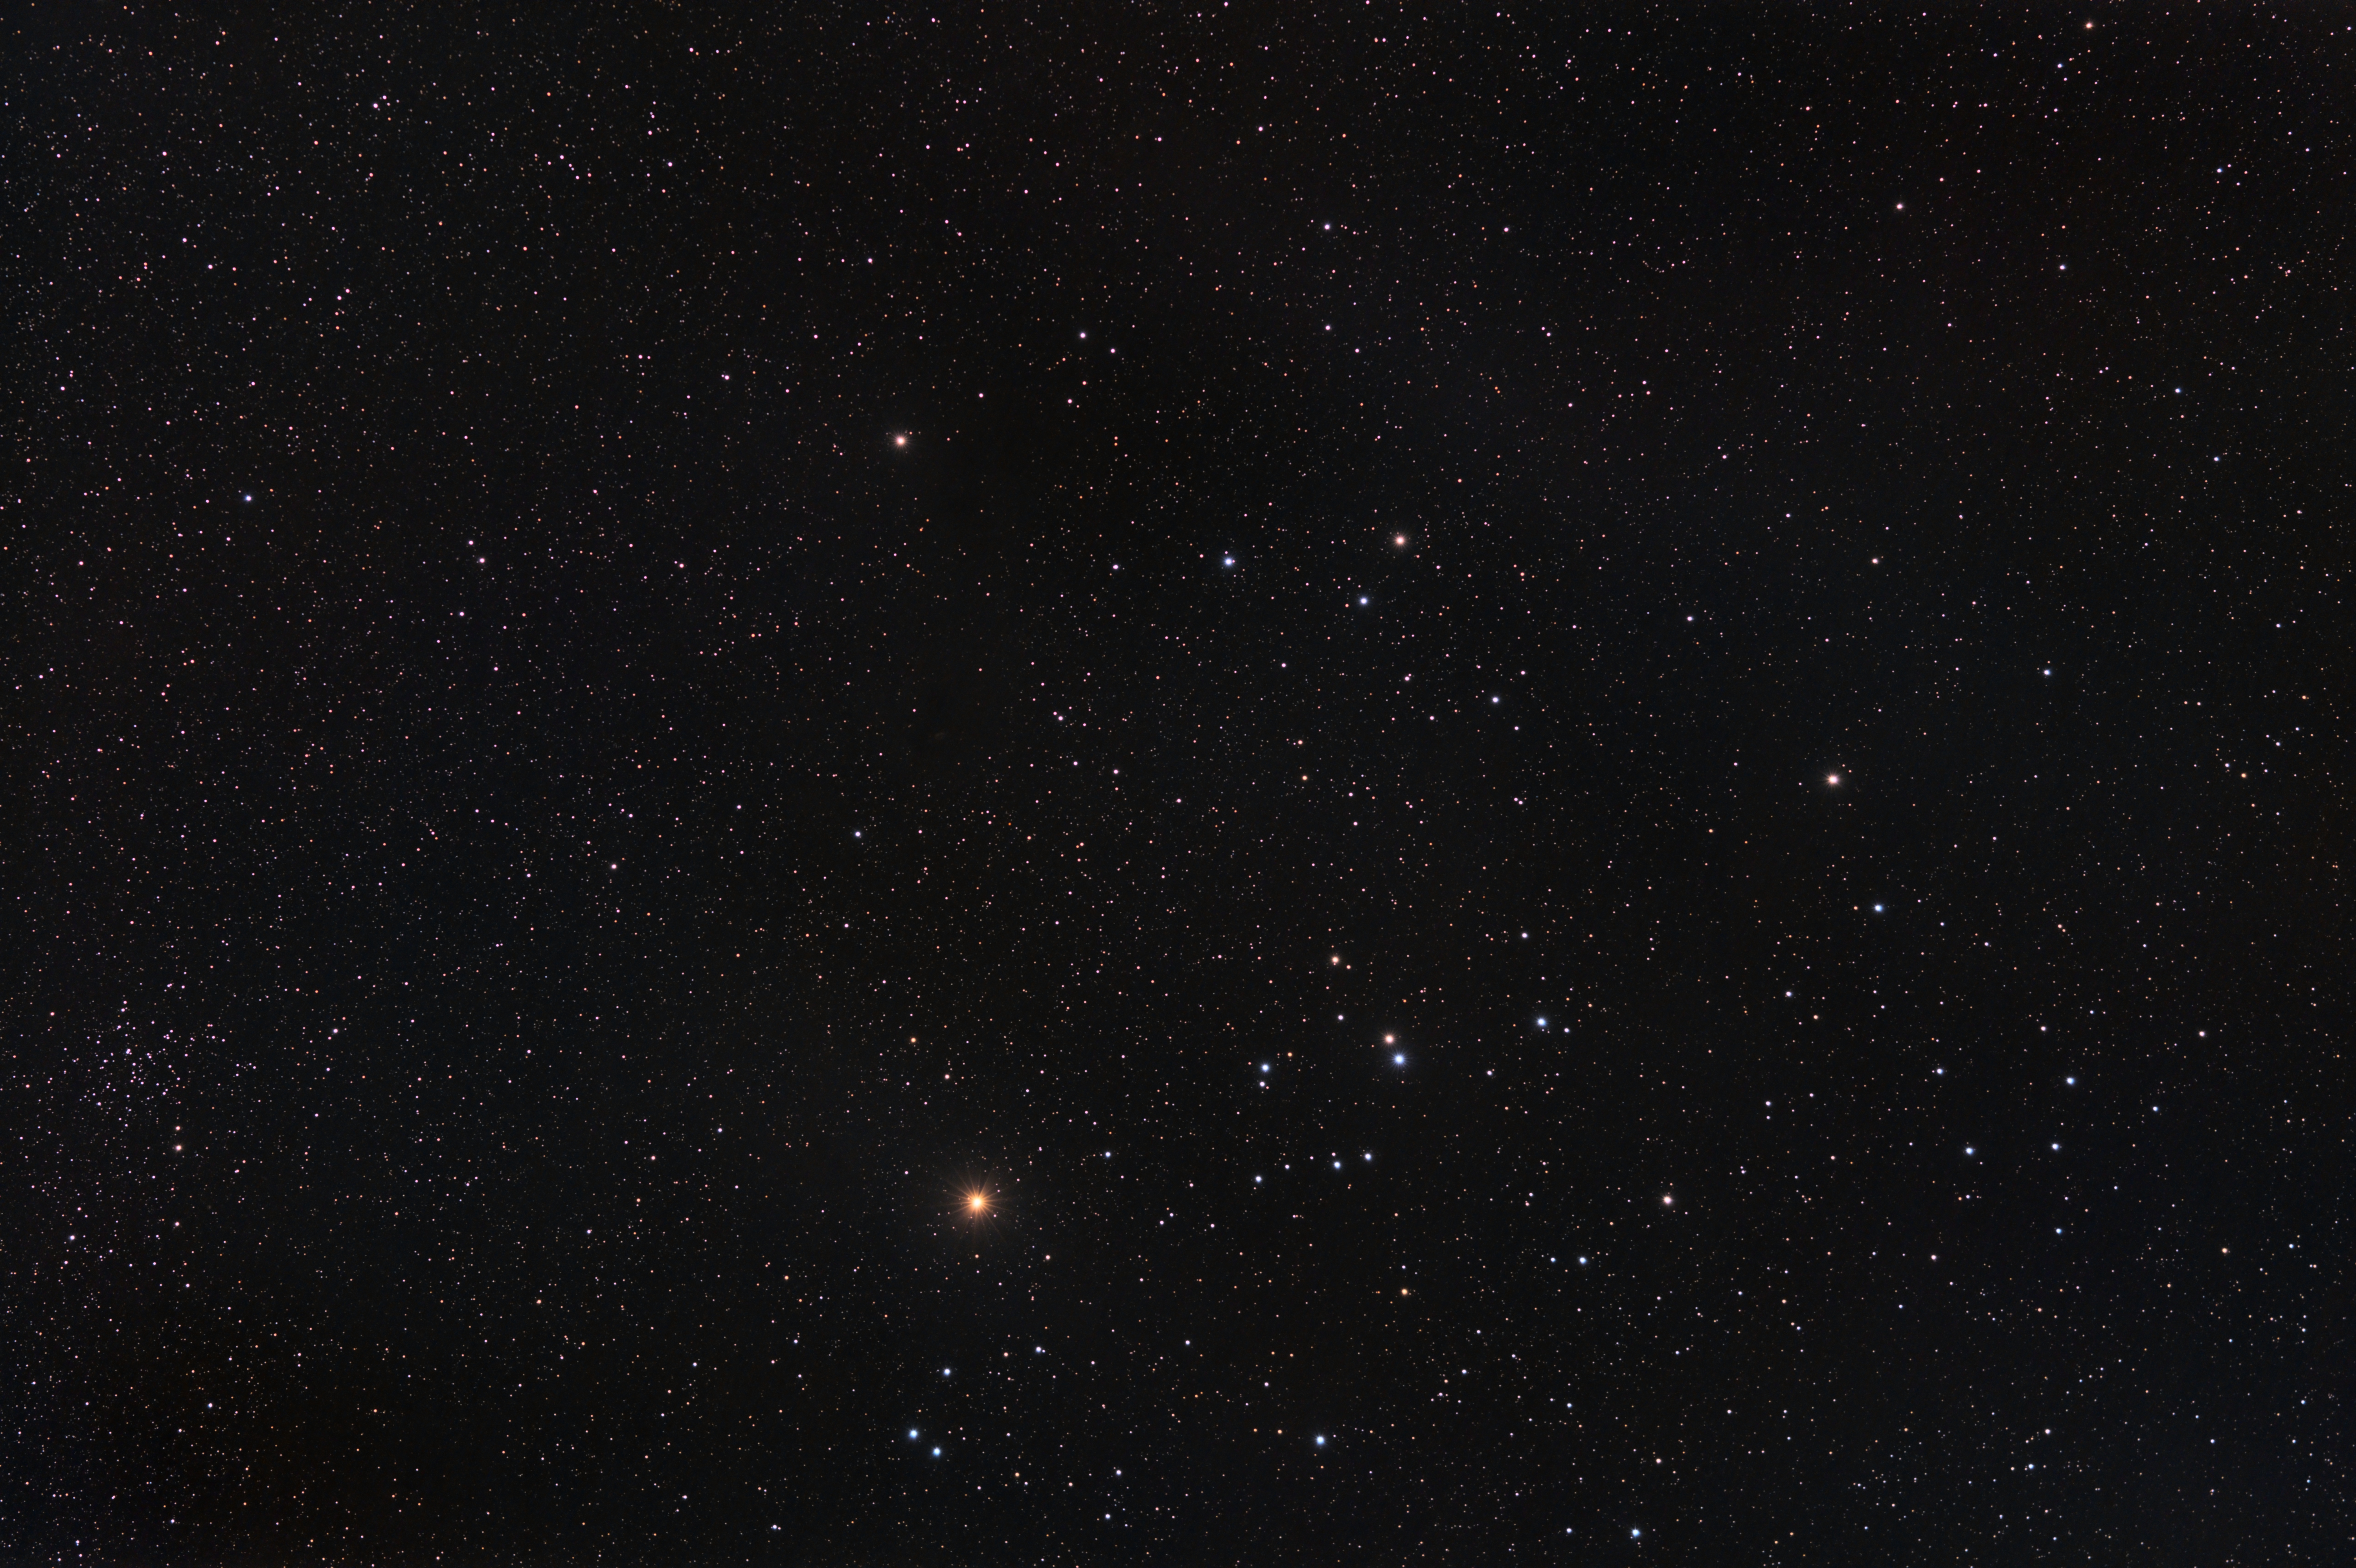
I was just able to fit the Hyades into the field of view of my 135mm lens while taking this image of it. Even without imaging equipment, the beauty and complexity of this region of space is enjoyable to see with just the naked eye and a pair of binoculars.
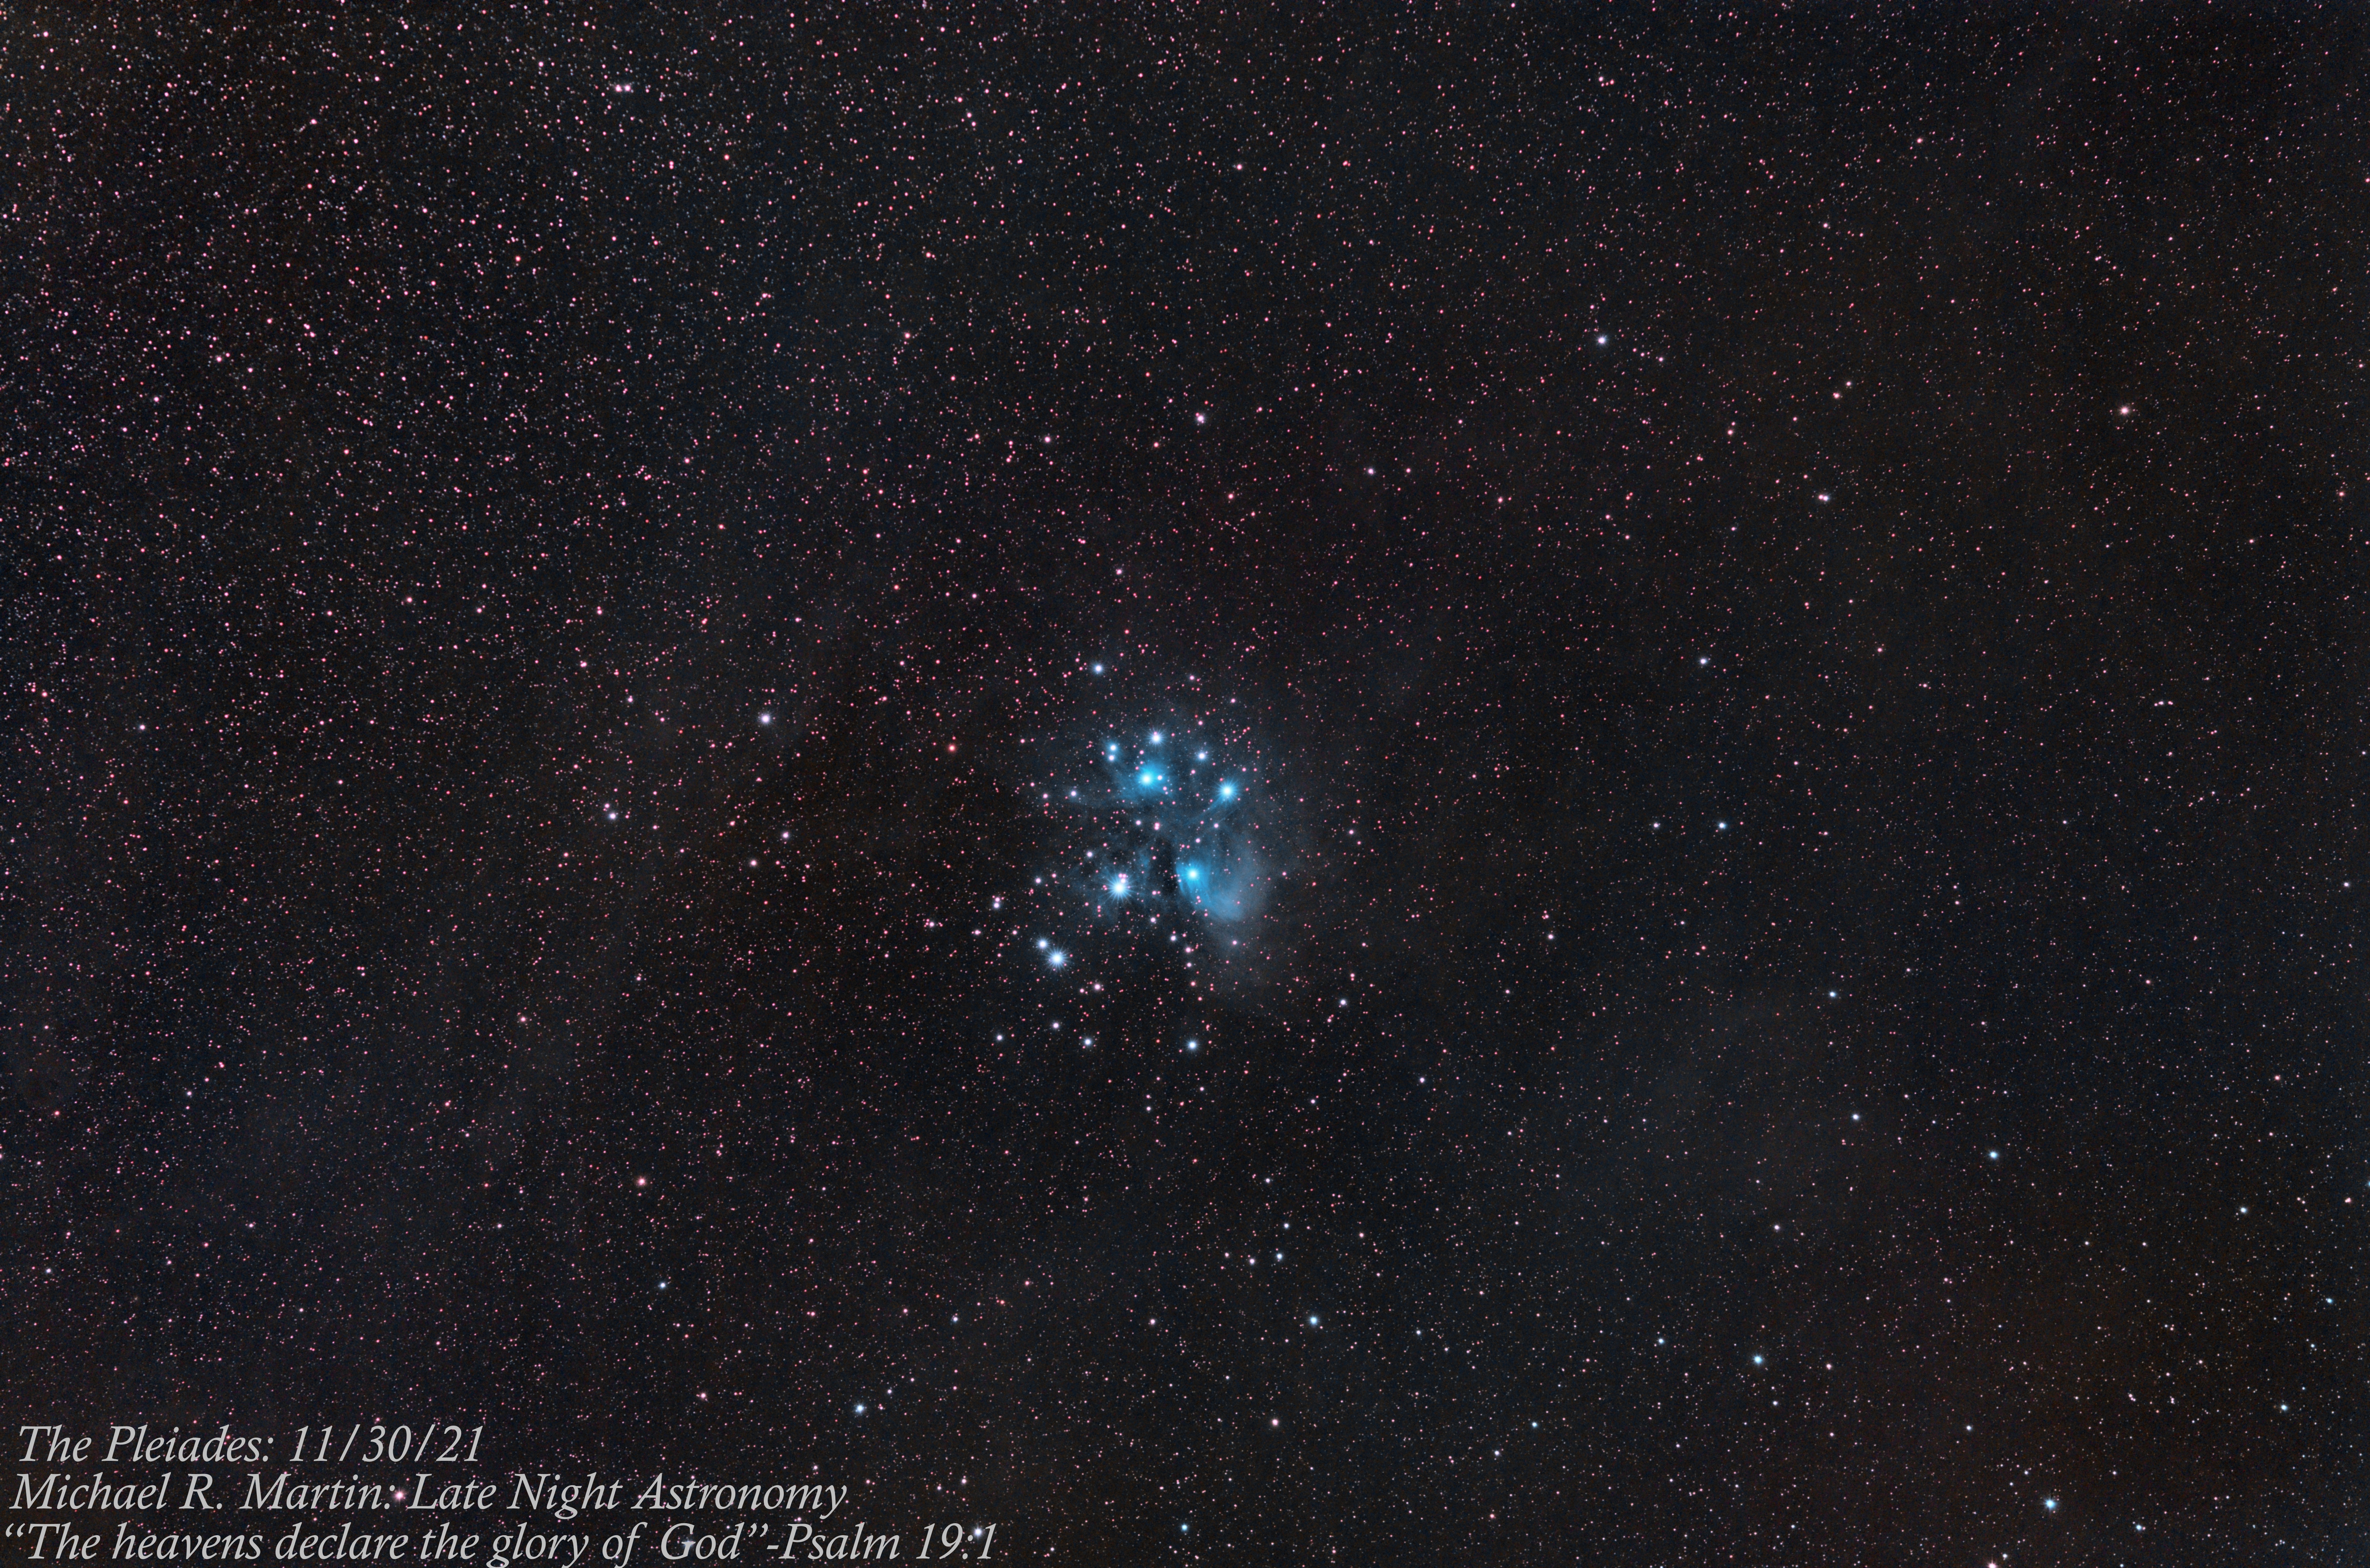
The Pleiades
Just above Hyades, you will find the Pleiades. The seven sisters are another great naked eye and binocular target that will reveal more and more stars as you move your way up to views through a telescope at low and medium magnifications.
In long exposure photography the blue nebula appears with the seven sisters. I hope to one day image the Pleiades from a dark sky location to reveal even more of the faint nebula making up this object..
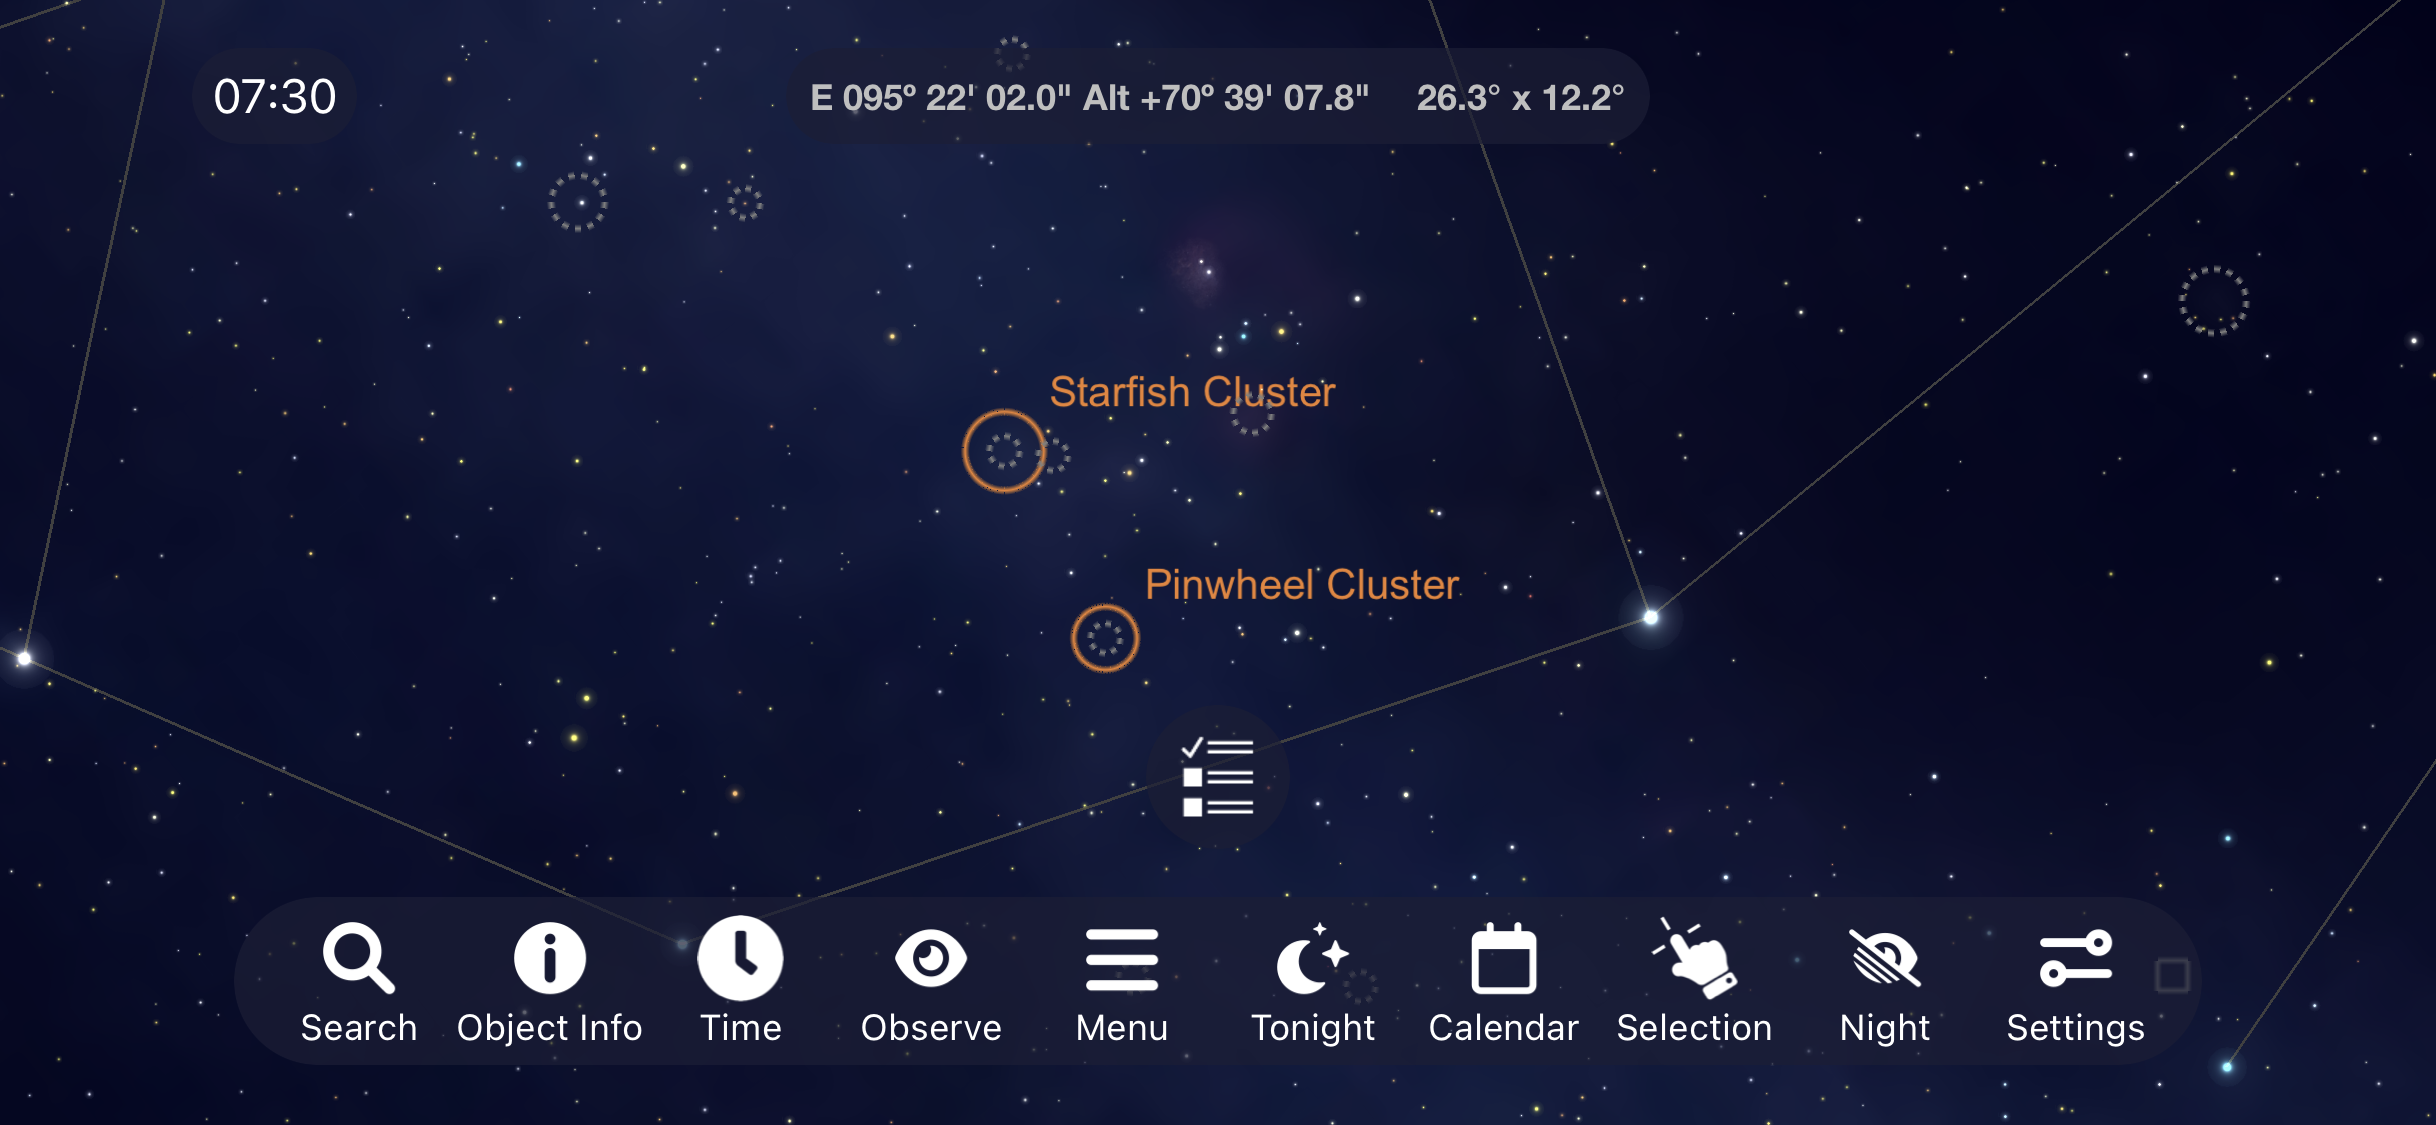
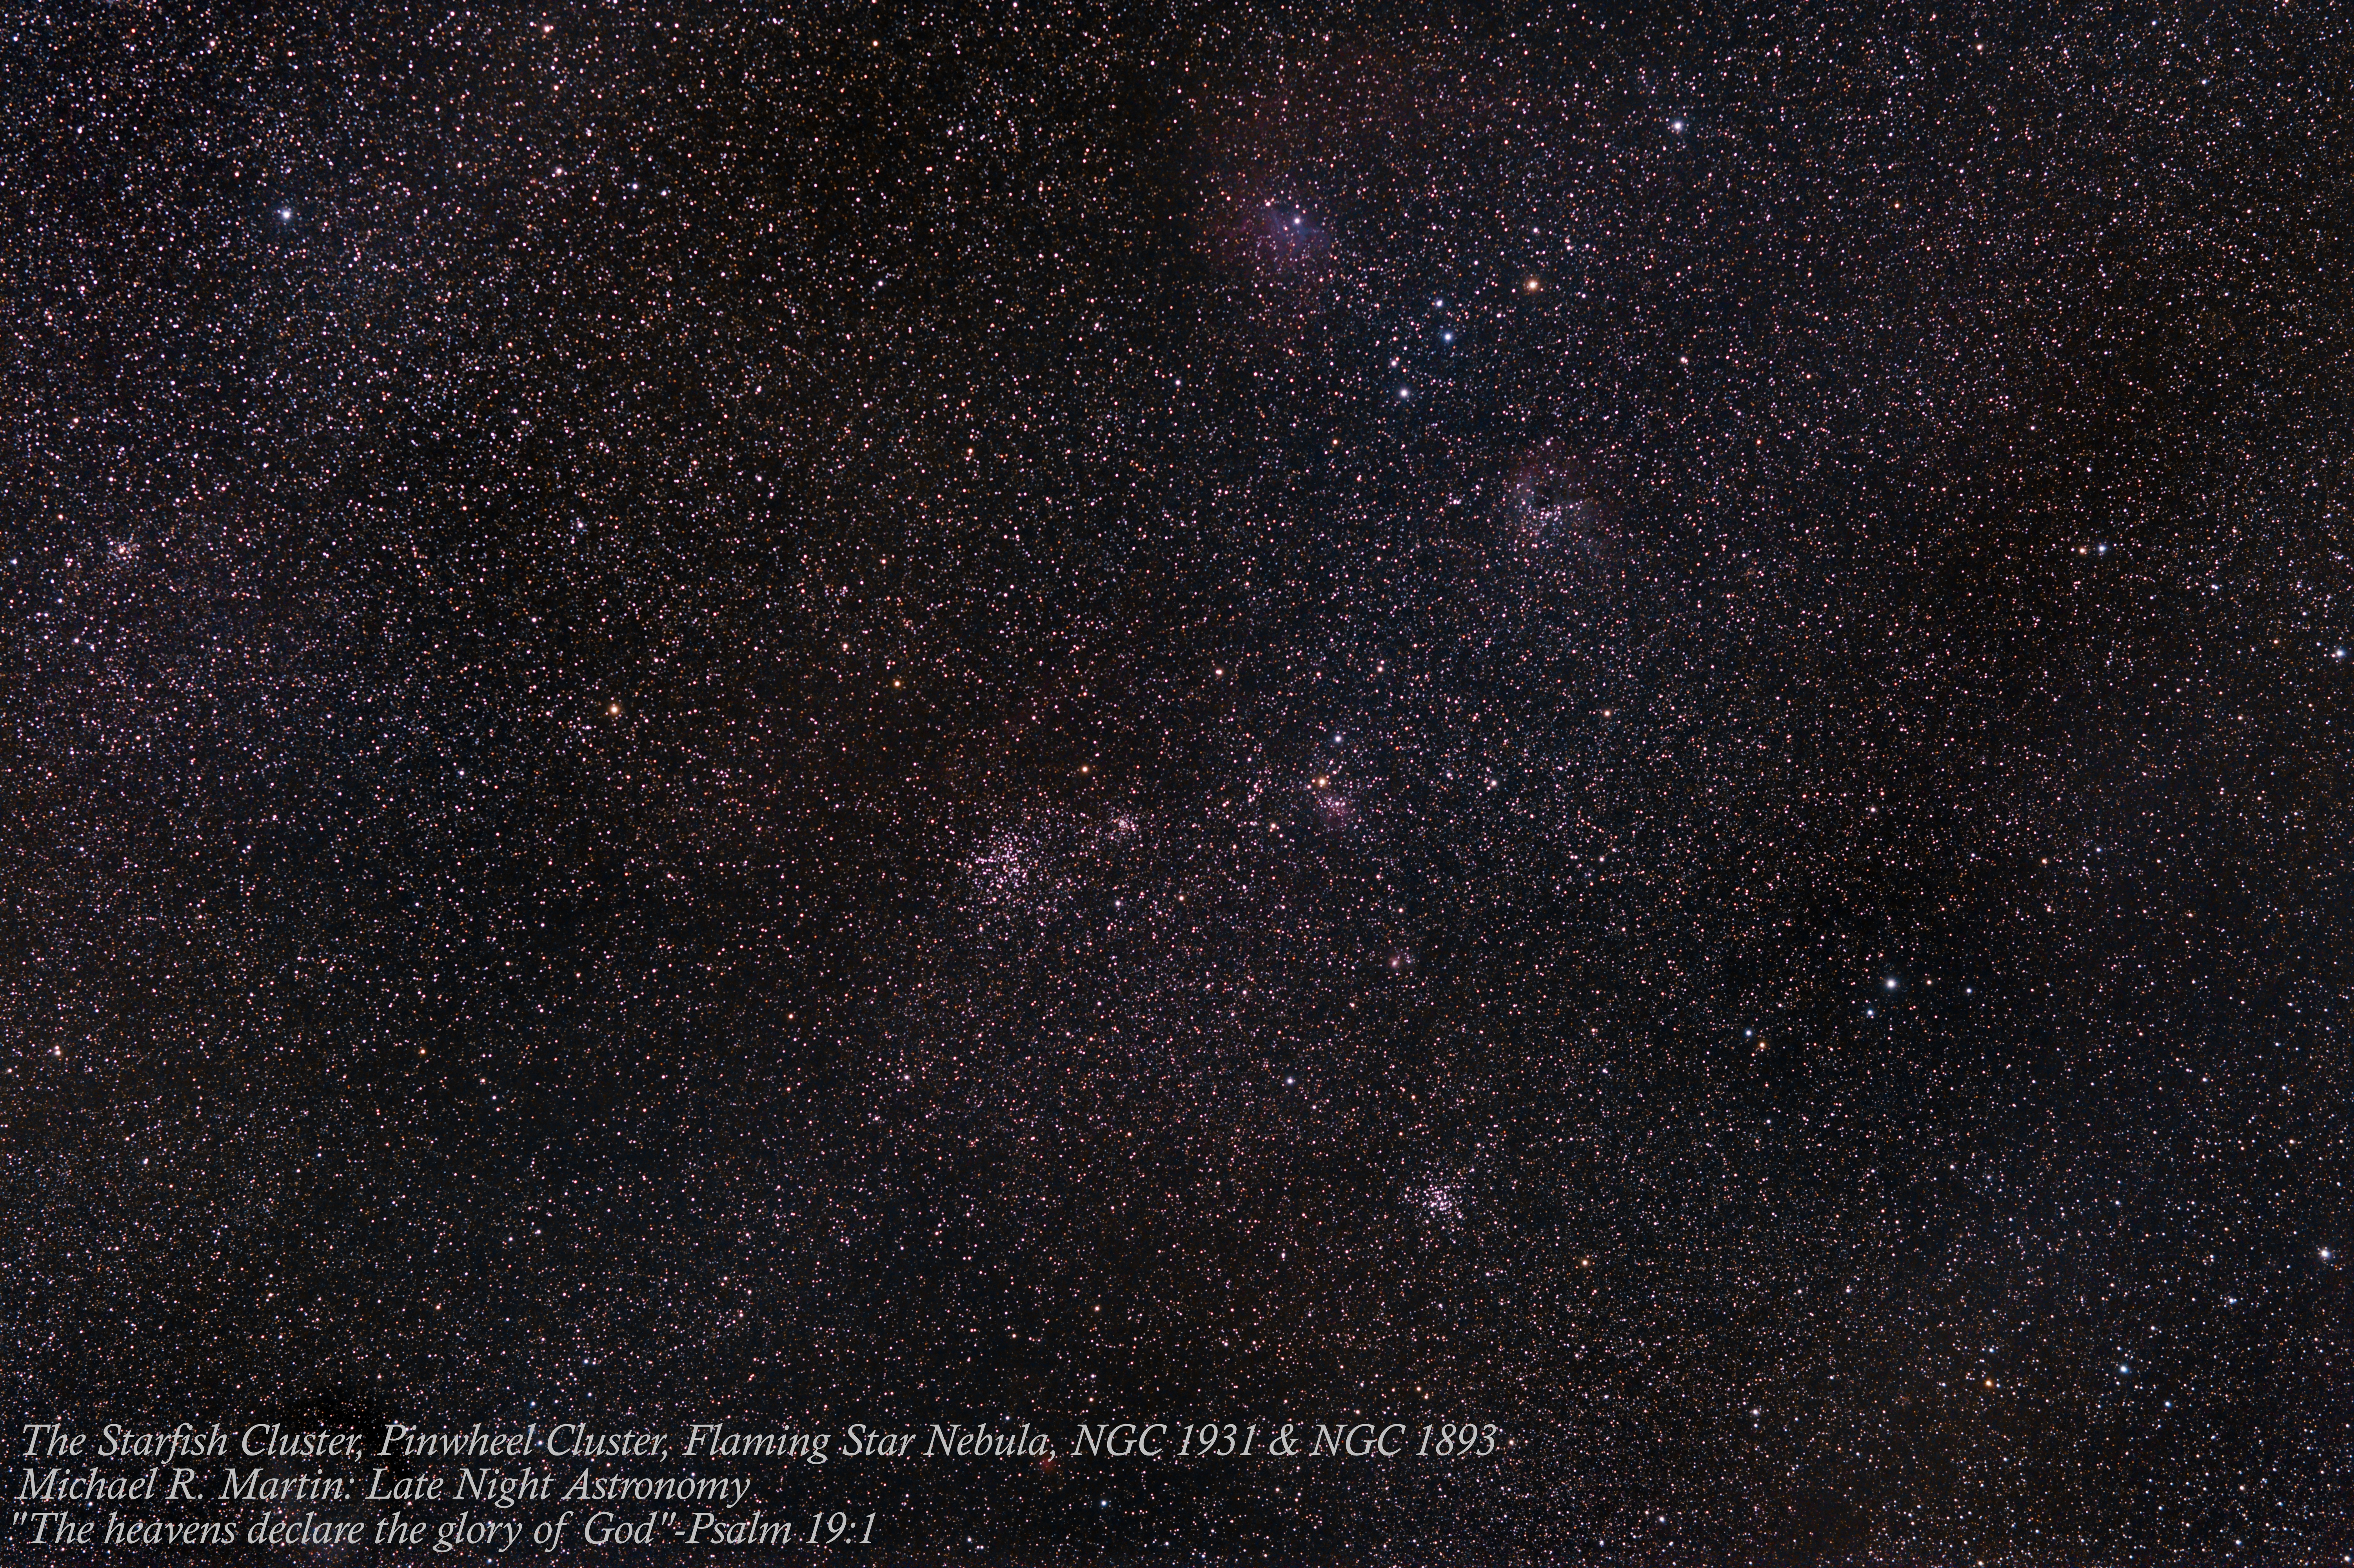
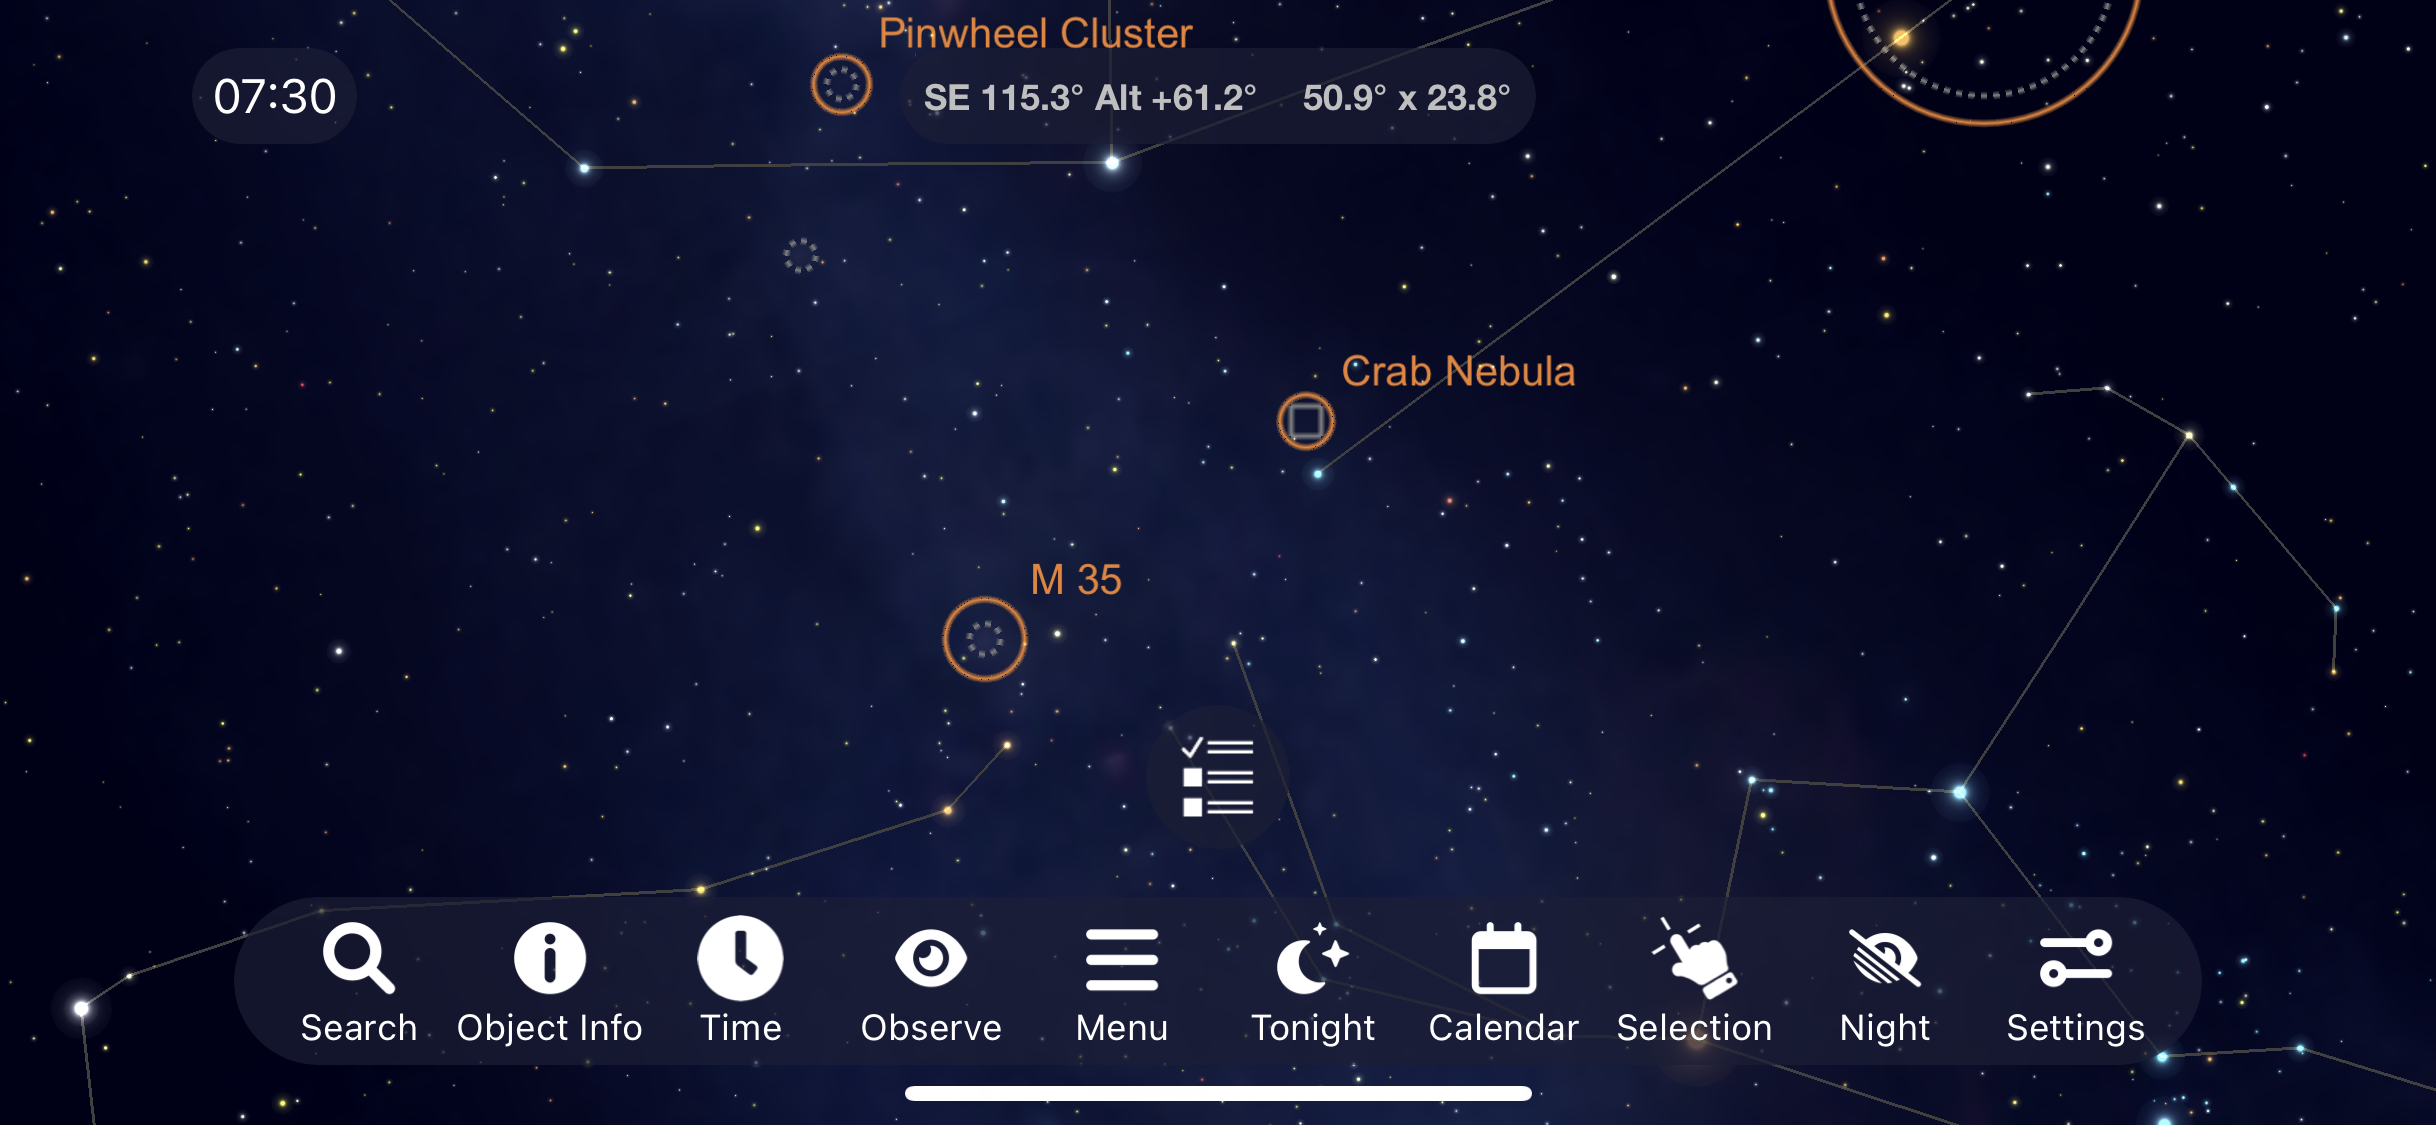
The Starfish Cluster & Pinwheel Cluster
Let’s make our way over to the Constellation Auriga. Here you will find amongst several objects the Starfish and Pinwheel clusters.
This region of space is a great view through binoculars and low magnification eyepieces in your telescope and it’s star density showed up well in astrophotography.
The Crab Nebula and a Bonus Object
In between Aurgia and Orion right at the edge of Taurus is the Crab Nebula. This object can be a difficult one to see under light polluted skies but it is worth your time to try and hunt down due to it being one of the most famous supernova remnants in the night sky. As a bonus object for the winter sky, since we’re already in this part of the sky you won’t want to miss one of the best open clusters in the Gemini Constellation, M35. This naked eye object can be enjoyed with no equipment whatsoever under a clear dark and steady sky.
Overview of the Best Winter Deep Sky Objects
Those are my top picks for the best deep sky objects to view or image in the winter sky. Let me know what you’ve been out to observe or imagine and if there is anything you’d add to this list in the comment section below! Thank you all so much for your support and clear skies from Late Night Astronomy.
Imaging the nighttime sky can be one of the most rewarding things to do in astronomy. When the light from deep sky objects that are thousands to millions of light years away hits the sensor of your imaging equipment it begins the wonderfully rewarding journey of imaging the heavens above. Today, I’m going to walk you through the techniques I use to properly image these objects and explain how to take Light, Dark, Flat and Bias Frames that can later be stacked and processed to bring out incredible details. To show each step of this process, we will be imaging one the best targets in the night sky, the Orion Nebula. If you have an interest in astronomy and astrophotography please subscribe and let me know about your questions and any techniques that you use to capture these images in the comment section below. Let’s begin with the most critical part that everything else depends upon, capturing the best light frames we can of our deep sky object.
How to Take Light Frames
Canon SL2, Samyang 135mm Lens, iOptron SkyGuider Pro
Light frames are the most important part of this entire process because they are the images of the actual object you are capturing. Nothing after this step matters unless you have solid usable data of the object you are imaging in the night sky. The more light frames you can capture the better your signal to noise ratio will be for your target once we stack these frames together using a program like DeepSkyStacker. For example, if I take 60 one minute exposures and stack them together to one hour of data it can nearly achieve the same signal to noise ratio as one long one-hour exposure would once we’re done with the whole process. This will lead to finer details showing up in the final image during post processing. A good resource that goes into incredible depth on these topics is “The Deep-Sky Imaging Primer” by Charles Bracken. I read this book a few years ago and it greatly improved my understanding of astrophotography and I’ll be sure to leave a link to it in the description below. I capture my light frames using a DSLR, Samyang 135mm lens and the iOptron SkyGuider Pro Tracking Mount. There are three main things we want to do to help us capture excellent light frames and those are making sure our camera is set to RAW, achieving sharp focus and choosing the proper exposure length. Without sharp, properly exposed light frames shot in RAW Quality with its incredible amounts of data there really is no use for what comes next in the process.
If you are interested in more info on DSLR Settings for Light Frames
To capture our light frames, let’s start by setting our camera to Manual Mode and RAW Quality. Next, let’s work on getting sharp focus for our light frames by focusing our equipment on the brightest star we can find. One thing that can help you with this is a Bahtinov Mask. After placing it over your camera lens, slowly adjust focus until the center spike is perfectly between the other two spikes. Now that we’ve set our camera to RAW and have adjusted focus, let’s turn our attention to getting a proper exposure of our target, for me tonight, that’s the beautiful Orion Nebula. For the DSLR I’m shooting with, I’ve set the ISO to 400 and my Samyang 135mm lens has its F-Number set to F/2.8. Now, we need to test out different exposure lengths to see which one will work best for our target. Let’s test out different exposures for our light frames by taking 15 second, 30 second, 45 second and 1 minute exposures. To determine what exposure works best, I’m going to press the info button to see the difference in the histogram for each image.
The histogram is your friend in astrohphotography!
The trick is to get a histogram that is about 3/4 of the way over to the left. Too far to left and you don’t have enough difference between your object and the background of space, too far to the right and you may lose some of the brightest details of your object from the data getting clipped off. Tonight, it looks like the best exposure for me will be somewhere around 20 seconds. This again will vary greatly depending upon what object you are imaging, the light pollution of your area and the capability of your tracking mount. Now that our camera is set to RAW, we’ve achieved sharp focus and determined the best exposure length it’s time to actually shooting our light frames. Remember, these are the most important part of the imaging process, the more light frames you capture and the higher their quality the better your signal to noise ratio will be thus revealing more detail in your final stacked and processed image. To assist you in capturing your light frames, use something like a remote shutter release trigger to set how many exposures you want and how long you want them to be. My goal tonight is to capture at least 200 separate 20 second light frames of the Orion Nebula before it lowers into the light pollution dome of a nearby city. Once I’ve double checked that the first few light frames are sharp and properly exposed, I head inside for about an hour until it has finished capturing them.
In Summary: Light Frames
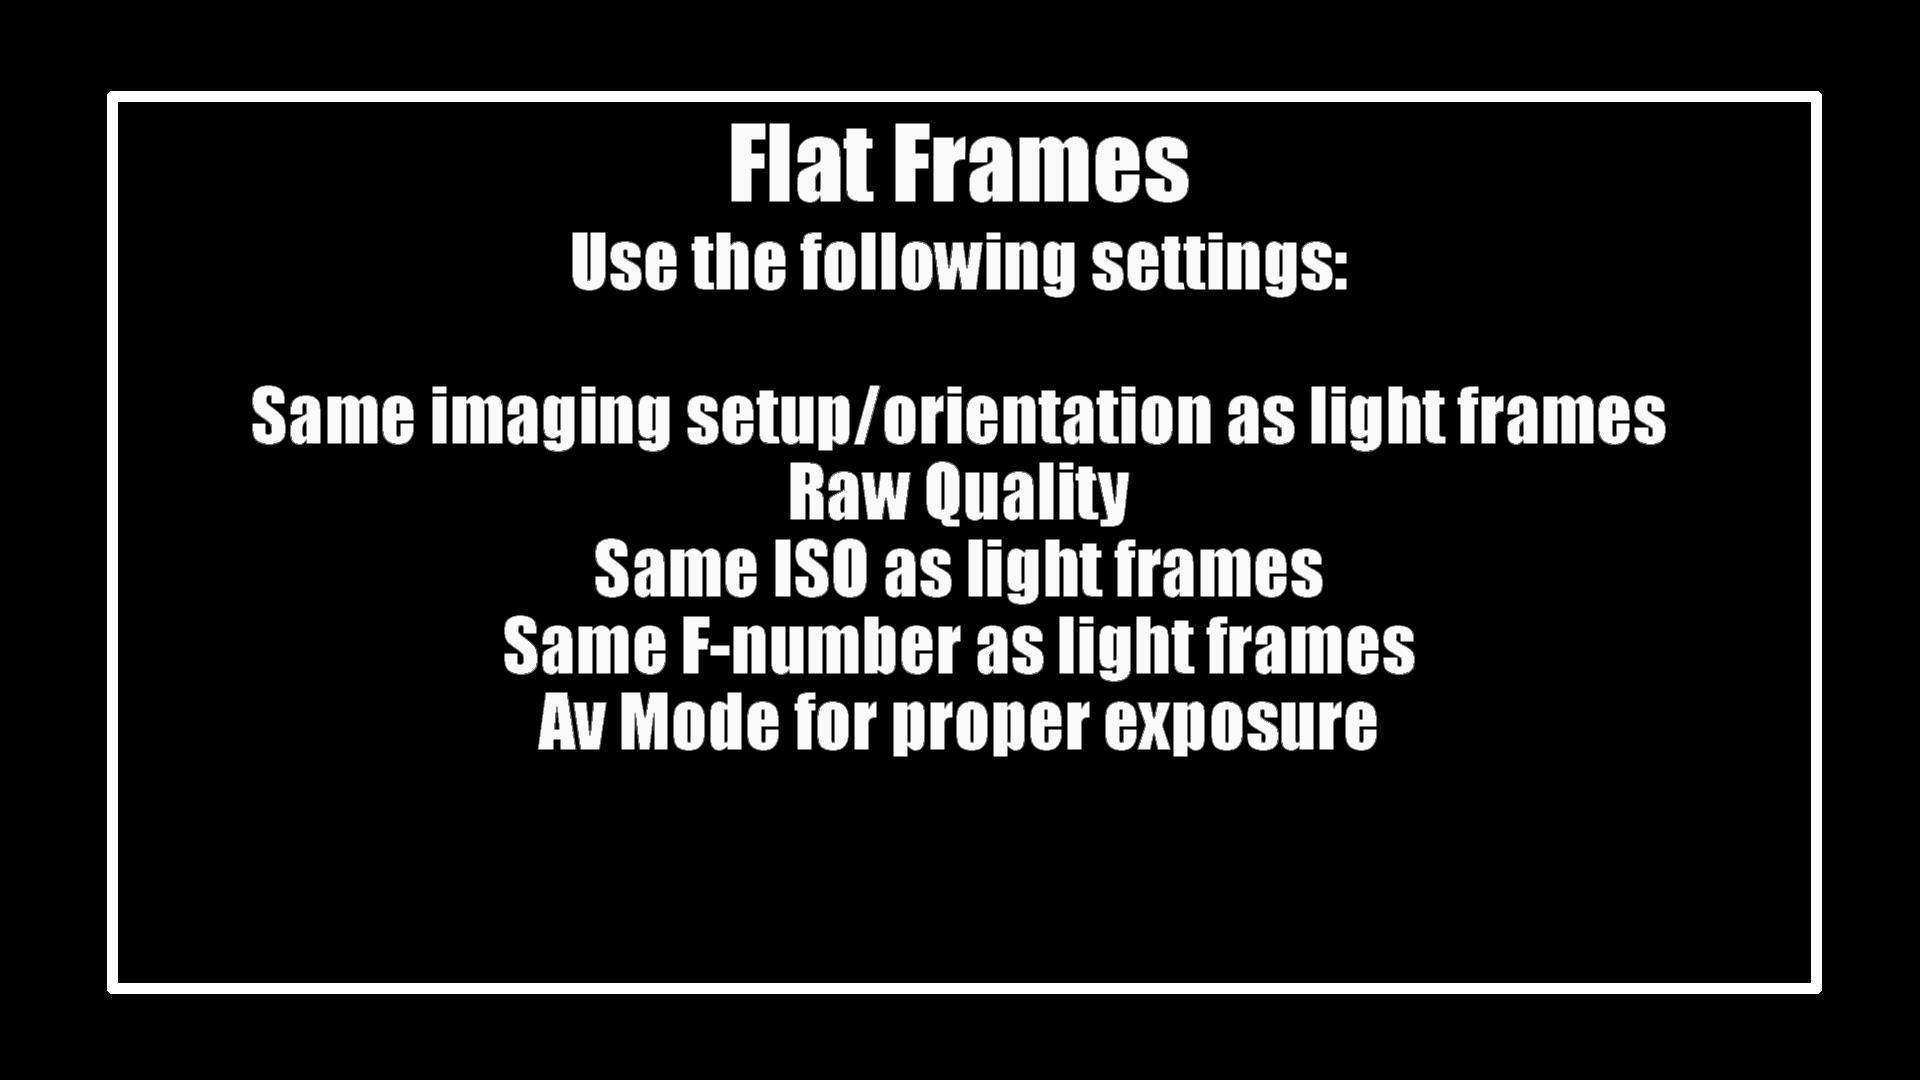
How to Take Flat Frames
The White T-Shirt is your Friend for Flat Frames
Now, our attention turns to the process of taking different types of additional frames that will later be used to correct imperfections that can show up in our light frames. I’m going to begin this part of the process by capturing the flat frames. Flat Frames will improve the quality of our image by removing unwanted differences in brightness, such as vignetting and dust shadows on our sensor. To get rid of these imperfections, Flat frames need to be evenly illuminated throughout the field of view and to accomplish this I like to use a sophisticated scientific instrument known as the white t-shirt. Begin by making sure your imaging setup is in the exact same orientation as it was for the light frames and make sure you are still shooting in RAW quality with the same ISO and F-Number as before. The only thing you will want change on the camera is the mode from Manual to AV. Carefully stretch a white T-Shirt over the lens hood, making sure there are no wrinkles. Once that’s done you are going to need a light source to evenly illuminate it. I like to use a white background on my iPhone with the brightness turned up to 100 percent. With both of those things in place, press the shutter to take the Flat Frames. Since you are shooting in AV mode, the camera will make sure everything is properly exposed with the histogram peaking near the middle. As for all these frames, the more the merrier, but there is a point to which you get diminishing returns on how much they will improve things. I normally shoot between around 75 Flat Frames.
In Summary: Flat Frames
How to Take Bias Frames
No Light Needed
Our next type of frame is the quickest to shoot and simply requires you to place the cap on your lens so that no light whatsoever shows up in your frames. These will improve our image by removing the bias signal and read noise from our sensor. Switch your camera back to Manual Mode and be sure to keep the same RAW Quality and ISO you’ve used all night. Go into your settings and select the fastest shutter speed available for your camera. For this camera that’s 4,000. Press the shutter and easily capture your bias frames. I normally aim for around 75 of these as well.
In Summary: Bias Frames
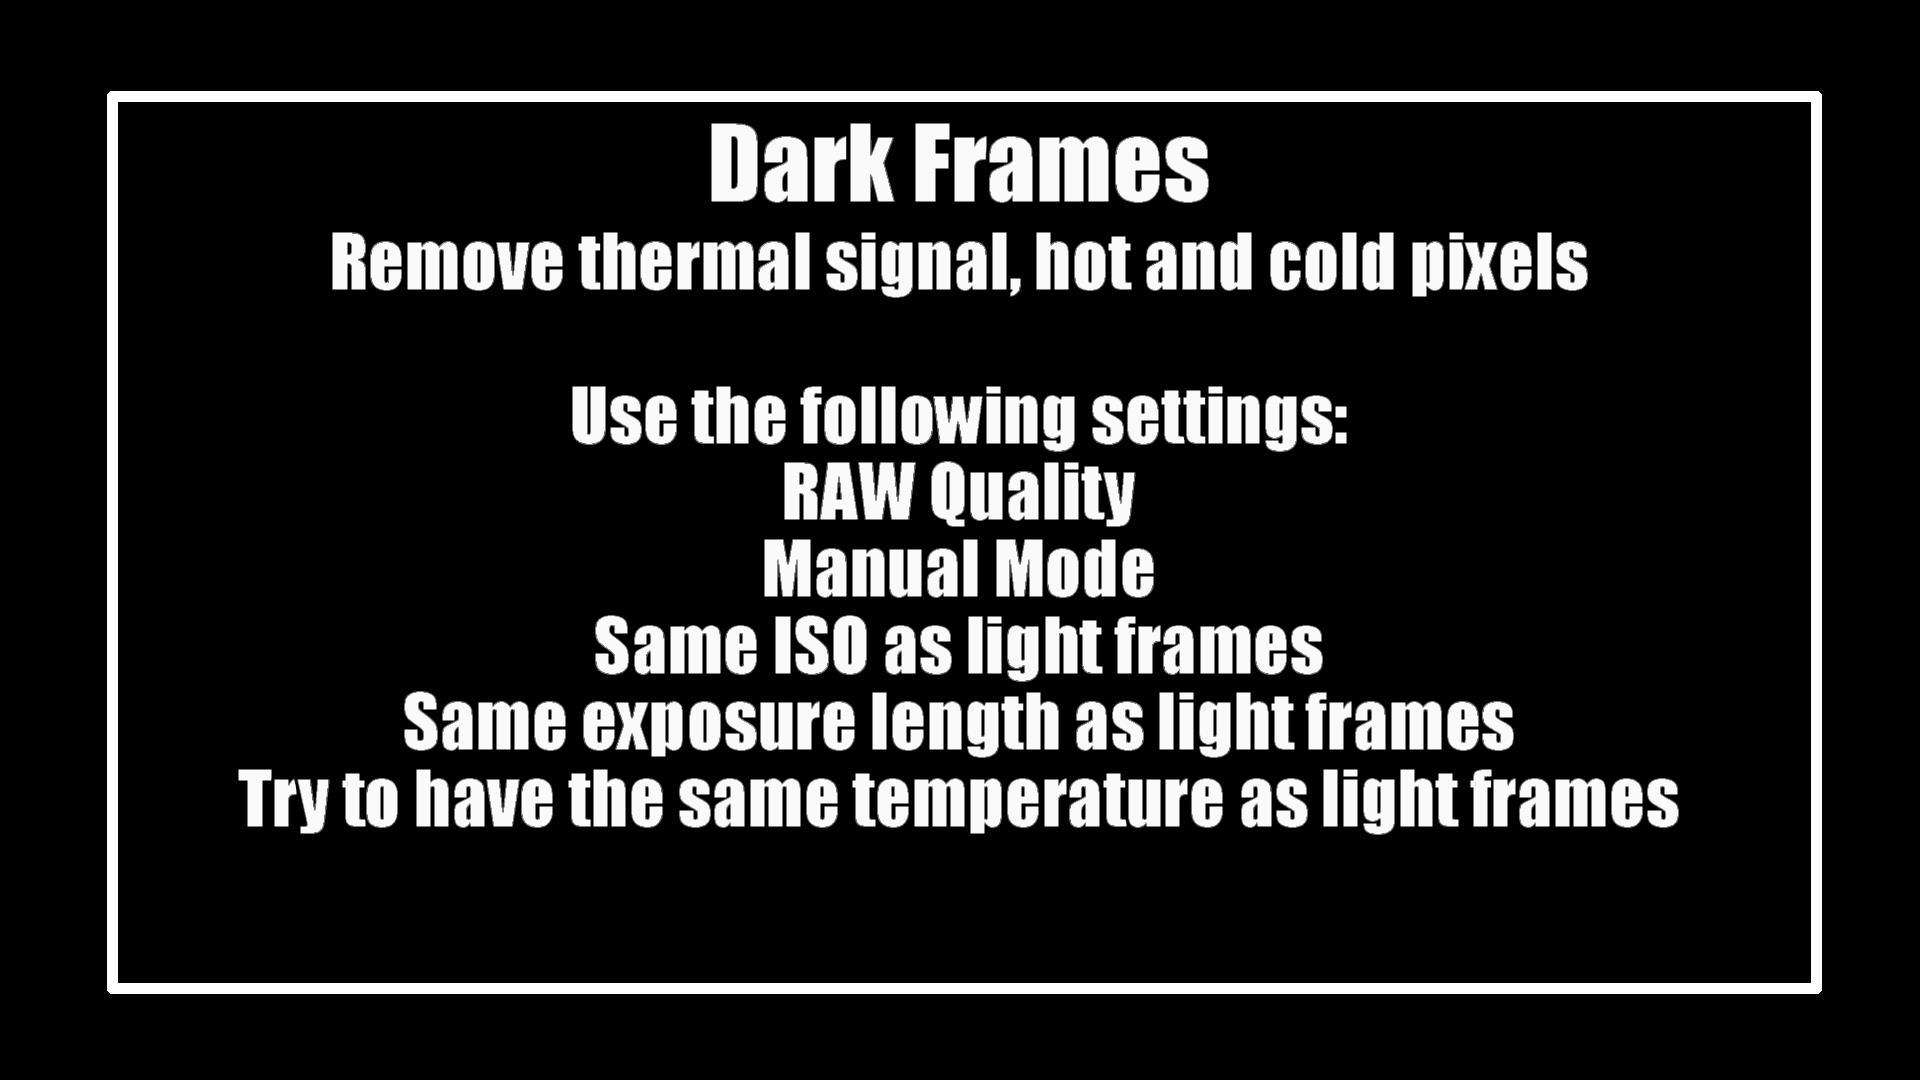
How to Take Dark Frames
No Light Needed
Finally, we have our Dark Frames. These will improve our image, by removing the thermal signal of our sensor and any hot or cold pixels. Like Bias Frames, they require you to keep the lens cap on to keep things dark, but the key difference for these is that you need to take them at the same exposure length as your light frames captured earlier in the night. For me tonight, that was 20 seconds. Make sure you are still shooting in RAW Quality with the same ISO as well. The exposure length and ISO are critical for Dark Frames because we want the camera’s sensor to be as close to the temperature as it was when it was taking the light frames a few minutes earlier. What I would suggest you do is keep your equipment setup just as it is outside and use your remote shutter release trigger like before to capture your Dark frames at the same length as your light frames earlier in the evening. Now, the temperature will change slightly throughout most nights, but this is a nice way to match the temperature of your sensor from earlier in the evening as best you can. I normally try to take between 75 and 150 Dark Frames depending on how long my exposure times are, changes in outdoor temperature and how early I’d like to get to bed.
In Summary: Dark Frames
I hope you’ve found this article helpful on how to capture the best Light, Dark, Flat and Bias Frames possible. Check back soon for my video on how to put each of these frames to use by stacking them in DeepSkyStacker. Once it’s released, I’ll tag it and place a link in the description of this video. If you have any questions or suggestions on how improve these imaging techniques, please let me know in the comment section below. Thank you all so much for your support and clear skies for Late Night Astronomy.
I love setting up a telescope with the Sun setting and the sky slowly transitioning from day to night. There is something exciting about planning what will be viewed and the anticipation of what is to come.
The night started out with some brief views of the crescent Moon. This is my favorite time to view the lunar surface. The shadows that are cast from the mountains and craters display incredible depth and make the Moon almost appear 3d though the eyepiece. Sadly, anything over half full and its surface becomes boringly flat, turning the Moon into a nuisance that does nothing more than spoil the view of deep sky objects with its light pollution.
Continuing into the evening, I was pleasantly surprised to find that Saturn was visible in the early nighttime sky. Easily, a favorite of mine and Lauren’s, its rings are now tilted to a point that will offer incredible views of the planet for years to come. Pushing the telescope up to 200 times magnification revealed the beautiful angle of its rings as well as the cassini divide that splits the rings themselves.
Holding up my iPhone to the eyepiece, I was able to take some pretty good video of the planet. The cassini divide is too thin to view in the video, but you can easily make out the divide between the rings and planet disc itself.
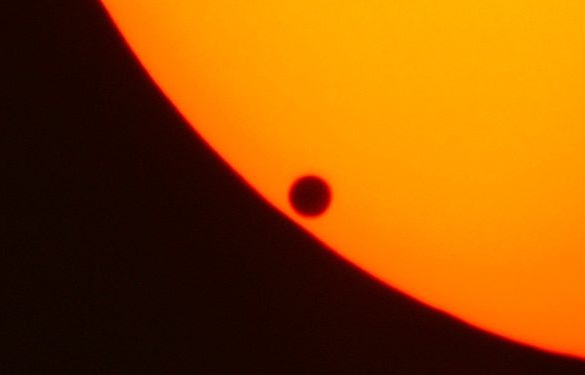
On the way back from a short trip to Bedford, Lauren and I noticed someone with a tripod on the top of a hill at Hollins University. We pulled over and walked up to the man, who, I had assumed correctly, was viewing the transit of Venus through a telescope with a solar filter. Unfortunately, the clouds did not part enough for Lauren and I to get a view through his telescope, but we did talk to the nice man, for several minutes, sharing some amateur astronomy stories and shooting the breeze about a variety of topics. I was very envious of his telescope, a classic 90mm “Questar” that, as he explained, has exceptional optics for planetary, lunar and solar viewing. It is rare that I get to meet someone else with a passion for this hobby, and it was the perfect end to an exciting day of views that were literally once in a lifetime!
6:04-Venus has just begun to touch the farthest edge of the Sun.
6:10-You can just barely make out the half of Venus that is over the upper right corner.
6:22-Venus is now completely covering its little part of the Sun as it continues to sail across its surface.
6:27-Clouds and some rain have come into the area. Hopefully it will clear, but either way we got to see the transit and it won’t happen again for 105 years!
THE EVENT
Around Six-Thirty on Tuesday, June 5th an event will occur that has not been seen for eight years and will not be view-able again in our life time, the transit of Venus across the Sun. From our vantage point, Venus will appear to sail across the surface of the Sun, leaving a very small, nearly pinpoint sized, hole on its surface. Making this event all the more exciting is the fact that this will not occur for another 100 year, so unless you are an infant or Larry King, you are not likely to see this again!
USE PROTECTION As with any solar viewing, using proper and certified protective filters and glasses is required to insure there is no eye damage that would likely be permanent. The best and cheapest way to view this transit comes from a company called “Rainbow Symphony” who have solar viewing glasses that block out all harmful ultra-violet and infrared radiation from the Sun.
Come Together As I’ve always said, the best way to enjoy astronomy is to do it with others! Invite some friends over, lend them your protective glasses and give them a taste of the excitement. Simple out reach like this can go a long way to educating the public and raising interest in astronomy as a whole.
“Guess who’s back, back again. Big Red’s back, tell a friend!” Eminem-February, 2012
(Referencing the orbital cycle that bring Mars and Earth near each other for incredible views every two years)
Good ole Slim Shady has it right once again. If you are into planetary observing, now is the time to pull out the long johns, put in the hand warmers and take out the scope as Mars returns for some spectacular views over the next couple weeks.
Every two years the orbital gods bring Earth between the Sun and Mars making the two planets closer together. This is known as an opposition. It is at this point every two years that amateur astronomers get their best views of our red headed neighbor. The last opposition of Mars and Earth occurred in early 2010 as I noted during one of my first blog posts on March 19, 2010.
Now, nearly two years later, with a clear night presenting itself just prior to one of our only snow storms of the season thus far, I went out and took a long awaited view of Mars. Using a 6mm eyepiece showing 200X magnification, the polar ice cap popped out as a bright white feature on the northern most tip of the planet. As the atmosphere would occasionally settle down, sharp views occasionally stabilized revealing some fine detailed land features in the extreme Southern hemisphere. This is where patience pays off in astronomy, particularly for planetary observing. One or two seconds of sharpness can provide some of the best memories from an evening out.
I’m hoping for a couple more nights of observing before Mars and Earth quickly begin to move away from each other starting in mid March. As Mars rotates, it shows a different side of itself to Earth every night; land features such as Sytris Major and Terra Meridian will show up as dark defined regions at 200X magnification. If you are interested in planetary observing now is the time to see Mars, it won’t be at this close distance to Earth for another two years and with the Mayan 2012 calendar coming to an end this upcoming December there is definitely no time like the present to observe our closest planetary neighbor.
This image from the iPhone’s SkySafari app shows a zoomed in view of Mars at the time of observing.
Where To Start?
So, your kid wants a telescope? While your first thought might be to run and buy “Star Trek” on Blu-Ray and leave it at that; know that there are many affordable options that most importantly are easy and fun to use. One website, I continuously come back to is telescopes.com. They have a wide selection of choices for beginner to expert level amateur astronomers. Telescopes, eyepieces and accessories found here are generally of good quality for a reasonable price with low to free shipping and handling.
Beginners Telescope for a Kid Buying for a child interested in astronomy is a very daunting task. It seems that as many objects there are in the sky there are choices of telescopes to buy. For a kid who is showing some interest in astronomy, the best telescope to get is a refractor. They require very little to no maintenance and are what a child imagines when they think of the design of a telescope. Meade’s NG70-SM refracting telescope is a great example of an affordable and useful beginners scope for a child. It’s 70mm aperture, 700mm focal length and included 9mm and 25mm eyepieces will bring in enough light for some nice low and medium power views of the craters of the Moon, cloud belts of Jupiter and even the beautiful rings of Saturn.
Getting Started The telescope arrived, your child unwrapped it with excitement and now what? Where does he or she begin? How do they know what to look at? Why is this 70 dollar telescope collecting dust in the corner of my living room a month after Christmas? First things first, sit down with your child and walk through the directions on how to build and use the telescope. While directions are boring, reading them carefully for assembly and giving your kid a tutorial on how the telescopes works will help lessen future frustrations. On the first clear, somewhat warm night, take out the telescope just after sunset and find the Moon. Have them start out with the 25mm low magnification eyepiece and use the red dot finder to center the object in the field of view. After some time with the 25mm, switch to the 9mm for some closer views of the shadows and craters.
What’s Next? Depending on the age of your child and continued interest shown, there are a couple avenues to consider. After spending sometime on the Moon, finding Jupiter and Saturn will probably be their next challenge. Online resources and iPod Touch/iPhone Apps can be used to find out what part of the year they can be viewed and when in the night time they are out. Moving on from these, I would suggest putting in the low power 25mm eyepiece and having them slowly scan the sky. They can explore interesting constellations and star patterns and might even come across a surprise deep sky object (Galaxy and Nebula) or two.
Additional Resources
If your kid is showing interest a few months to a year in you might want to consider purchasing some additional resources for a Christmas or birthday present . The first thing you might want to add are some books and movies on space. In terms of books, nothing quite beats theBackyard Astronomers Guide. While this might be too advanced for kids, I would highly recommend it for teenagers who are looking for everything from basic facts to in-depth knowledge of amateur astronomy. The History and Discovery Channel’s have some incredible series that could entertain and educate anyone on the concepts of space. The Universe and When We Left the Earth are two of my favorites, giving a rich scientific and historical perspective of our place in the universe and our accomplishments in manned space flight.
Telescope Accessories In terms of accessories for the telescope, a more powerful eyepiece for some closer views of the Moon, Jupiter and Saturn might be needed. A good affordable choice would be the 6mm Zhumell Z Series Planetary Eyepiece. It will provide 117x magnification views through the Meade NG70, which is probably near the limit of what this telescope can handle. Most importantly, this is a nice eyepiece that could be used with any potential telescope upgrade down the road.
Enjoy it! Astronomy can be a great way for you and your child to bond over something that can help shape their perspective of our planet and their place in the universe. Astronomy can also easily become an aggravating nightmare. Hopefully, following this basic buying and observing guide will alleviate some of those challenges and uncertainties and replace them with memories of excitement and exploration for you and your child.
With the fall air turning ever so colder, I thought it would be a good time do an overview of how my “summer of astronomy” went. Being a teacher, I was looking forward to June, July and August to provide me with some late night observation opportunities. While, there were some nice and clear nights throughout those 3 months, I was surprised at how cloudy it was during most evenings and nights. Even though there were not as many opportunities to go out this summer as I had hoped, there was one object in particular that I was very excited to observe, and the summer months did allow me some great views of it.
Saturn is probably my favorite object to view, so using the new 6mm Zhumell eyepiece at 200x magnification on it over the summer was quite a treat. As opposed to last year, where Saturn’s rings were head on with Earth providing a less than spectacular showing, this year they appeared much more tilted from our perspective as part of Saturn’s 29 year orbit around the Sun. This will continue to provide memorable views and glimpses of the famous Casini divide over the next 10 years. As was pointed out in my review of the Zhumell 6mm Planetary Eyepiece, the views provided from it were sharp and detailed from edge to edge providing the best sights of Saturn I have seen to date from my telescope.
While the Summer of 2011 was a bit of a disappointment overall, there were still several times when I was able to take out the telescope for some good viewings. This just goes to show that it is always a good idea to take advantage of the clear nights you are given, because you never know when another one will come along again.


 Every two years the orbital gods bring Earth between the Sun and Mars making the two planets closer together. This is known as an opposition. It is at this point every two years that amateur astronomers get their best views of our red headed neighbor. The last opposition of Mars and Earth occurred in early 2010 as I noted during one of my first blog posts on
 Buying for a child interested in astronomy is a very daunting task. It seems that as many objects there are in the sky there are choices of telescopes to buy. For a kid who is showing some interest in astronomy, the best telescope to get is a refractor. They require very little to no maintenance and are what a child imagines when they think of the design of a telescope.


